


As the digital world grows, so does the need to protect personal and sensitive information. Encrypting custom help desk fields is essential for securing data from unauthorized access and identity theft. Desk365 provides this security through field-level encryption using Advanced Encryption Standard (AES), along with enhanced HIPAA-specific controls designed for organizations handling electronic Protected Health Information (ePHI).
In this guide, we will walk you through encrypting custom helpdesk fields in Desk365, role-based access controls and encrypted field logs, emphasizing emphasizing the importance of HIPAA compliance for handling sensitive healthcare information.
Overview of field-level encryption
Field-level encryption ensures that sensitive information stored and transmitted through Desk365 is secure. This process involves converting data into ciphertext, making it unreadable without the decryption key. For healthcare providers and organizations dealing with electronic personal health information (ePHI), this is crucial for compliance with the Health Insurance Portability and Accountability Act (HIPAA).
HIPAA controls for ePHI fields
Desk365 provides stronger governance, visibility, and control over encrypted ticket fields.
1. Role-based ePHI ticket field visibility
You can configure role-based visibility and edit access for each encrypted (ePHI) ticket field directly from Ticket Fields settings. For every role, you can choose to:
- View & Edit – Full access to the encrypted field
- View Only – Read-only access
- Hide Completely – No visibility of the field
This ensures that sensitive information is only accessible to authorized roles, supporting HIPAA-aligned access control across your help desk.
Role-based permission for ePHI management
Role permission is available under:
Settings > Admin > Roles > Compliance
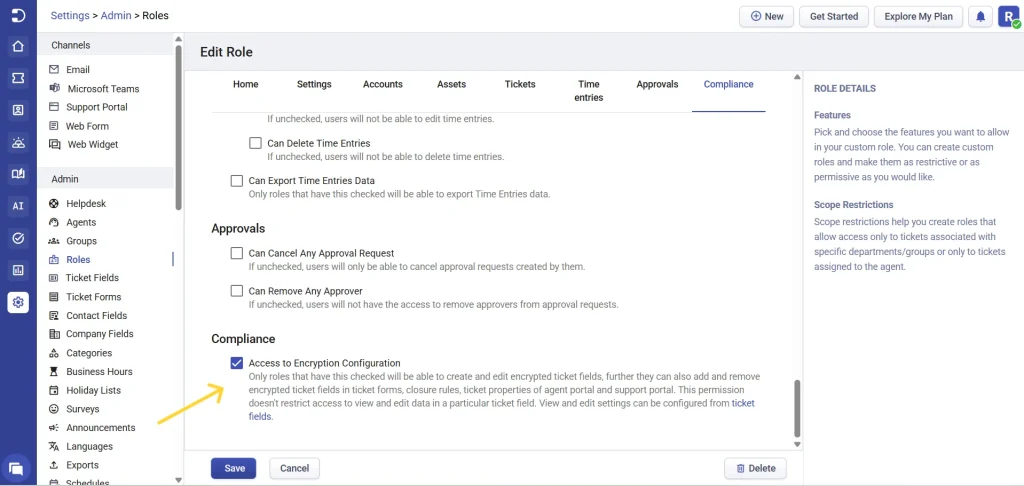
This permission determines whether a role can:
- Create, edit, or add encrypted (ePHI) ticket fields
- Use encrypted ePHI fields across key areas of Desk365, including:
1. Ticket Properties – Securely view or edit ePHI fields from the ticket details page
2. Ticket Forms – Add encrypted ePHI fields to forms used by agents or contacts
3. Support Portal – Collect sensitive information securely from contacts
4. Closure Rules – Encrypted ePHI fields can be referenced in closure rules. If a closure rule requires an ePHI field and the agent has access to that field, the agent must meet the rule’s conditions before closing the ticket. If the agent does not have access to the ePHI field, Desk365 allows the ticket to be closed and evaluates any remaining applicable closure rules instead.
Important notes:
- This permission is enabled by default for Admins
- You can enable or disable it for custom roles
- Roles without this permission will see encrypted fields marked as “Restricted” instead of the actual data
Permissions required
- Any agent can use encrypted fields where permitted
- Only agents with access to Settings and Compliance can configure encrypted fields
- Role-based permissions determine who can view or edit ePHI fields
Key points to remember
- Scope: Only custom text fields data can be encrypted.
- Organization-Wide: Encryption applies at the organization level, including all departments.
- Field Type: Encryption is applicable only to text field types.
- API Support: Encrypted data is accessible via APIs.
- Integration: Encrypted fields can be used in custom functions and all integrations.
Limitations
- Reporting: Encrypted fields cannot be used in Reports
- Automation Rules: Encrypted fields cannot be used as conditions in automation rules.
- Advanced Filters: Encrypted fields cannot be utilized in advanced filters, search or sort options.
Step-by-step guide to encrypt custom fields
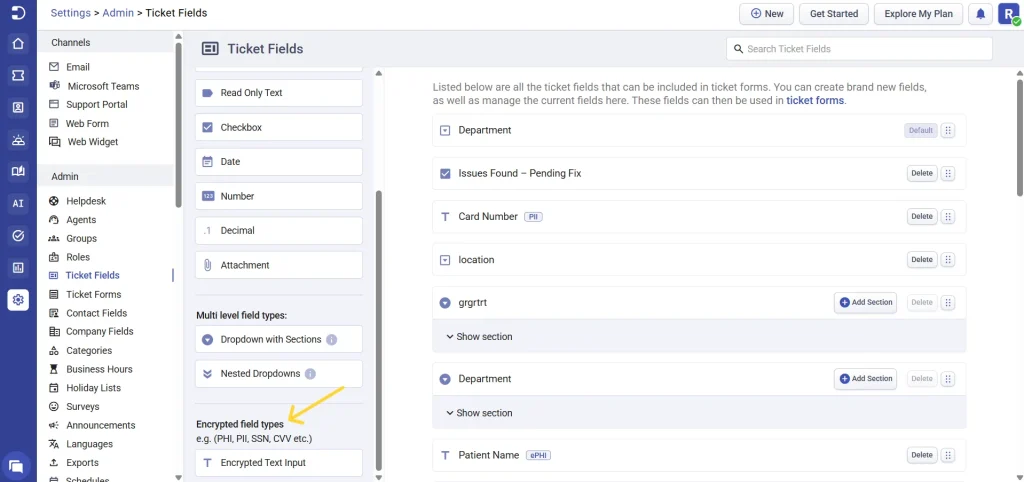
- Navigate to Settings > Admin > Ticket Fields.
- Select the Encrypted Text Input under Encrypted Field Types.
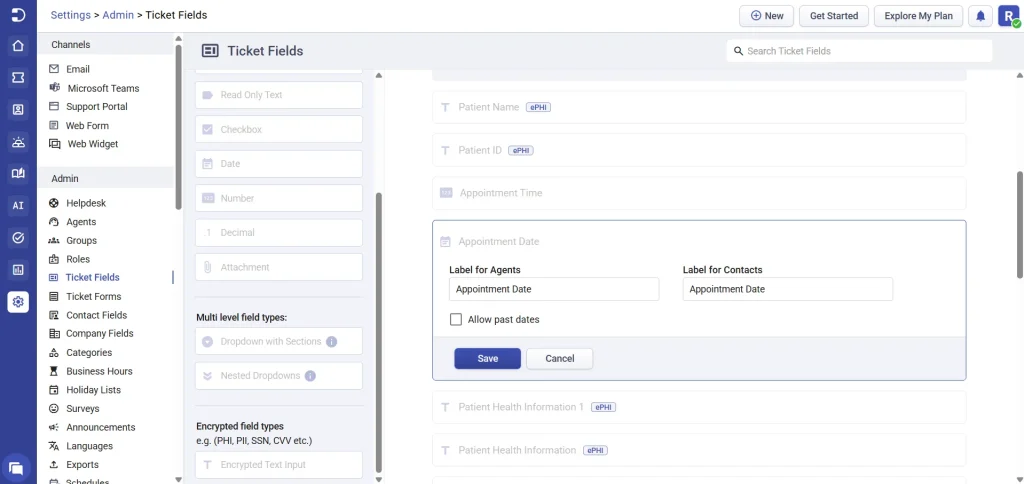
- Edit the field type and label it appropriately for agents and contacts.
- Configure role-based visibility (View & Edit, View Only, or Hide) as required
- Click save
- Add the encrypted field to the desired ticket form.
Example ticket showing encrypting ePHI custom help desk fields
Let’s say a healthcare clinic needs to create an Appointment Form that complies with HIPAA regulations. In addition to encrypting sensitive patient information, the clinic also wants to ensure that only authorized roles can view or edit ePHI fields and maintain an audit trail for compliance.
Here’s how the admin configures this using the HIPAA controls.
Step 1: The admin navigates to Settings > Admin > Ticket Fields and creates custom ticket fields required for appointment handling such as the appointment date, appointment time, etc.
Under Encrypted Field Types, the admin selects Encrypted Text Input and creates fields such as patient ID and patient name.
Each field is clearly labeled so agents and contacts understand that any data entered will be encrypted and unreadable without proper access.
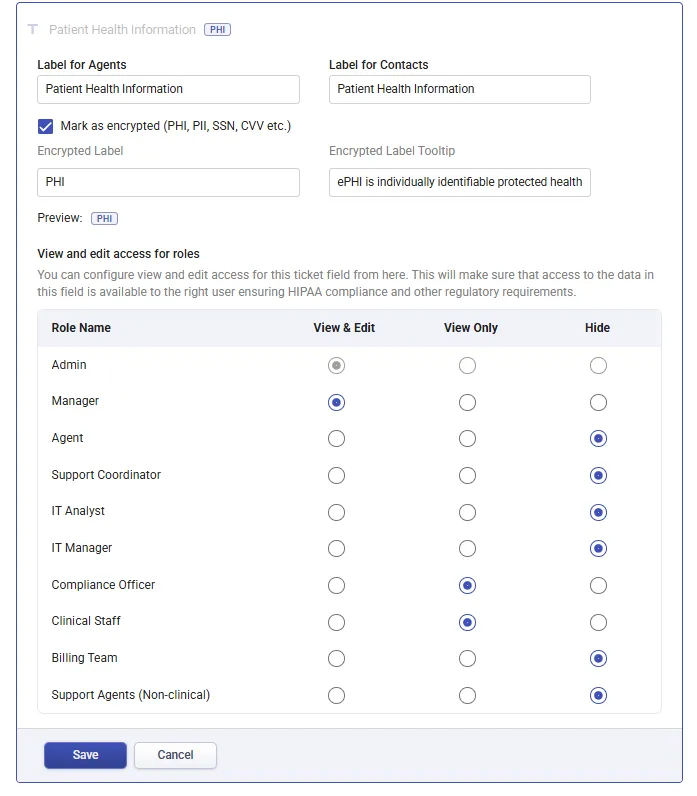
The admin checks Mark as ePHI, indicating that the field contains electronic Protected Health Information (ePHI) and requires enhanced security and compliance controls.
Next, the admin configures role-based visibility for each encrypted field:
Clinical Staff: View & Edit
Billing Team: View Only
Support Agents (non-clinical): Hide Completely
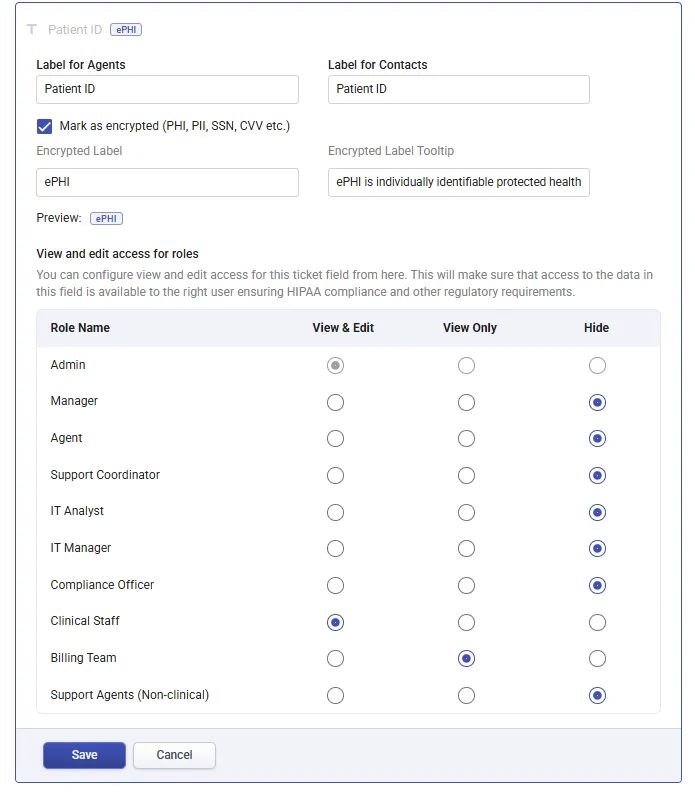
This ensures sensitive patient data is accessible only to authorized roles.
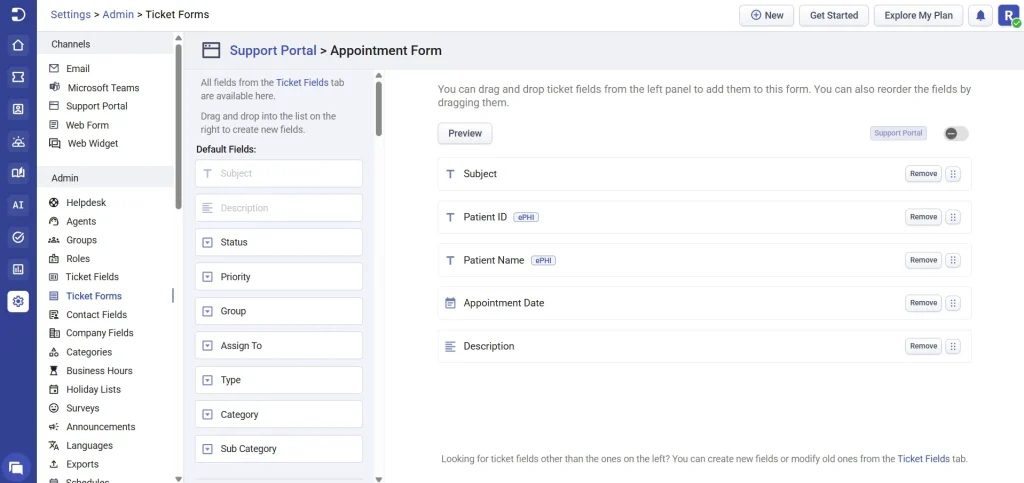
Step 2: The admin adds the encrypted ePHI fields to the Appointment Form.
From this point on, whenever a new ticket is created using this form:
- All ePHI data entered into these fields is encrypted using AES
- Access to the data is enforced based on role permissions
- Roles without permission see the fields marked as Restricted
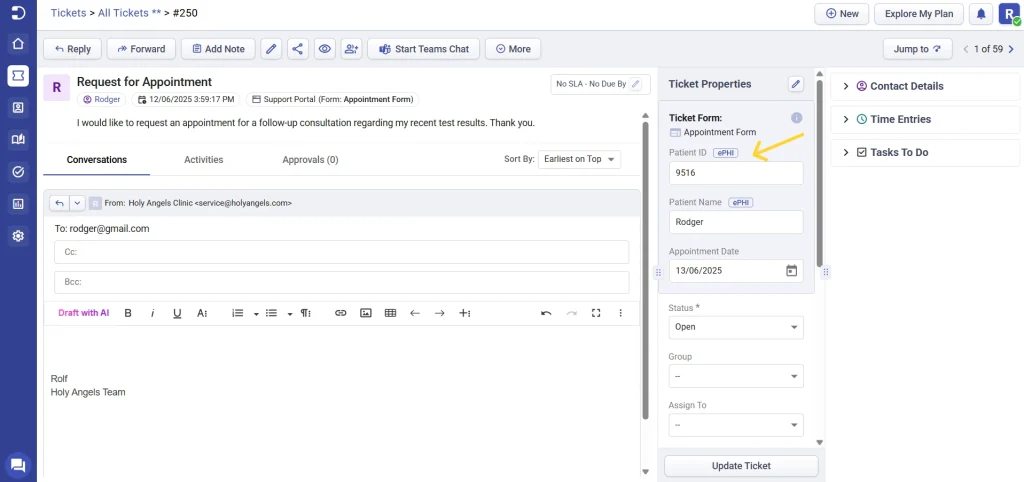
Step 3: The admin creates a new ticket to verify that the PHI Data Field is functioning correctly and that the entered data is encrypted.
By following these steps, the healthcare clinic successfully encrypts ePHI data, enforces role-based access, and maintains a complete audit trail within Desk365. This approach strengthens HIPAA compliance while ensuring sensitive patient information is protected from unauthorized access.
Adding ePHI fields using dropdowns with sections (with role-based HIPAA controls)
In some cases, sensitive ePHI data should be collected only when a user selects a specific option from a dropdown and only be visible to authorized roles. For example, a healthcare clinic may need to capture Patient Insurance Details only when a request is related to Billing, while ensuring that access to this information is restricted based on role permissions.
Below is how to configure this setup in Desk365 using Dropdown with Sections and Encrypted Text Input fields.
Let’s say a healthcare clinic uses a single Appointment Form for multiple departments. When a contact selects Billing as the department, the clinic needs to securely collect insurance-related ePHI, while hiding this information from roles that do not require access.
Step 1:
- Navigate to Settings > Admin > Ticket Fields
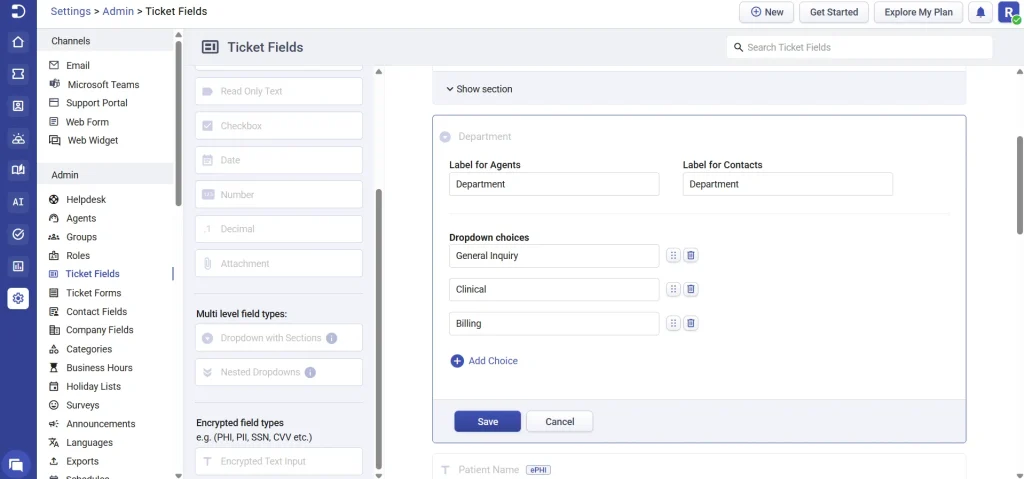
- Select the field type Dropdown with Sections
- Label the field appropriately (for example, Department) for both agents and contacts
- Add dropdown choices such as, General Inquiry, Clinical and Billing
- Click Save
Step 2:
- Click Add Section next to the newly created dropdown field

- Set the Section Title (for example, Billing Section)
- Under Select choices under this section, choose Billing
- Click Save
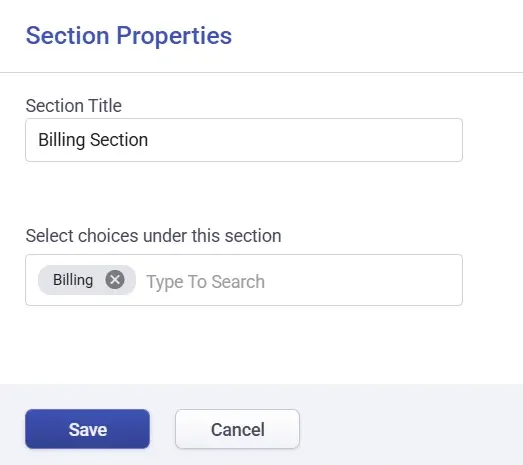
This ensures that any fields added to this section appear only when Billing is selected.
Step 3:
- Inside the Billing Section, click Add Field

- From the list of ticket field types, select Encrypted Text Input and click Add

- Label the field for both agents and contacts (for example, Patient Insurance Details). Check Mark as ePHI to indicate that the field contains protected health information. Optionally add a tooltip or preview label to explain how the data will be used.
- Then configure the view and edit access for different roles for this ticket field and click Save.
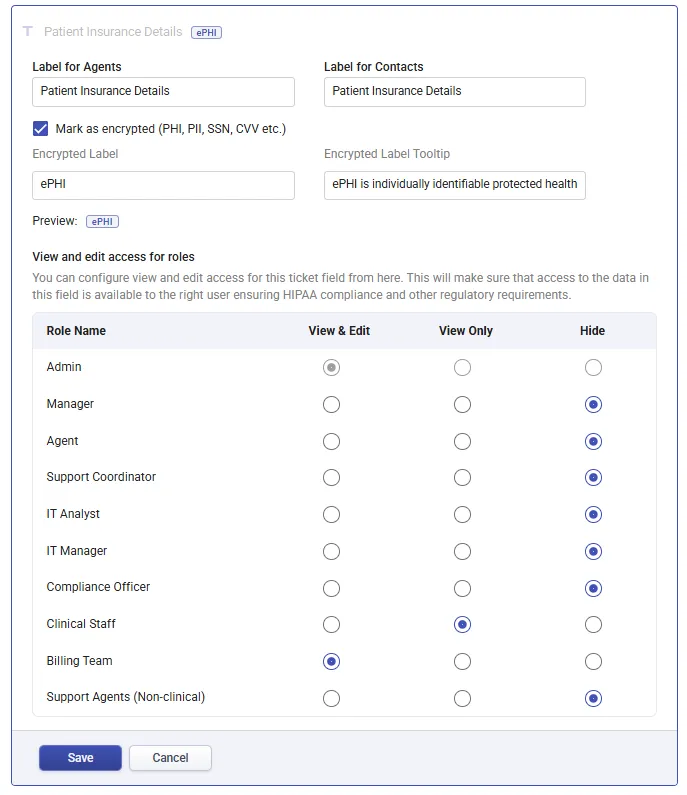
Roles without permission will see the field marked as Restricted, ensuring sensitive insurance data is not exposed.
With this configuration in place, the Patient Insurance Details field appears only when Billing is selected.
- All data entered into the field is encrypted using AES
- Access to the field is enforced based on role-based HIPAA permissions
- Field access and configuration changes are recorded in Encrypted Field Logs for compliance and audit readiness
By combining Dropdown with Sections, Encrypted Text Input, and role-based HIPAA controls, Desk365 enables healthcare, HR, and finance teams to collect sensitive information securely, only when necessary and only by the right people.


