

Assets are the foundation of asset management. An asset represents any physical or digital item that your organization owns, uses, or manages – such as laptops, desktops, printers, monitors, software licenses, or network equipment.
By creating assets in Desk365, you give your support and IT teams complete visibility into:
- Who is using an asset
- Where the asset is located
- Its purchase, warranty, and vendor details
- Its current condition and lifecycle stage
- All support tickets linked to the asset
Each asset has its own lifecycle and ownership, even if multiple assets belong to the same product model.
Asset vs product: Understanding the difference
It’s important to clearly understand the difference between products and assets.
- Product – A product represents a model or item type. Example: HP LaserJet Pro M404dn
- Asset – An asset is a real, individual instance of that product. Example: HP M404dn – Finance Dept
In Desk365:
- Products live in Product Inventory
- Assets live in Assets
A single product can have many assets created from it.
Before you begin
Before creating assets, make sure the following are already set up in your account:
- Asset types and asset fields
- Product inventory
- Vendors (optional, but recommended)
These configurations determine:
- Which fields appear on the asset form
- How assets are categorized
- What information you can capture for reporting and ticketing
How to create an asset in Desk365
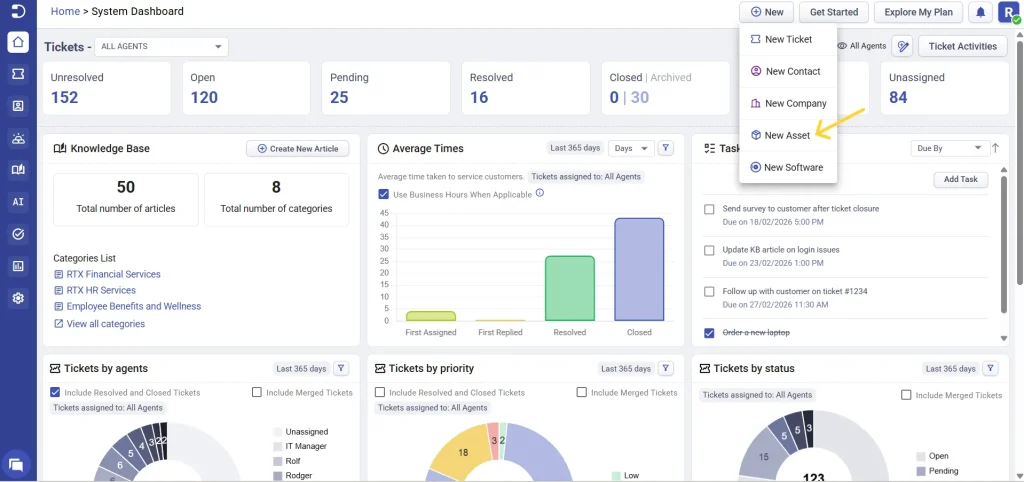
- Go to the agent portal
- Click the New button at the top-right corner of the screen
- From the dropdown, select New Asset
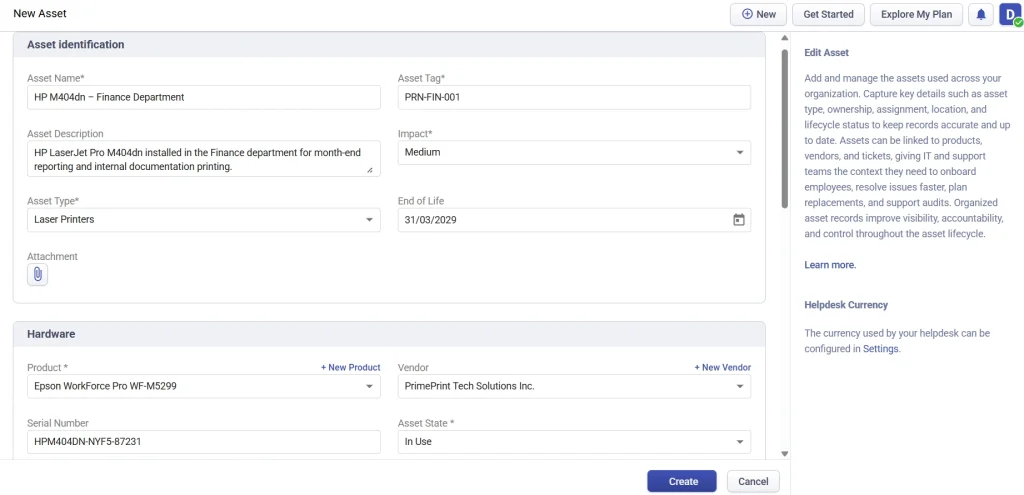
4. The New Asset form opens. You will see default asset field groups. Based on the asset type you select additional customized fields automatically appear
5. Fill in the asset details and click create
Once the asset is created:
- The asset is saved successfully
- It is automatically associated with:
– The selected product from inventory
– The selected vendor
– The asset becomes available for ticket linking and reporting
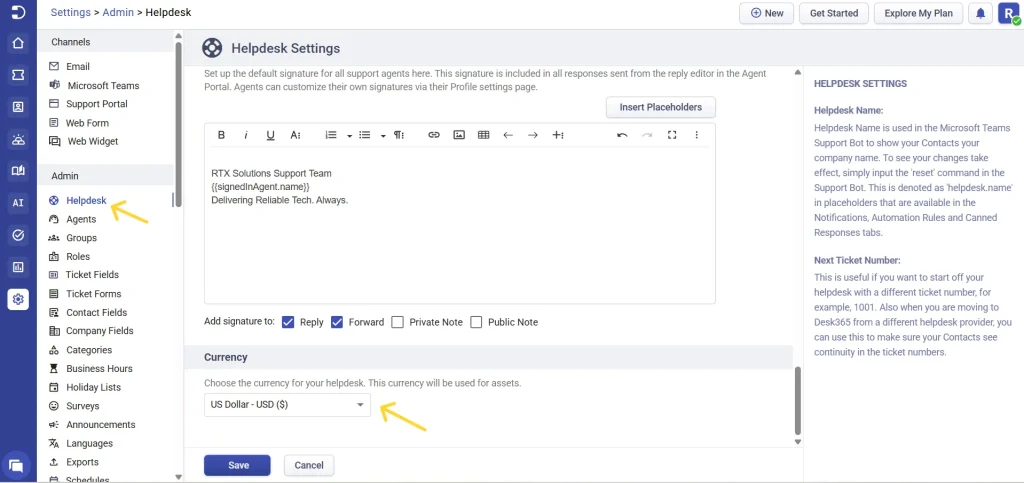
Note: Ensure the correct helpdesk currency is configured before entering financial details such as Purchase Cost, Salvage Value, and Depreciation.
The currency used by your helpdesk can be configured in helpdesk settings.
Go to Settings > Helpdesk Settings > Currency. Choose the currency for your helpdesk. This currency will be used for all assets
Creating and managing asset locations
Asset locations help you track where assets are physically or logically located. Locations are especially useful for organizations with:
- Multiple offices
- Different regions or countries
- Remote or field-based teams
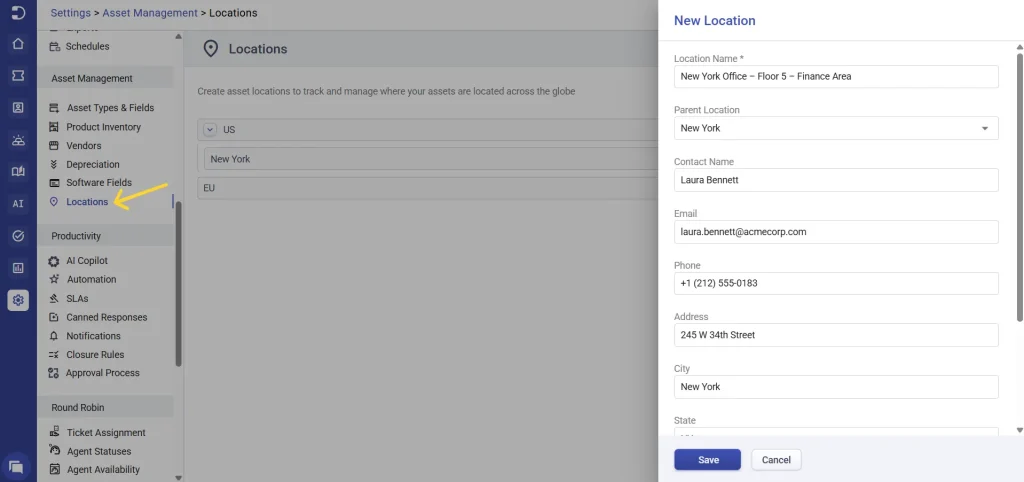
By default, Desk365 provides two locations, US and EU. To create a new asset location
- Go to Settings > Asset Management > Locations
- Click new location
- Fill in the location form fields
- Click Save to create the location.
How locations are used when creating assets
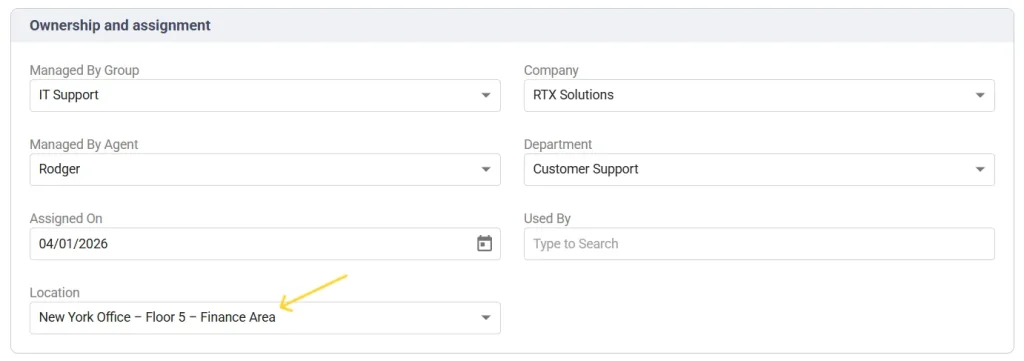
When creating or editing an asset:
- Select a Location in the Ownership and Assignment section
- This links the asset to that physical or regional location
- Agents can later filter assets by location
- Location-based reporting becomes possible
Configure Asset Access
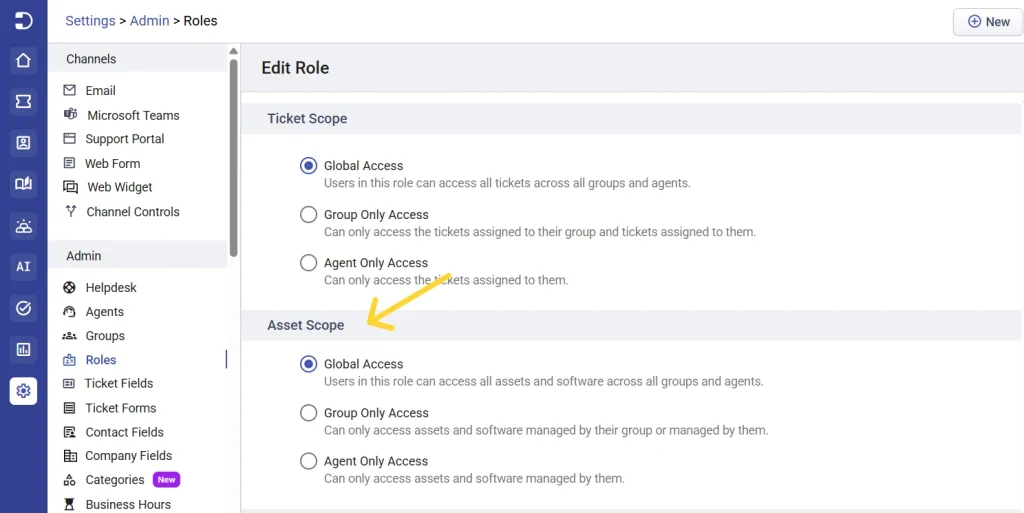
Admins can control which assets and software users can access using the Asset Scope settings under Settings > Admin > Roles.
The Asset Scope setting provides three access levels:
- Global Access: Users can access all assets and software across all groups and agents.
- Group Only Access: Users can access assets and software managed by their group or managed by them.
- Agent Only Access: Users can access assets and software they manage.
The default Admin, Manager, and Agent roles have Global Access to assets and cannot be modified. To configure a different asset access level, admins can create a custom role and select the required scope based on their team’s needs.
Viewing assets
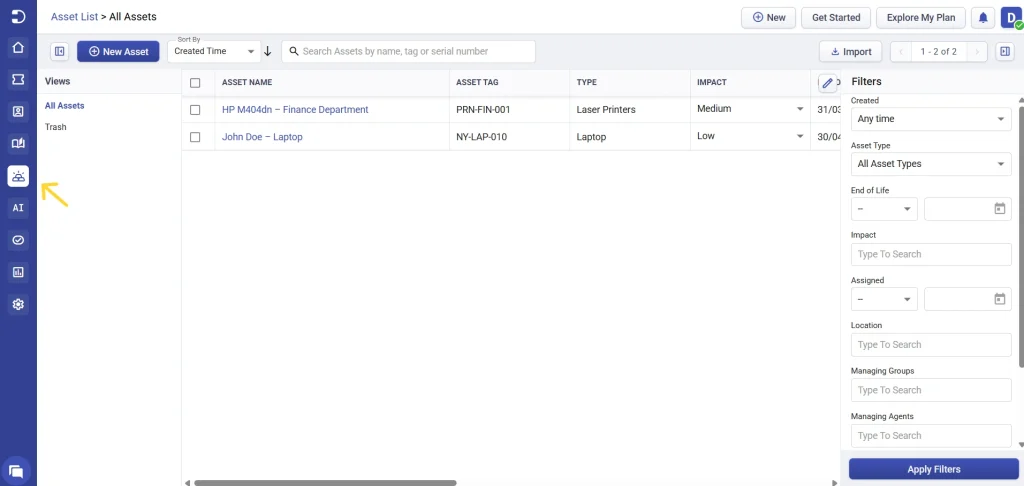
- Go to Assets > Assets List from the main menu
- All created assets are listed here
- Use search and filters to find assets quickly
- Create custom views in the Assets List and Software List to quickly access specific sets of assets or software based on your preferred filter criteria.
Learn more about creating custom views for assets and software.
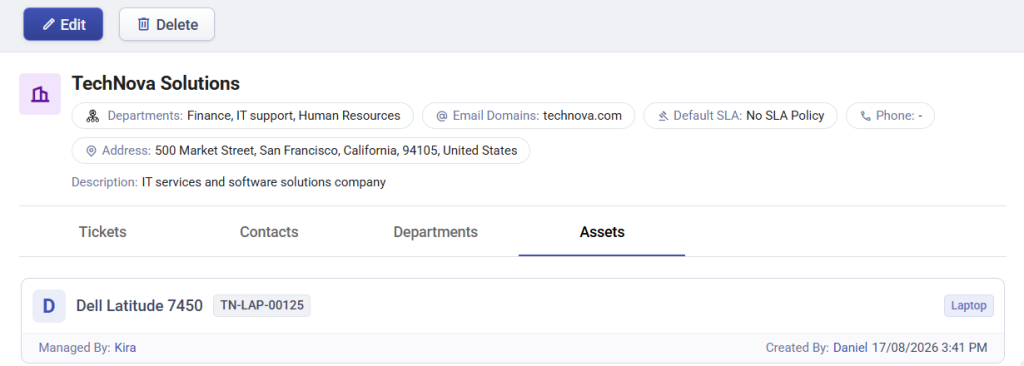
You can also view all assets associated with a company from the company’s Assets tab.
- Go to Accounts > Companies > All Companies.
- Open the required company.
- Select the Assets tab to view all assets associated with the company in one place.
This provides a dedicated view of the company’s assets, making it easier to find the right asset when handling related support requests.
Managing assets
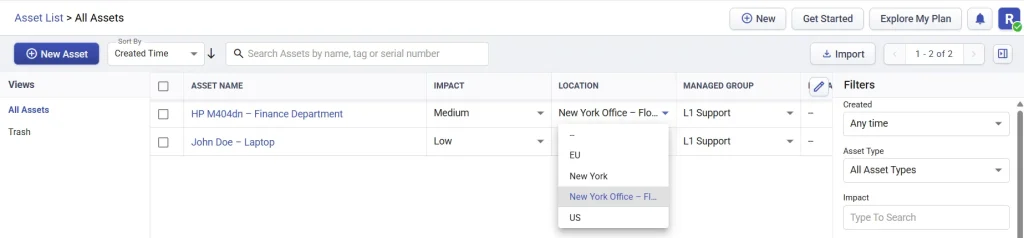
Certain fields in the asset list, such as Impact, Location, Managed Group, and Managed Agent, are available as editable dropdowns. You can update these directly from the list view for each asset.
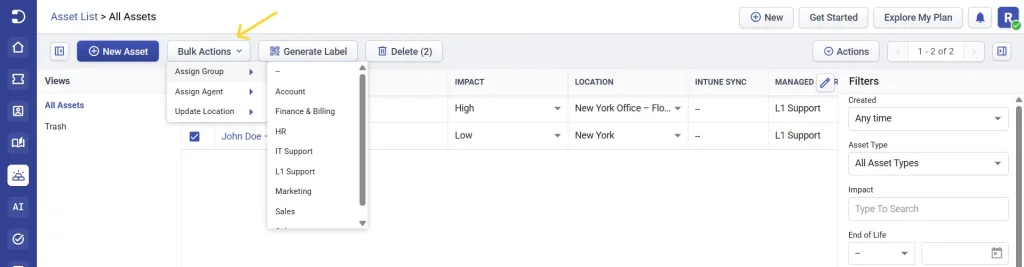
You can also select up to 30 assets and use Bulk Actions to:
- Assign Group
- Assign Agent
- Update Location
Note: The same inline editing and bulk action options are also available in the Software List, allowing you to manage software records in a similar way.
- Click on an asset to open its detailed view. From here, you can see associated product and vendor information directly within the asset.
When you click on the product or vendor name, a quick overview panel opens, giving you key details without navigating away from the asset. From this panel, you can choose to view the full product or vendor properties page.
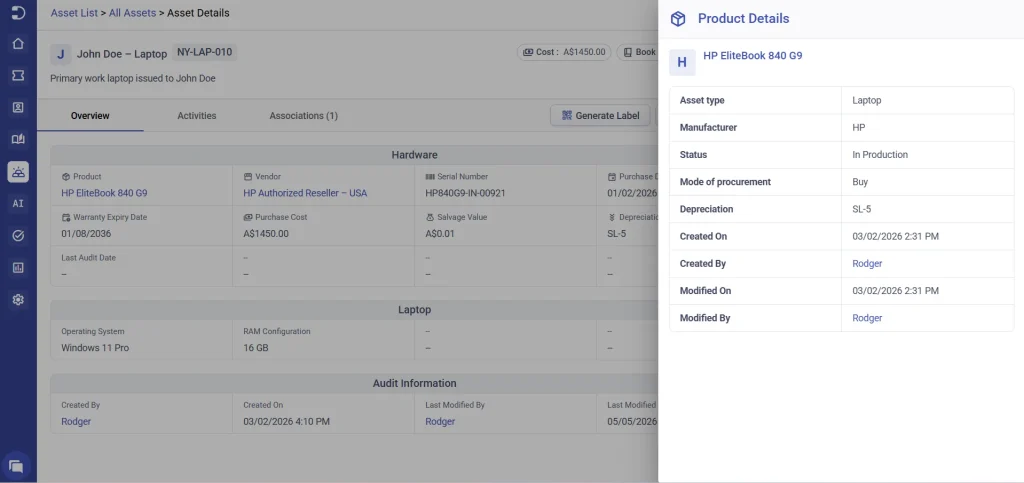
Note: Access to these detailed settings pages is available only to roles with permission to access Settings tab.
You can also:
- Click Edit to update all asset details or,
- Quickly update properties from the right-side panel, such as:
– Assignment
– Asset State
– Impact
– Location - Generate customizable asset labels with QR codes and barcodes. Choose from preset label sizes or create your own, select the information to include (such as Asset Name, Asset Tag, Serial Number, Barcode, or QR Code), preview the label before printing, and generate labels for one or multiple assets at once.
- If an asset is no longer required, click Delete to remove it.
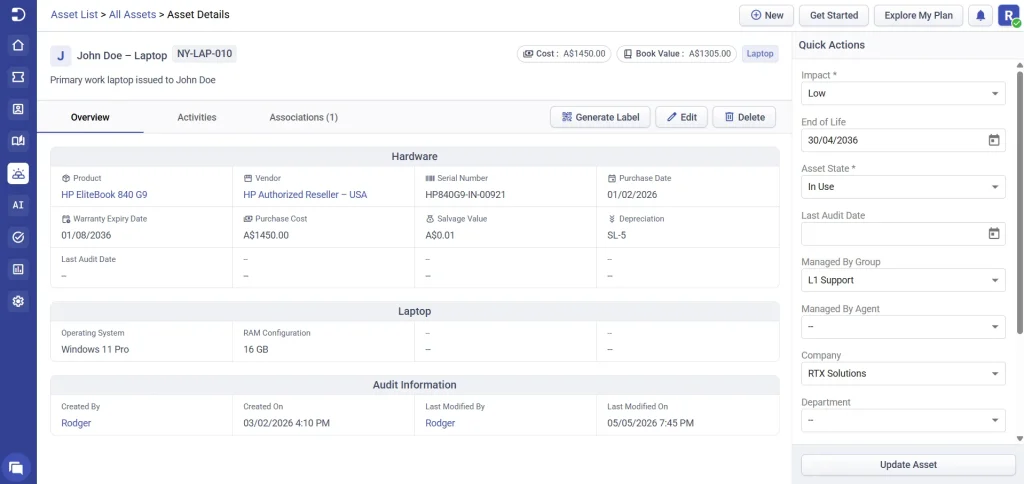
View the Activities tab to see the complete history of an asset, including when it was created, updated, or deleted.
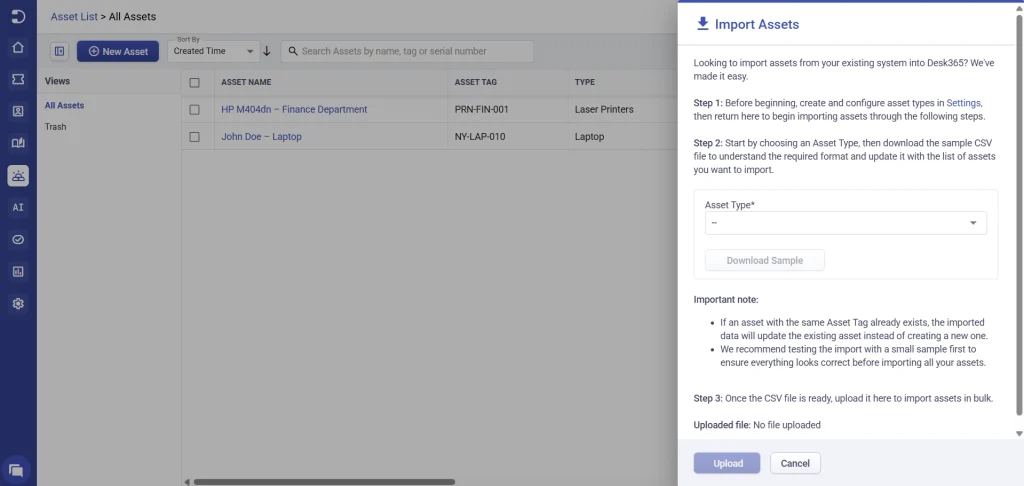
You can also import or export assets in bulk directly from the Assets List page.
Click Actions in the top-right corner to import assets by selecting an Asset Type, downloading the sample CSV, updating it with your asset details, and uploading the completed file. If an asset with the same asset tag already exists, Desk365 updates the existing record instead of creating a duplicate.

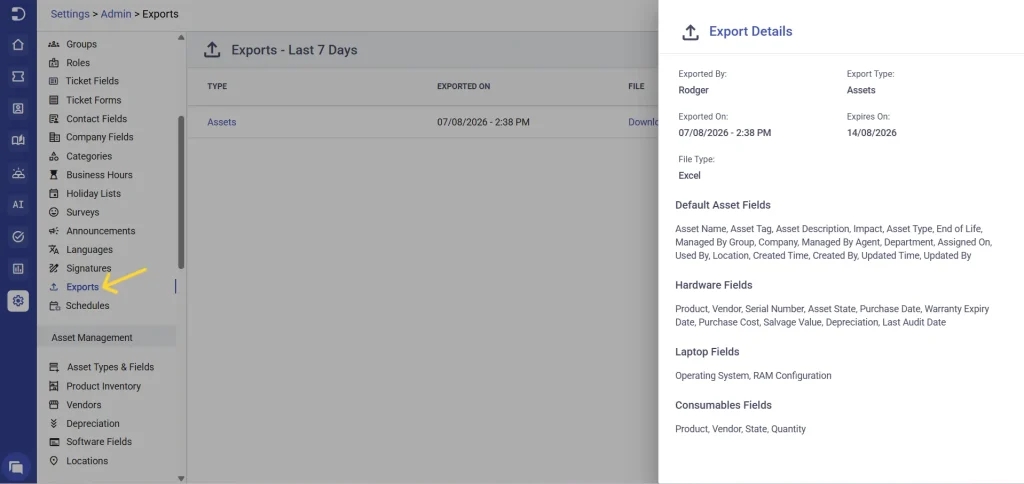
Similar to importing assets, export assets by selecting the fields you want to include. You can export all assets or only the assets that match your current filters.
If no Asset Type is selected in the filters, you can export standard asset fields along with custom fields from all asset types.
If a specific Asset Type is selected in the filters, you can export standard asset fields along with the custom fields associated with that selected asset type.
Every export is recorded in the Exports tab, where you can view the export history, see who generated the export, when it was created, and download the file whenever needed.
Linking assets and tickets
Linking assets to tickets helps agents understand the full context of an issue.
How to associate a ticket from an asset
- Open the asset
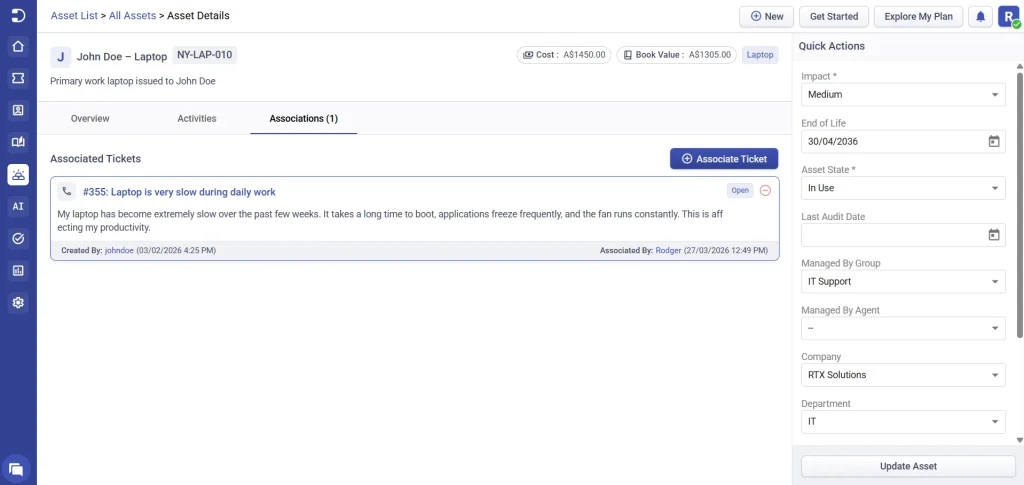
- Go to Associations > Associate Ticket
- Choose all tickets, or contact tickets
- Enter the ticket number
- Select the ticket and click Associate
The ticket now appears under the asset’s Associated Tickets section.
How to associate an asset from a ticket
- Open a ticket
- Go to Assets
- Click Associate Asset
- Select the asset type
- Choose the asset
- Click Associate
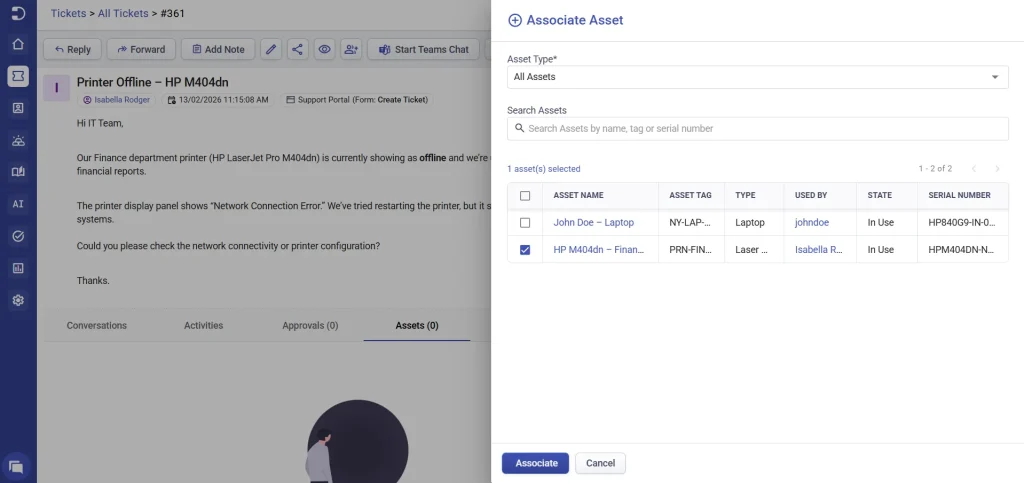
This ensures asset and ticket information stays connected.
If you’re importing data from another system or building custom integrations, you don’t have to create assets manually.
Desk365 provides Asset Management APIs that let you create, update, retrieve, and manage assets programmatically. The APIs also support managing products, vendors, asset types, and asset fields, along with associating assets to tickets.
View the API documentation here.
Now that you know how to create and manage assets, continue with Understanding Asset Depreciation in Desk365
This will help you track asset value and plan replacements more effectively.