The Health Insurance Portability and Accountability Act (HIPAA) sets stringent requirements for protecting health information that can identify individuals. At Desk365, we are committed to providing features that help our customers use our service in a HIPAA-compliant manner. This article explains how you can implement HIPAA compliance in Desk365.
Understanding HIPAA requirements
HIPAA is a U.S. law that provides data privacy and security provisions to protect medical information. The law has become more significant due to numerous health data breaches caused by cyber-attacks.
The Health Insurance Portability and Accountability Act (HIPAA) has several key purposes, all aimed at protecting patient information and improving the healthcare system. Here are the main objectives:
- Privacy of health information: HIPAA sets national standards to protect medical records and personal health information. It ensures that healthcare providers, health plans, and other entities handle patient information with care, maintaining its confidentiality and security.
- Security of electronic records: HIPAA includes provisions for safeguarding the security of electronic health records (EHRs). These rules require appropriate administrative, physical, and technical safeguards to ensure the integrity, confidentiality, and availability of electronic protected health information (ePHI).
- Portability of insurance coverage: One of the original purposes of HIPAA was to improve the portability and continuity of health insurance coverage. It helps individuals maintain insurance coverage when they change or lose their jobs, reducing the risk of being uninsured due to pre-existing conditions or gaps in employment.
- Healthcare administration simplification: HIPAA aims to reduce the administrative costs and burdens in the healthcare system by standardizing the electronic transmission of financial and administrative transactions, including billing, claims processing, and eligibility verification.
- Enforcement of standards: HIPAA also sets forth a series of enforceable standards and practices. It includes provisions for addressing violations and imposes penalties on entities that fail to comply with HIPAA requirements, thereby reinforcing the importance of adherence to privacy and security standards.
- Improving healthcare efficiency: By standardizing transactions and encouraging the use of electronic systems, HIPAA seeks to improve the efficiency and effectiveness of the healthcare system, facilitating quicker and more reliable access to health information by healthcare providers.
HIPAA plays a critical role in modern healthcare by providing a framework for managing the use and disclosure of sensitive patient information, thus enhancing patient trust and contributing to the overall quality of the healthcare system.
HIPAA-covered entities
HIPAA applies to “covered entities” and their Business Associates (BAs). Covered entities are organizations that handle Protected Health Information (PHI) or personal health records (PHRs). Business associates refer to those who do not engage directly with patients, but they are still involved in creating, receiving, or transmitting patients’ Electronic Protected Health Information (ePHI). HIPAA mandates that Covered Entities and Business Associates take measures to protect health information.
Requesting a Business Associate Agreement (BAA)
If your organization requires a Business Associate Agreement (BAA) for HIPAA-related use of Desk365, BAAs are available with the Desk365 Premium Plan. Please email help@desk365.io to request a BAA and learn more about Premium plan eligibility.
Actions you can take for HIPAA compliance in Desk365
To help ensure the security of your customers’ information, you can take the following actions in Desk365:
- Creating ePHI fields
- Using ePHI fields in forms
- Administering roles and permissions
- Monitoring activity with Encrypted Field Logs
- Protecting sensitive information with Data Redaction
Let’s go through each action in detail.
1. Creating ePHI fields
If a field contains the health information of your customers or patients, you can mark it as ePHI (electronic Protected Health Information). This process helps in identifying and protecting sensitive data.
Steps to add ePHI fields in Desk365:
- Navigate to Settings > Admin > Ticket Fields.
- Select the Encrypted text input under Encrypted field types.
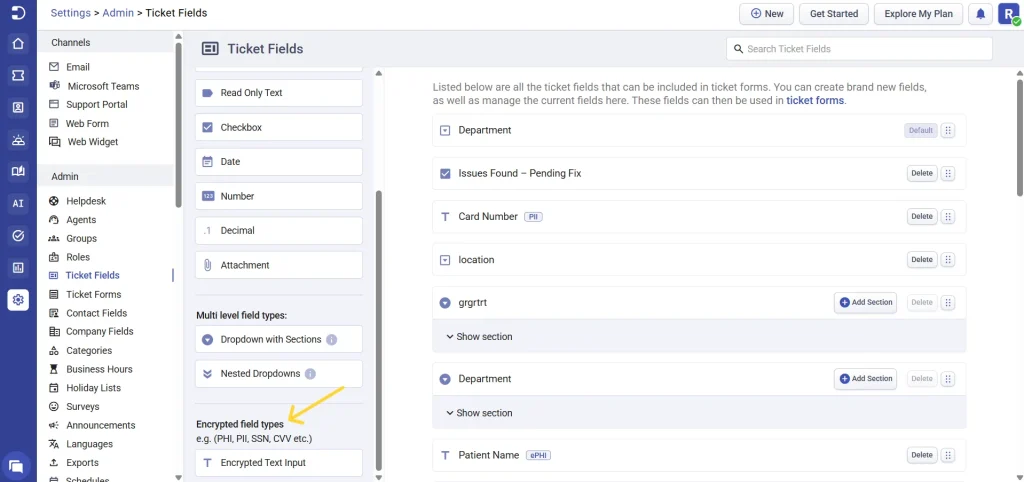
- Edit the field type and label it appropriately for agents and contacts.
- Check the Mark as ePHI box.
- Configure each roles access for this ePHI ticket field and click save
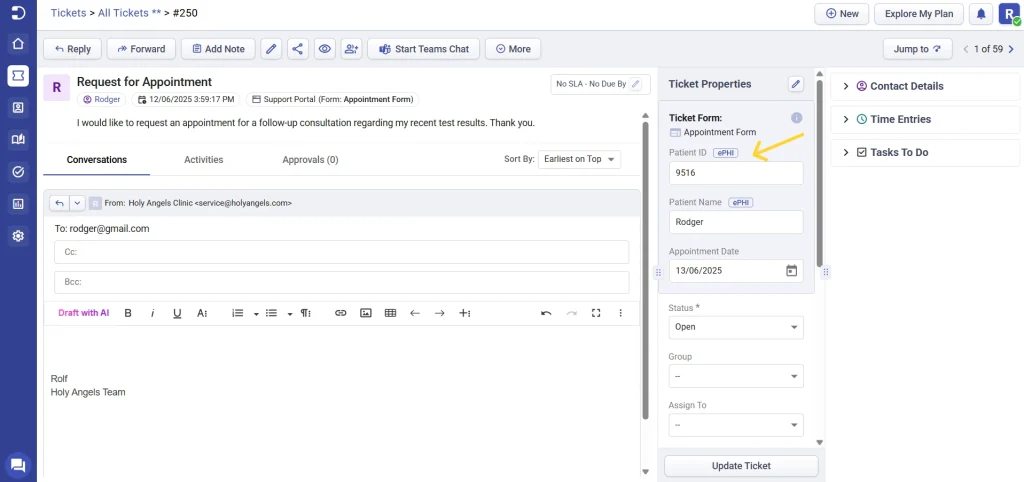
2. Using ePHI fields in forms
Encrypting fields that contain personal health information adds an extra layer of security. While encryption is not mandatory, it is highly recommended to prevent unauthorized access to confidential data. When adding an ePHI Field to a form in Desk365, encryption is automatically enabled. This is on top of the encryption of all data in Desk365 (all data is encrypted at rest and in transit). Learn more about adding ePHI Fields to Forms in Desk365.
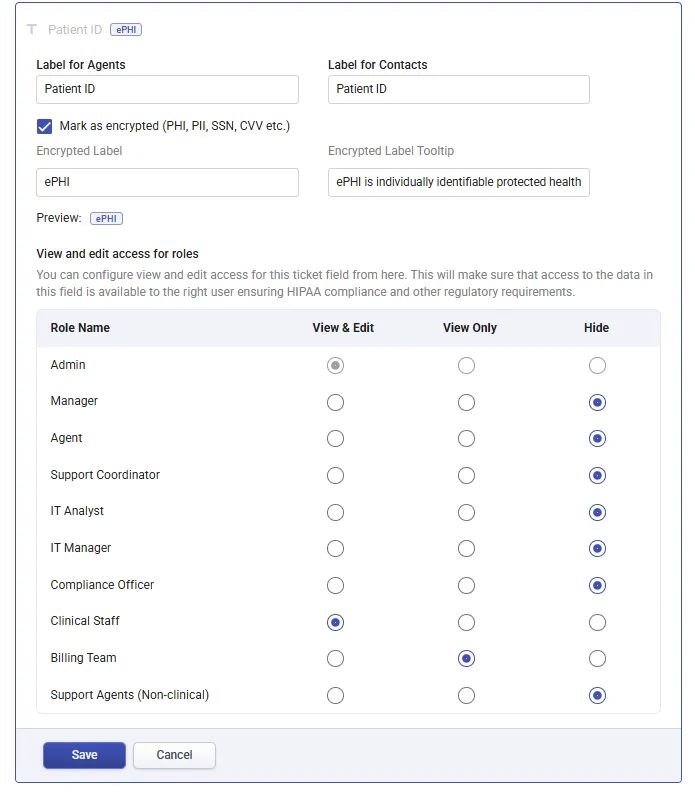
3. Administering roles and permissions
Desk365 allows you to define roles and permissions to control how sensitive data (PHI, PII, CVV, SSN, etc.) is accessed across your organization. By combining role-level HIPAA permissions with field-level visibility controls, you can ensure sensitive data is accessible only to authorized users.
Below are the steps to administer roles and permissions for ePHI in Desk365
Steps to administer roles and permissions:
- Navigate to Settings > Admin > Roles
- Create a new role or edit an existing role based on your access requirements
Option 1: Configure HIPAA compliance access at the role level
Desk365 includes a dedicated Compliance permission within each role.
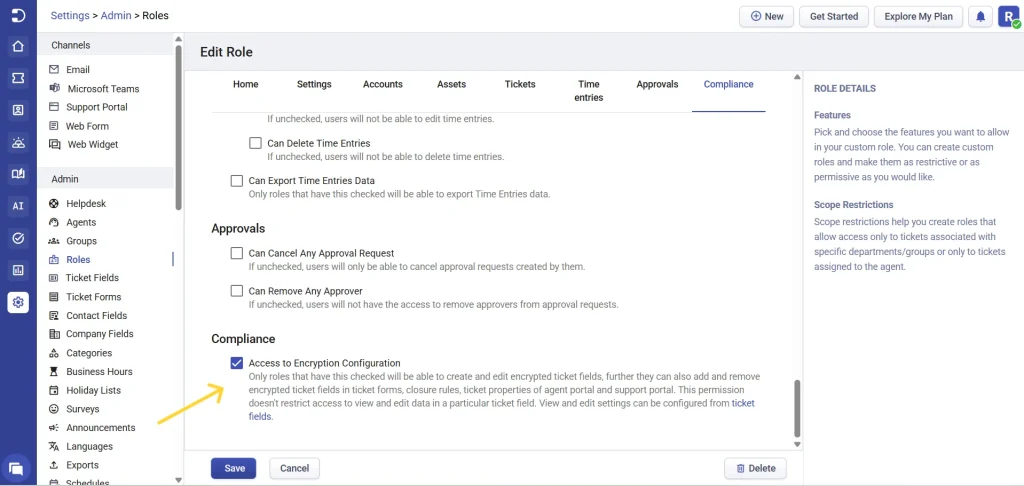
While editing a role, open the Compliance tab and enable Access to encryption configuration. When this option is enabled, the role can:
- Create, edit, and add encrypted ticket fields
- Use encrypted fields across Ticket Properties in the Agent Portal, Ticket Forms, Support Portal forms and Closure Rules
Roles that do not have this permission enabled will see encrypted fields marked as Restricted instead of the actual field names.
Note: This permission is enabled by default for Admin roles and can be customized for other roles as needed.
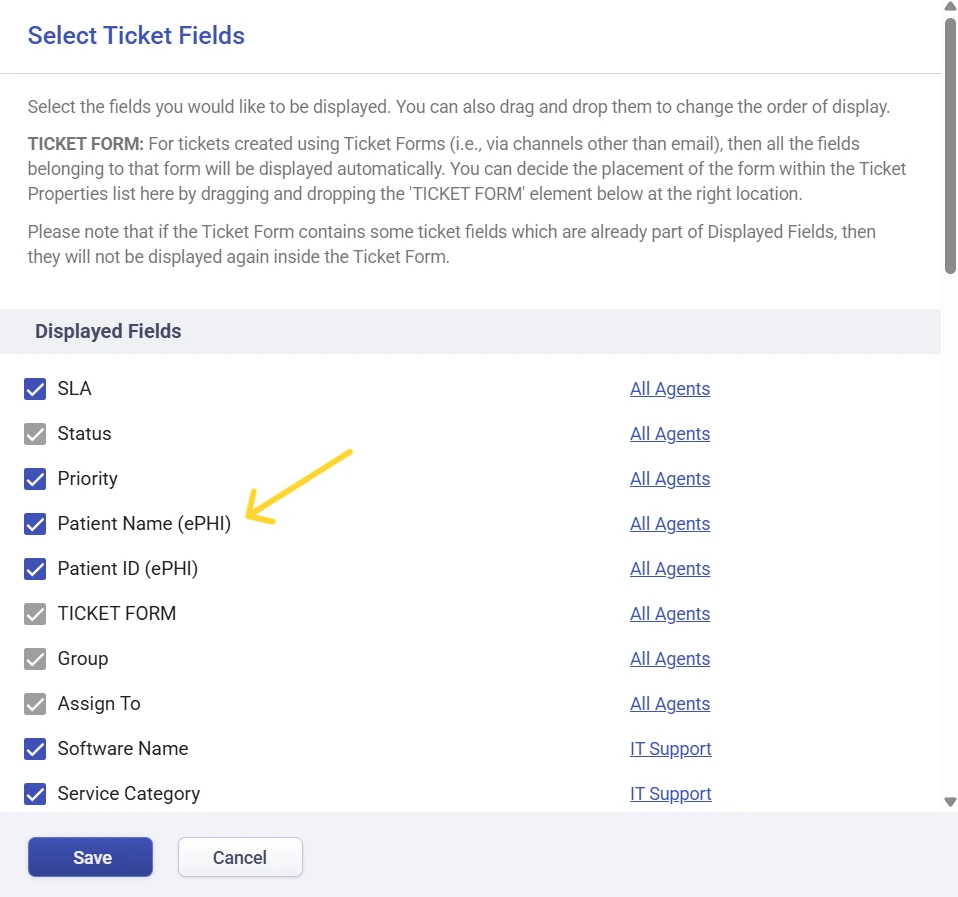
Option 2: Control field-level visibility in Ticket Properties
In addition to role-level HIPAA access, Desk365 allows you to control how ePHI fields are displayed at the ticket level.
- Within the role setting, enable the “Can Modify Displayed Fields in Ticket Properties” option.
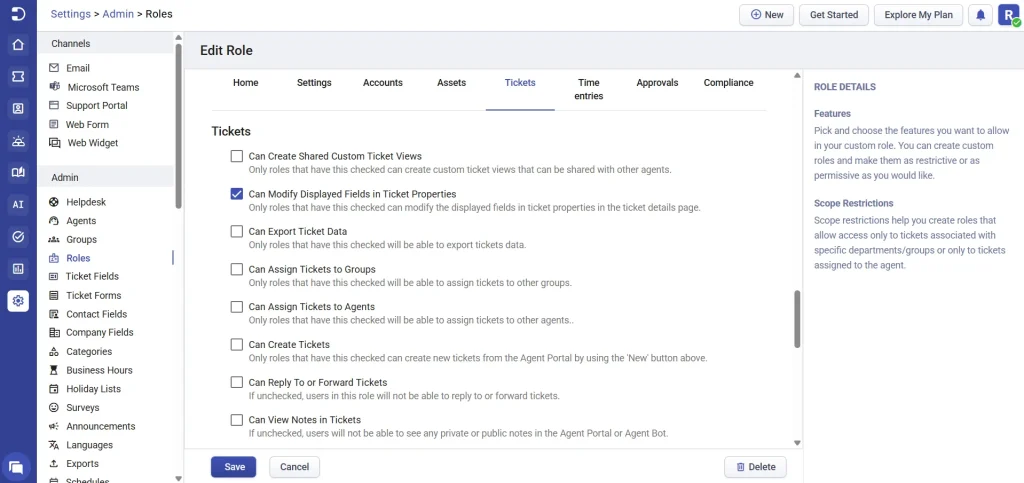
- Checking the option gives access to modify the displayed fields in ticket properties in the ticket details page. You can now find the ticket form along with the ticket fields displayed automatically below the ticket properties on the ticket details page.
- By clicking on the edit option in the ticket properties section, you can opt to make the ePHI field visible and control the access.
4. Monitoring activity with Encrypted Field Logs
Encrypted Field Logs provide a detailed record of all activities related to encrypted sensitive data in Desk365. These logs track actions such as creating or updating ePHI, PII, CVV, SNN) fields, modifying their visibility in ticket forms and ticket properties, and changes to role permissions. Encrypted Field Logs are available as part of the Desk365 Premium plan.
Navigate to Settings > Admin > Encrypted Field Logs
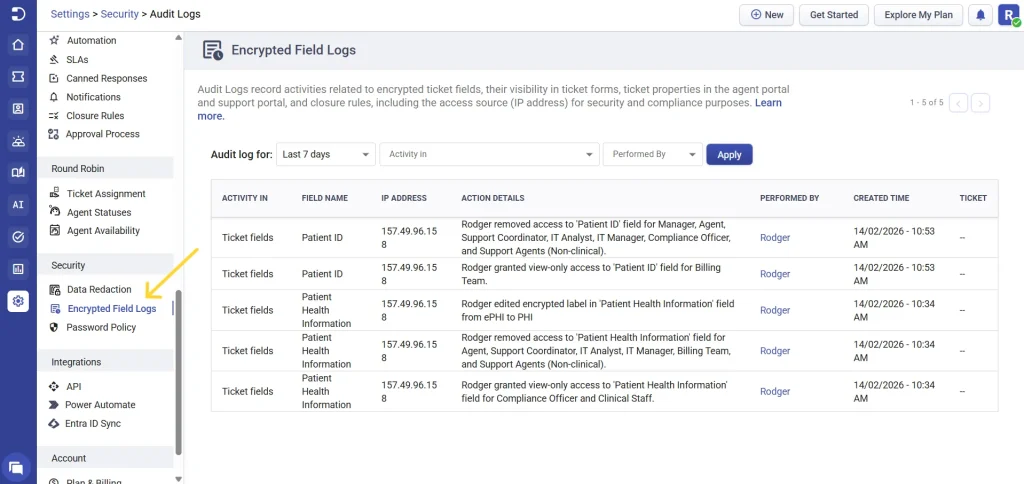
Each audit log entry includes:
- The event type (for example, ticket fields, ticket forms, or role permissions)
- The affected field or setting
- The IP address from which the action was performed
- The user who performed the action
- The date and time of the activity
- The ticket number and,
- The action details
By reviewing Encrypted Field Logs, administrators gain clear visibility into how sensitive data is accessed and managed, helping support security reviews, internal audits, and ongoing compliance requirements.
5. Protecting sensitive information with Data Redaction
Desk365 includes Data Redaction to automatically detect and mask sensitive information in customer communications. This helps prevent confidential data such as email addresses, SSN, phone numbers, credit card details, and IP addresses from being exposed in tickets, replies, forwards, or internal notes. Data Redaction is available as part of the Desk365 Premium plan.
Once enabled, redaction runs automatically in the background and hides sensitive values while allowing agents to continue working on tickets normally.
- Log in to the Desk365 Agent Portal
- Navigate to Settings > Security > Data Redaction
- Turn on the toggle to enable Data Redaction
After enabling the feature, you can activate specific redaction rules based on the types of information you want to mask. Desk365 provides default rules that can be enabled or disabled anytime, and you can test rules to verify how sensitive data will appear once masked.
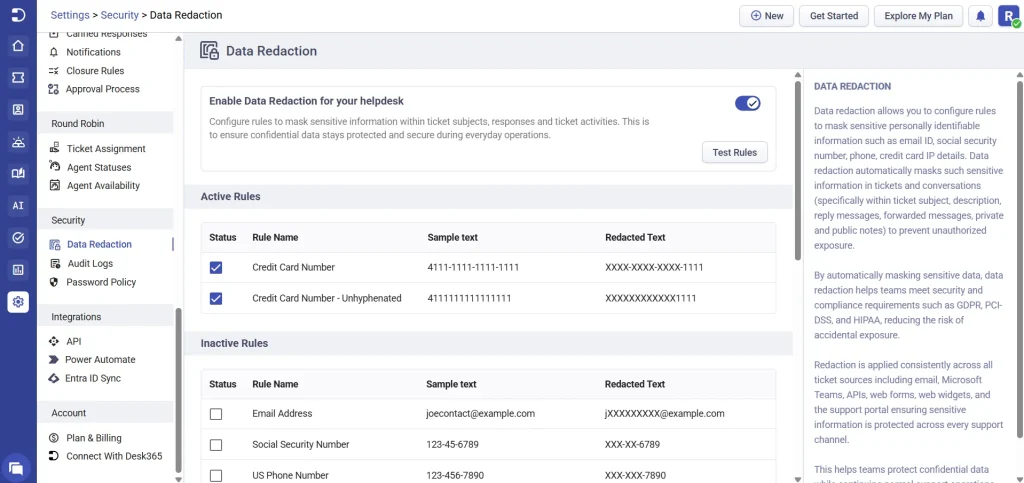
With Data Redaction enabled, sensitive information is automatically masked in ticket subjects, descriptions, replies, forwards, and internal notes across all supported channels.
Learn more about Data Redaction.
By utilizing these features in the Desk365 Premium plan, you can enhance the security of your customers’ health information and ensure compliance with HIPAA regulations. For more detailed guidance, feel free to reach out to our support team.