Multi-Factor Authentication (MFA) in Desk365 adds an extra layer of security to your helpdesk by requiring users to verify their identity using more than just a password. This helps protect both your agent portal and support portal from unauthorized access.
With MFA enabled, users must complete a second verification step during login. This can be done using an authenticator app or a one-time password sent via email. MFA can be configured separately for agents and contacts, but the setup and experience remain the same.
Please note that MFA applies only to email and password logins. If you’re using Microsoft Entra SSO, multi-factor authentication is handled directly by Microsoft, Desk365’s MFA settings will not apply in that case.
How MFA works in Desk365
To get started, go to, Settings > Security and Compliance > Agent / Contact Authentication > MFA
On the MFA configuration screen, you can enable and manage multi-factor authentication for agents and contacts to add an extra layer of account security.
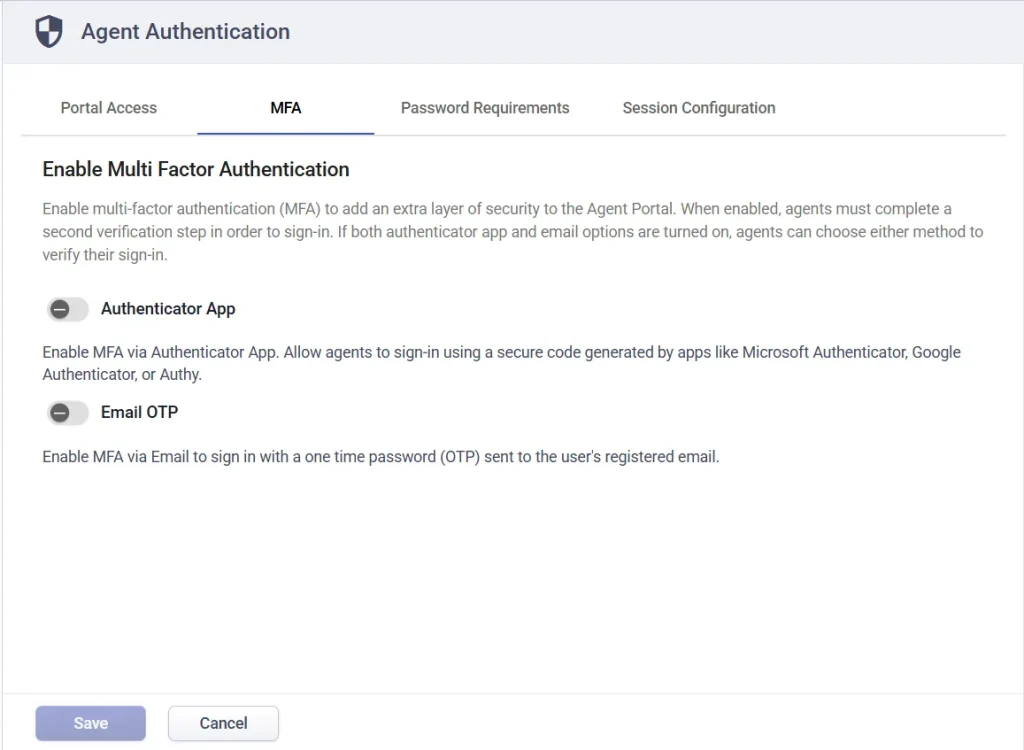
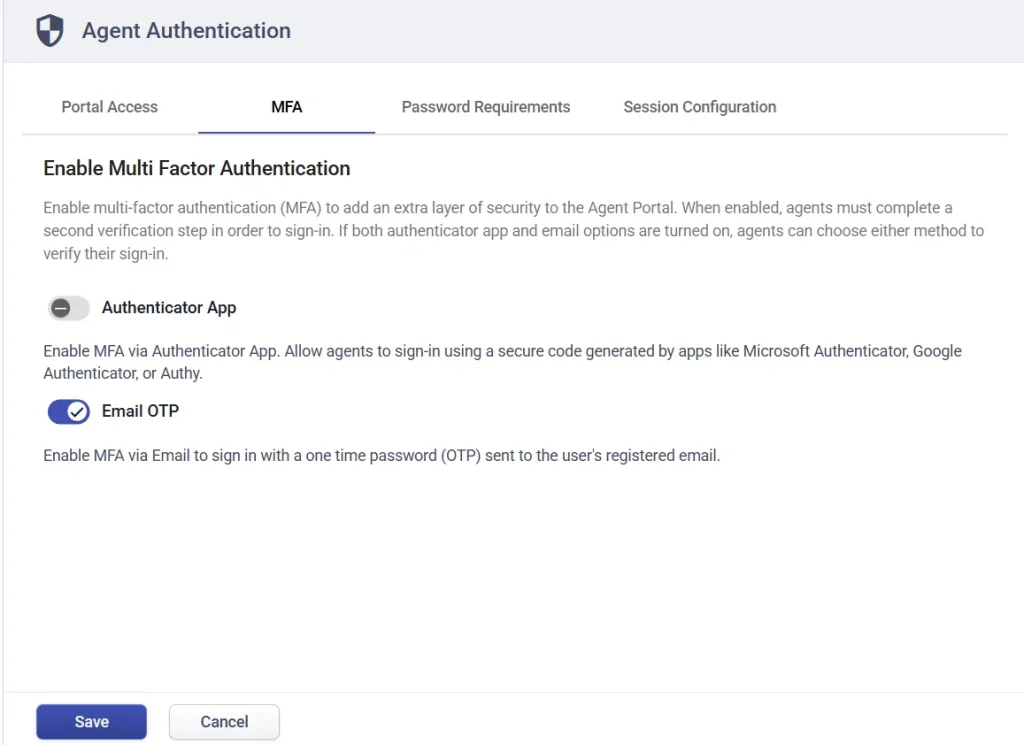
On this page, you will see two ways to enable MFA:
- Authenticator App – This option allows users to sign in using a verification code generated from an authenticator app such as Microsoft Authenticator, Google Authenticator, or Authy.
- Email OTP – This option sends a one-time password to the user’s registered email address during login.
Once you enable MFA, users who sign in using email and password will be asked to complete an additional verification step after entering their credentials.
If both the authenticator app and email OTP are enabled, users will see both options during login. They can choose how they want to verify their identity. The authenticator app is typically used as the primary method, while email OTP acts as a backup when needed.
Enabling MFA for agent authentication
MFA for agents can be managed by admins and agents with the necessary role permissions. Agents will only be able to use MFA after it has been set up at the admin level.
1. Configure MFA using an Authenticator App
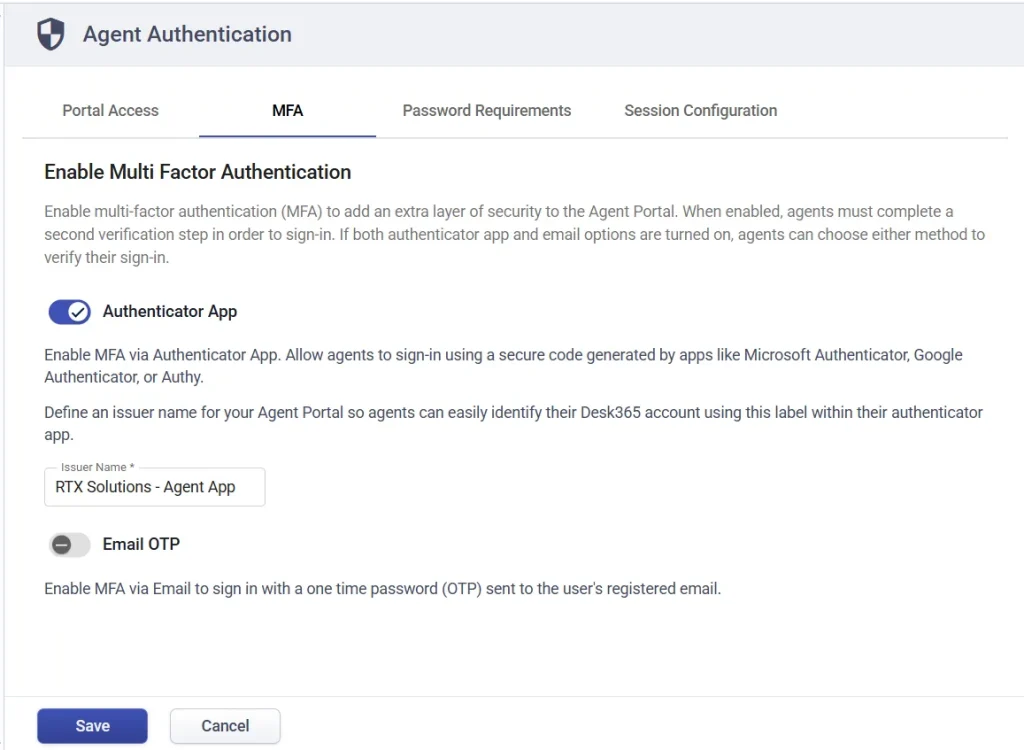
Go to agent authentication settings and enable MFA using an authenticator app.
This allows agents to sign in using a time-based authentication code generated from apps like Microsoft Authenticator, Google Authenticator, etc.
You will be asked to specify an Issuer Name. This is the label that appears inside the authenticator app to help users identify their account.
For example, enter:
RTX Solutions – Agent App
Click save.
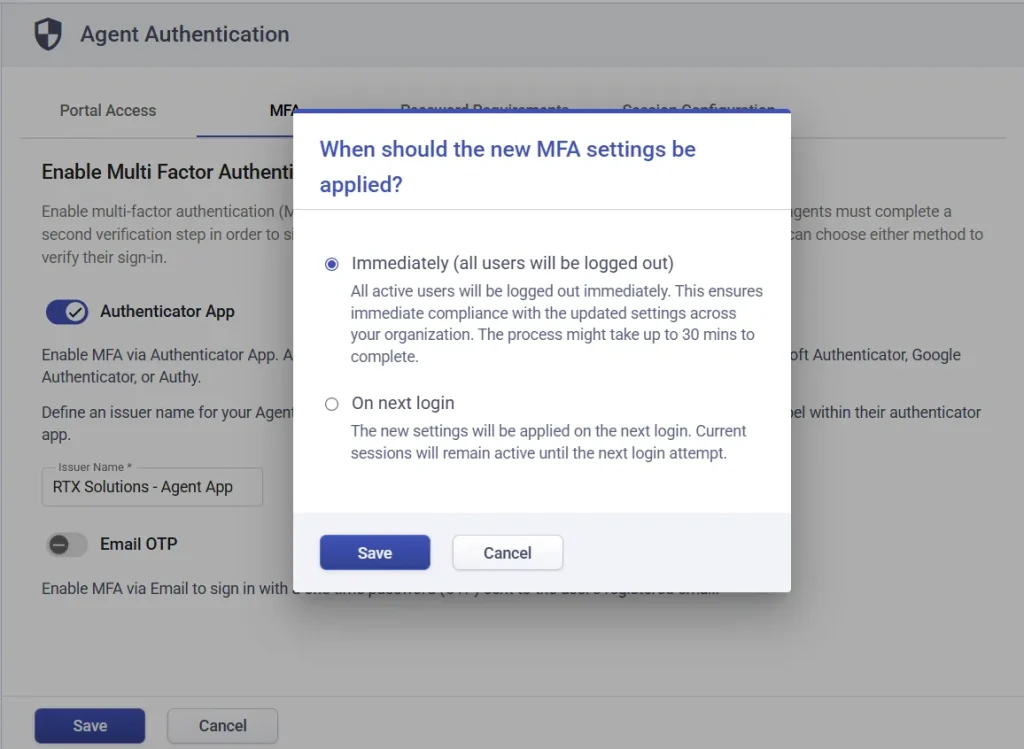
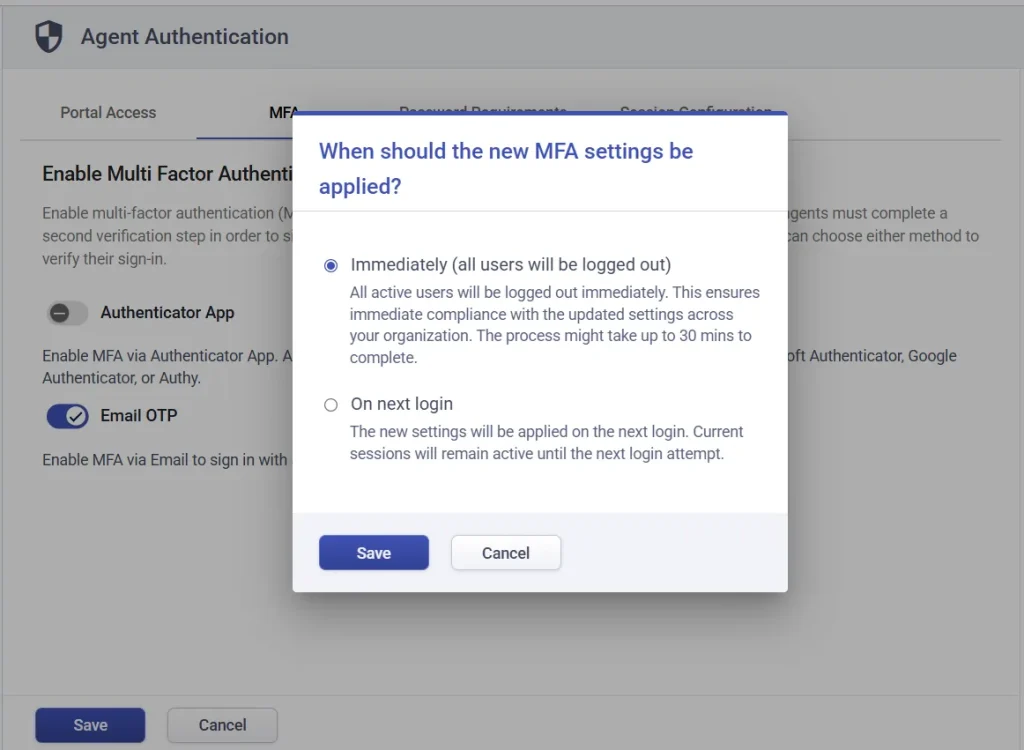
Step 2: Apply the MFA policy
After saving, a confirmation popup will appear asking when the policy should be applied.
- Immediately (all users will be logged out) – All active sessions will be ended. This ensures that MFA is enforced right away. The process may take up to 30 minutes.
- On next login – The new settings will apply only when users log in again. Current sessions will continue until then.
For this example, let’s select ‘Immediately’ and click save.
The MFA policy is now applied.
Step 3: Set up MFA (Agent experience)
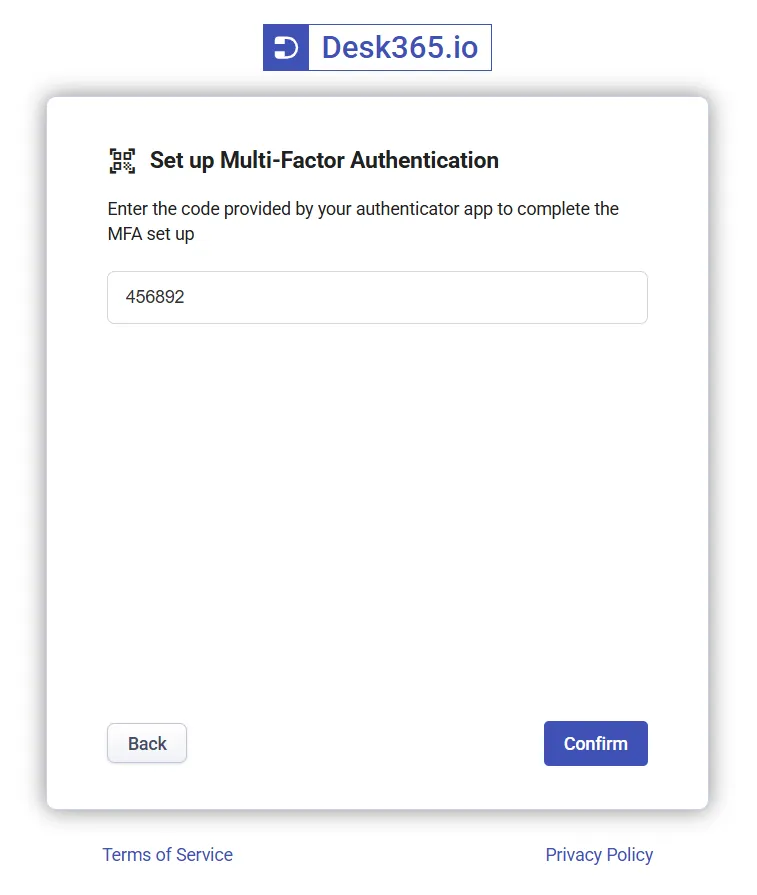
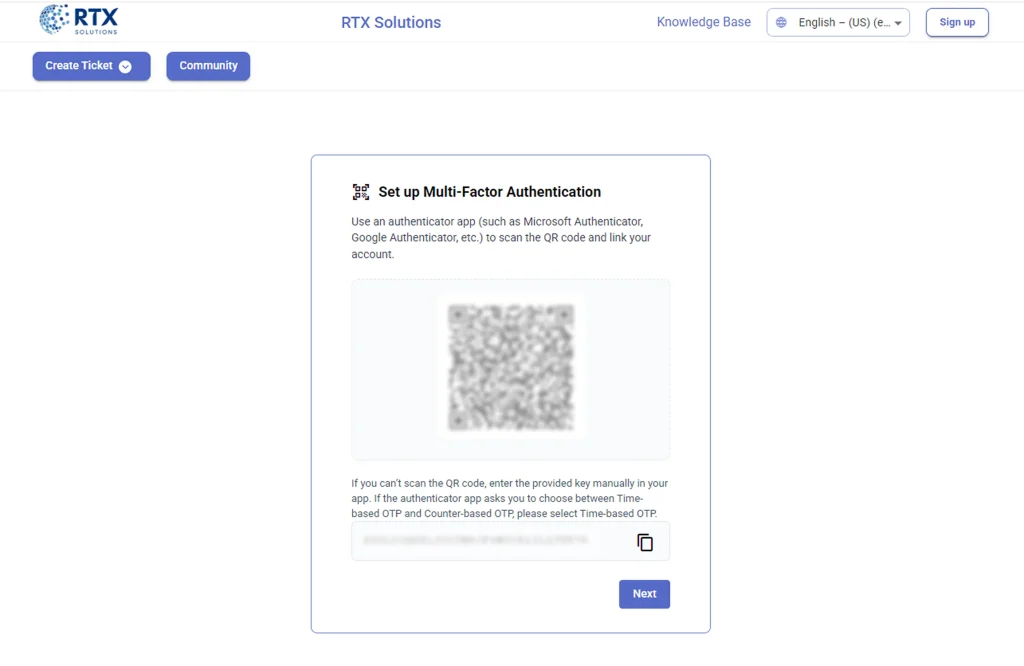
Once enabled, agents will be prompted to set up MFA when they log in.
They will see a QR code on the screen.
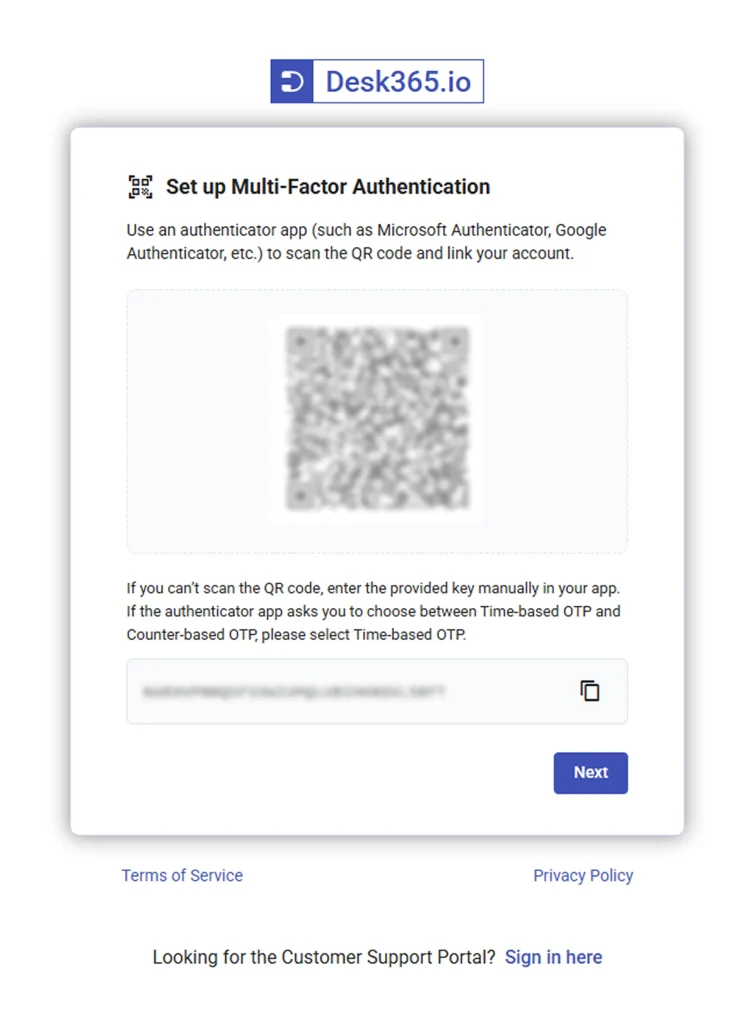
Agents should scan this QR code using their authenticator app. If scanning is not possible, they can manually enter the key shown on the screen.
After scanning, the app will generate a verification code. Enter this code to complete setup.
Step 4: Save recovery codes
After successful verification, a set of recovery codes will be shown.
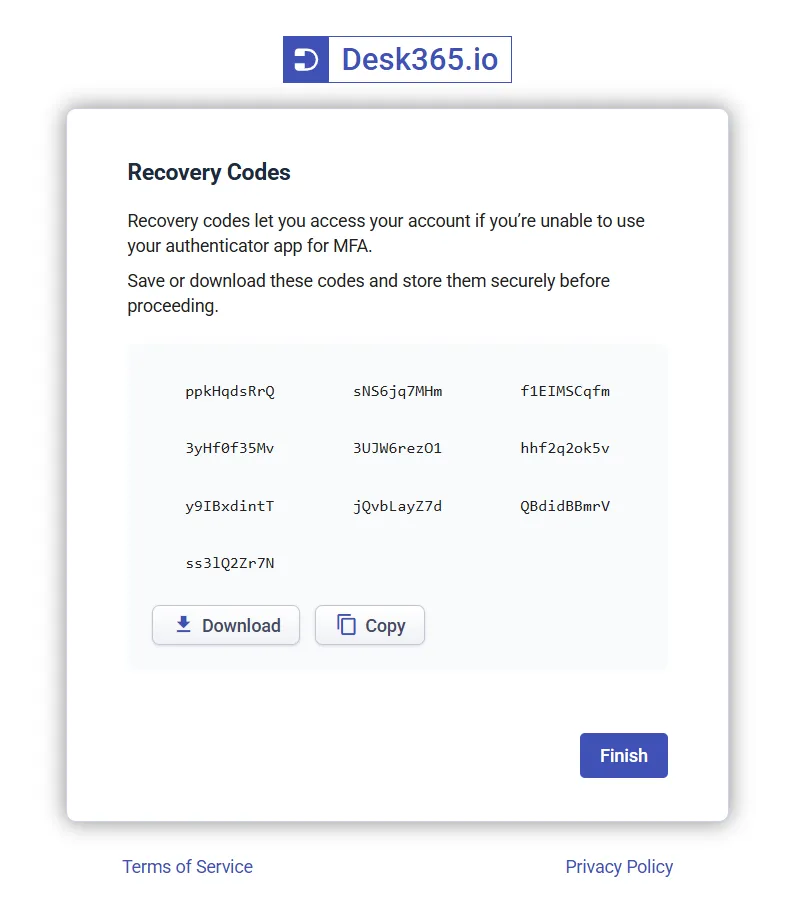
Recovery codes are backup codes that can be used if the user cannot access their authenticator app.
- You will receive 10 recovery codes
- Each code can be used only once
- These codes can be downloaded or copied
Users must store these codes securely before continuing. Once done, click finish.
They will then be redirected to the agent portal.
2. Enabling email OTP for agents
Admins or agents with role permissions can also enable MFA using email OTP.
Turn on the Email OTP option and click save.
You will again be asked when to apply the policy. Choose ‘Immediately’ or ‘On next login’. For this example, select ‘Immediately’ and save.
Once enabled, agents logging in will have the option to receive a one-time password via email.
Agent login using email OTP
When logging in, the agent must enter the OTP sent to their registered email address to complete verification.
A popup will appear asking them to enter the OTP sent to their registered email.
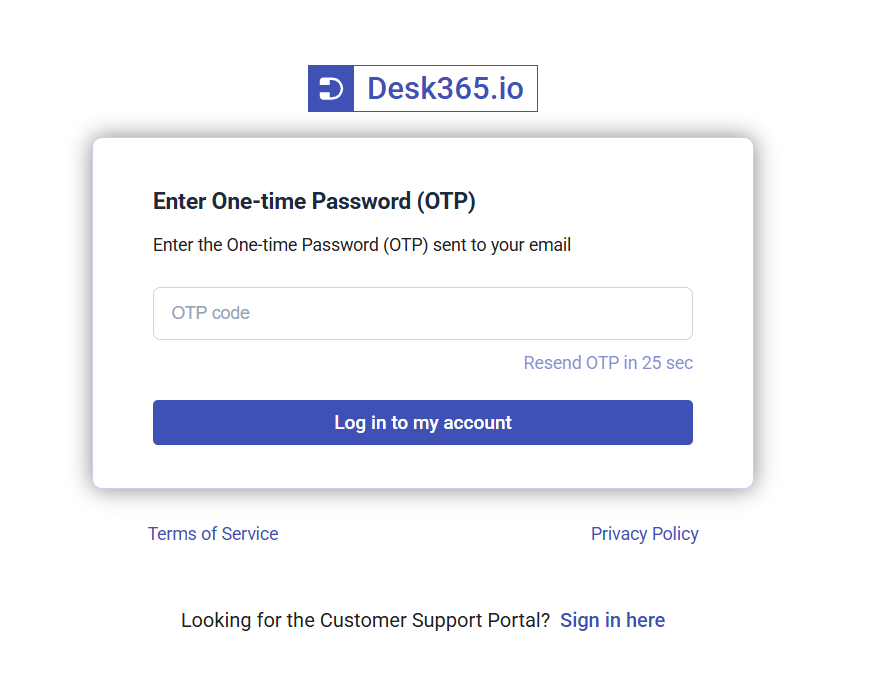
Once entered correctly, the agent will be logged in.
Note: The OTP is valid for 10 minutes. A new OTP can be requested after 30 seconds.
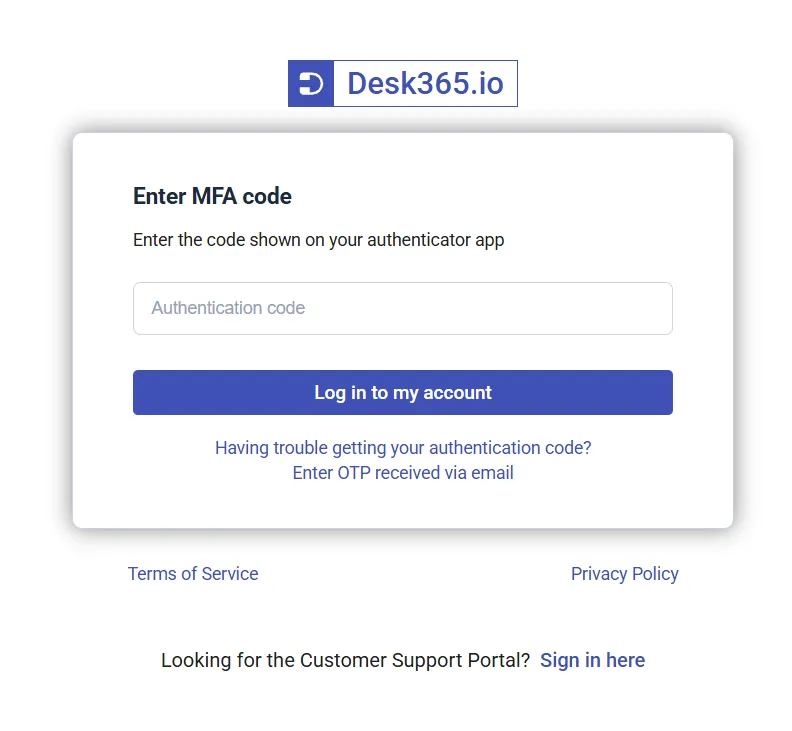
If both Authenticator App and Email OTP are enabled, the authenticator app will be used as the primary verification method during login. Users will first be prompted to enter the authentication code generated in their authenticator app.
If they are unable to access the app or retrieve the code, they can choose the “Enter OTP received via email” option on the login screen to verify their identity using an email OTP instead.
MFA for contact authentication (Support portal)
MFA can also be enabled for contacts who access your support portal.
Your support portal may already support email login and Microsoft Entra Single Sign-On. MFA applies only to contacts signing in with email and password.
When enabled, all contacts must complete an additional verification step during login.
If both authenticator app and email OTP are enabled, users can choose either method.
Enable MFA for contacts using authenticator app
Similar to agent authentication, go to Contact Authentication settings and enable MFA via authenticator app.
Enter an issuer name to identify the account inside the app.
For example:
RTX – Support Portal
Save the settings and choose to apply the policy immediately.
Now, when a contact logs in using email and password, they will be prompted to set up MFA.
The process is the same as agents:
- Scan the QR code using an authenticator app
- Enter the generated code
- Download or copy recovery codes
- Click finish
Once completed, MFA is enabled for the contact.
Role permissions for MFA
Access to MFA settings and management depends on role permissions. Only users with the right permissions will be able to view, configure, or manage MFA.
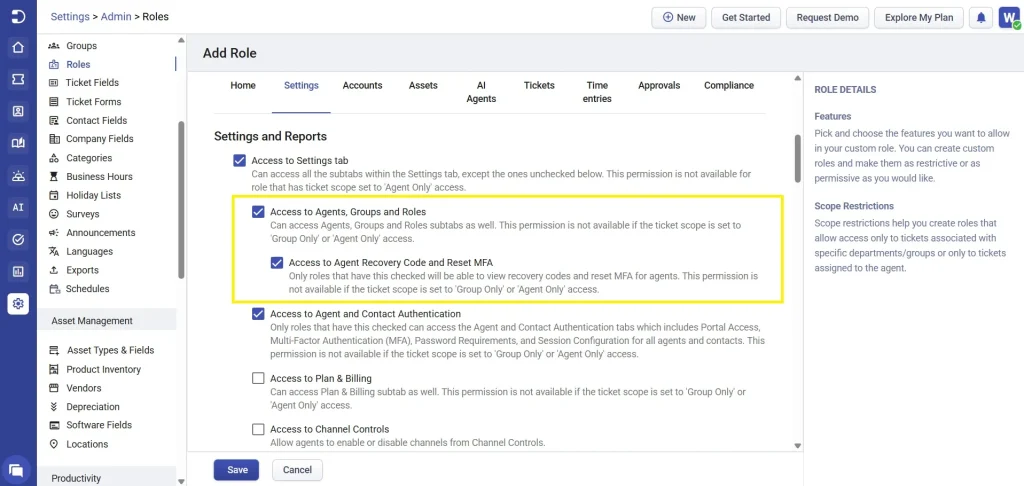
Only roles with the “Access to Agent Recovery Code and Reset MFA” permission enabled can:
- View recovery codes for agents
- Reset MFA for agents
If this permission is not enabled, the user will not be able to access recovery codes or help agents regain access to their accounts.
Roles with the “Access to Agent and Contact Authentication” permission enabled can:
- Access the authentication settings page
- Configure portal login options
- Enable or disable MFA
- Manage password policies for agents and contacts
If this permission is disabled, the user will not be able to see or modify any MFA or authentication-related settings.
In short, both permissions must be explicitly enabled in a role for users to manage MFA settings or assist others with recovery and access.
Important notes
- MFA applies only to email and password login, not Microsoft Entra SSO
- Each user receives 10 recovery codes and each can be used only once
- Recovery codes can only be generated again after two hours from the previous request
- Email OTP is valid for 10 minutes
- Authenticator app is the primary method and email OTP is a fallback
MFA in Desk365 helps secure both your agent portal and support portal by adding an extra verification step during login. Whether using an authenticator app or email OTP, it ensures that only authorized users can access your system.
By enabling MFA and configuring the right permissions, admins can significantly improve the security of their helpdesk operations while keeping the login experience simple for users.