Integrating Desk365 with Power BI is a straightforward process that involves a few simple steps. You need to import the data from Desk365 into Power BI with the help of the Desk365 API and then you can transform it into customized, impactful reports using Power Query with pagination, which enables data cleansing, shaping, and combining data from multiple sources. And then you can filter the tickets within the report in Power BI.
By the end of this help center article, you’ll be able to create interactive reports and dashboards that provide valuable insights into your customer support operations.
Establish connection with Desk365's API
To initiate the integration of Desk365 with Power BI, you have to establish a connection with Desk365’s API from Power BI. To do that navigate to your Power BI tool and perform the following actions.
- Select Web from common data sources under Get data.
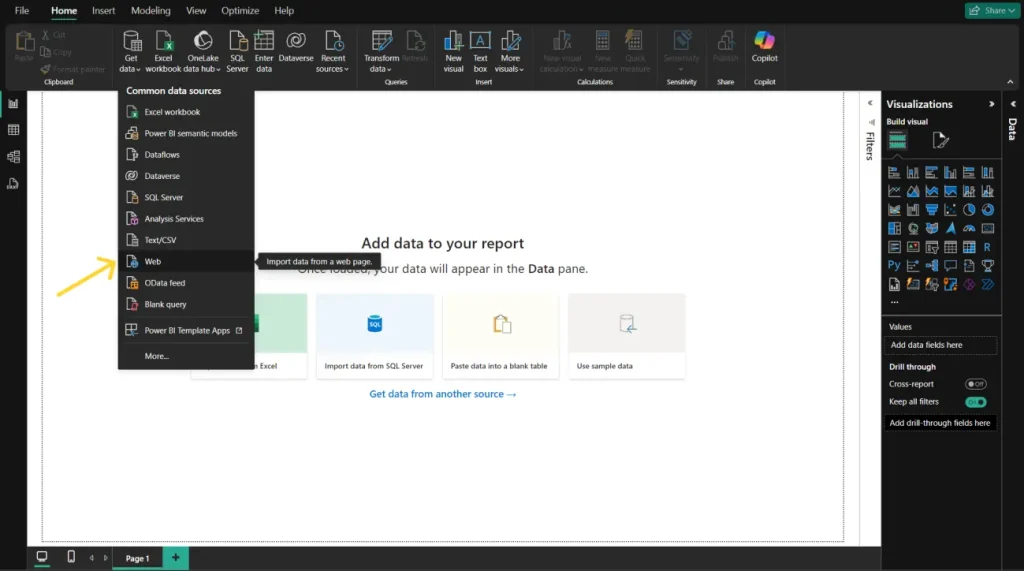
2. Click on Advanced and fill in the details as mentioned below.
Enter the below link in URL parts.
https://<<yoursubdomain>>.desk365.io/apis/v3/tickets
Under HTTP request header parameters, type the value as ‘Authorization‘ and set the value to ‘<<YOUR-DESK365’S-API-KEY>>‘ as shown below and click on ‘Ok’.
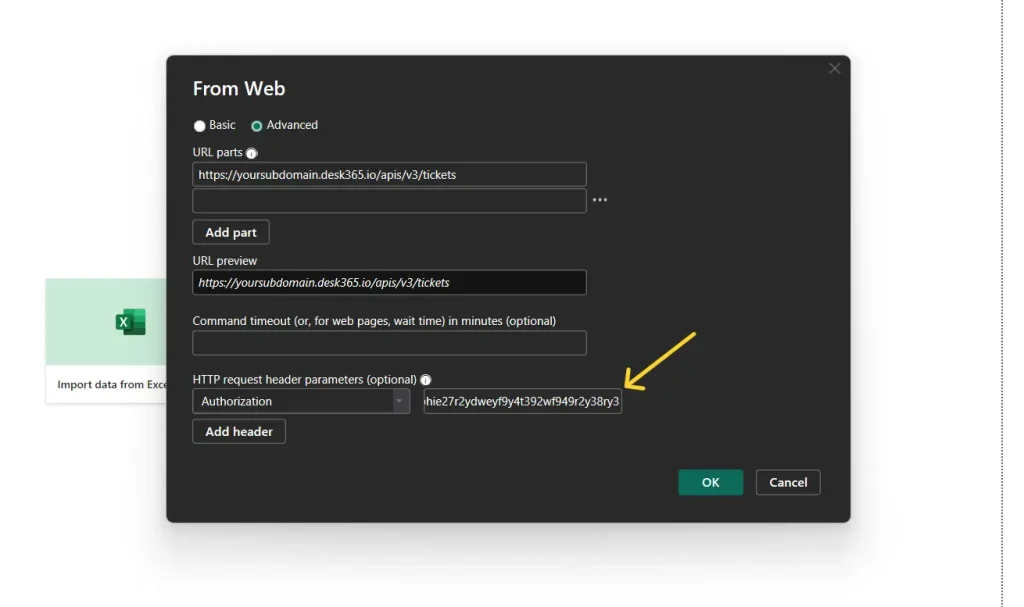
3. As the next step, select the same link mentioned earlier in the ‘Access Web content’ pop-up and click ‘Connect’.
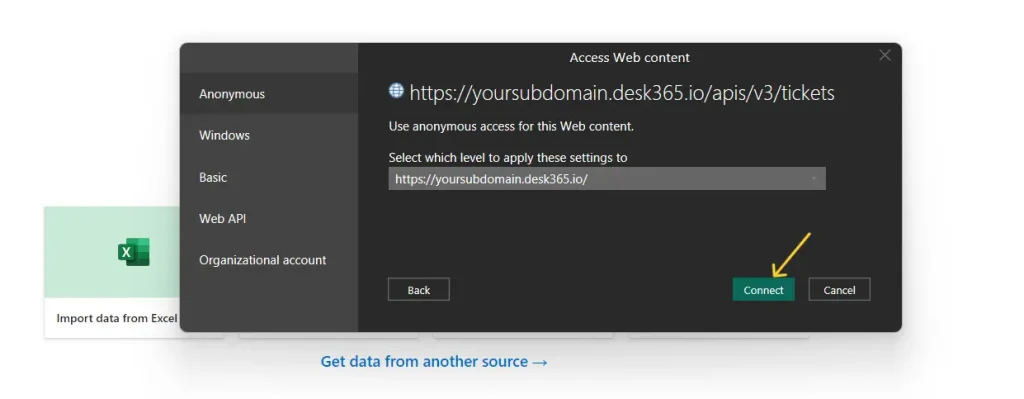
Your Power BI is now successfully connected to Desk365’s API.
Create a function to fetch the list of tickets from the Desk365 API
The second step to integrate Desk365 with Power BI is to create a function. This function facilitates the retrieval of tickets and their corresponding details from Desk365.
Follow the below steps:
- Navigate to your Power BI platform.
- Right click and select new query > blank query.
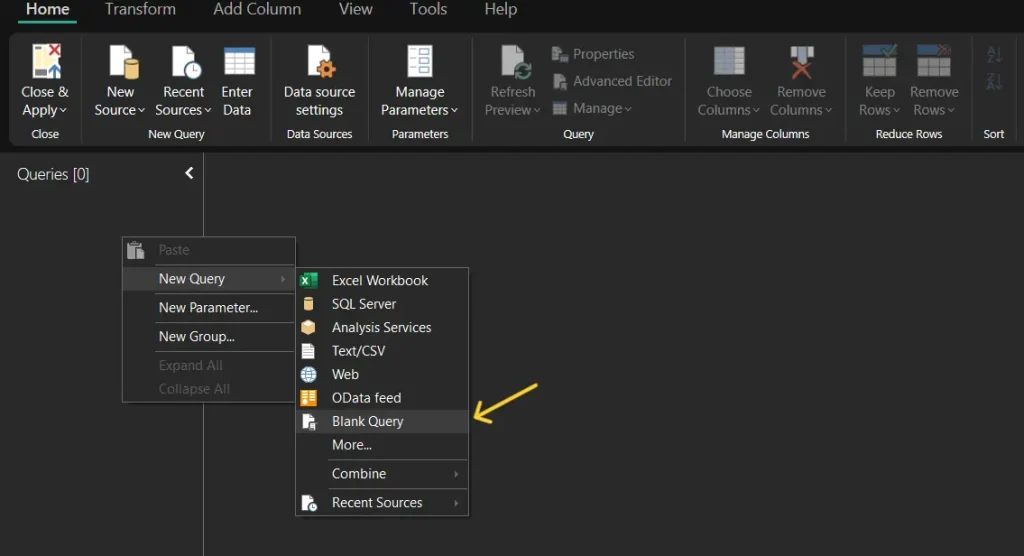
3. Rename the query to GetAllTickets

4. Copy and paste the provided function code into the Advanced Editor and click Done
					let
    // Base URL and API Key for the API requests
    BaseUrl = "https://yoursubdomain.desk365.io/apis/v3/",
    ApiKey = "<<YOUR-DESK365-API-KEY>>",
    // Number of tickets per page (possible values: 30, 50, 100)
    TicketCount = 30,

    // Query parameters for fetching tickets, including custom fields, survey details, and activity since a specific time
    QueryParams = [
        ticket_count = Text.From(TicketCount),     // Include tickets per page
        include_description = "0",                 // Include description in the response
        include_custom_fields = "0",               // Include custom fields in the response
        include_survey_details = "0",              // Include survey details in the response
        order_by = "created_time",                 // Sort tickets by "created_time" or "updated_time"
        order_type = "desc",                       // Specify the sorting order "asc" (ascending) or "desc" (descending)
        updated_since = "2024-11-01 08:48:06"      // Filter tickets with activity since the specified timestamp
    ],

    // Function to Fetch a Single Page of Data
    FetchPage = (offset as number) =>
        try
            Json.Document(Web.Contents(
                BaseUrl,
                [
                    RelativePath = "tickets",
                    Query = Record.Combine({[offset = Text.From(offset)] & QueryParams}), // Combine base query and custom query params
                    Headers = [Authorization = ApiKey]
                ]
            ))
        otherwise [tickets = {}, next_page = null, count = 0], // Default response in case of error

    // Fetch initial data to get the total count
    Source = FetchPage(0),
    TotalTickets = if Source = null or not Record.HasFields(Source, "count") then 0 else Source[#"count"],

    // Calculate the number of pages needed
    PageCount = Number.RoundUp(TotalTickets / TicketCount),

   // Generate a list of offsets for each page, using PageCount to limit the number of iterations
    PagesData = List.Generate(
        // Start with the first page's response
        () => [Page = 0, Response = Source], // Fetch the first page only once here
        each [Page] < PageCount, // Limit the iteration to PageCount
        each [
            Page = [Page] + 1,                       // Increment the page counter by 1
            Response = Function.InvokeAfter(() => FetchPage(Page * TicketCount),#duration(0,0,0,1)) // Fetch the next page using the updated offset (Page * TicketCount)
        ],
        each [
            Count = [Response][count],    // Extract the total count of tickets
            Tickets = [Response][tickets] // Extract the list of tickets from the response
        ]
    )
in
   PagesData
5. Now, create another new query (e.g., name it Tickets).
6. Open the Advanced Editor for this query and paste the second block of code provided.
					let
    // Call the GetAllTickets function
    PagesData = GetAllTickets,

    // Flatten the list of tickets and include the count
    FlattenedTicketsWithCount = List.Transform(PagesData, each List.Transform([Tickets], (ticket) => Record.AddField(ticket, "count", [Count]))),

    // Combine all tickets from each page into one list
    CombinedTickets = List.Combine(FlattenedTicketsWithCount),

    // Convert the list of records into a table
    TicketsTable = Table.FromRecords(CombinedTickets),

    // Select specific columns from the tickets table that are needed
    SelectedColumnsTable  = Table.SelectColumns (
        TicketsTable,
        {
            "count",
            "ticket_number",
            "contact_email",
            "subject",
            "description",
            "description_text",
            "status",
            "priority",
            "type",
            "source",
            "assigned_to",
            "company_name",
            "sla",
            "group",
            "category",
            "subcategory",
            "created_on",
            "updated_on",
            "resolved_on",
            "closed_on",
            "due_date",
            "first_response_time",
            "first_assigned_time",
            "first_assigned_duration",
            "resolved_duration",
            "first_replied_duration",
            "closed_duration",
            "custom_fields",
            "survey_rating"
        },
        MissingField.Ignore
    ),

   // Source mapping table
    SourceMappingTable = #table({"Key", "Value"}, {
        {1, "Email"},
        {5, "Microsoft Teams"},
        {6, "Support Portal"},
        {7, "Phone or Other"},
        {12, "Web Form"},
        {13, "Web Widget"}
    }),

    // Check if the "source" column exists
    SourceExists = List.Contains(Table.ColumnNames(SelectedColumnsTable), "source"),

    // Join SourceMappingTable to SelectedColumnsTable on source
    MergedSource = if SourceExists then
        Table.NestedJoin(
            SelectedColumnsTable, "source",
            SourceMappingTable, "Key",
            "SourceMapping", JoinKind.LeftOuter
        )
    else
        SelectedColumnsTable,
    // Expand the mapped value
    ExpandedSource = if SourceExists then
        Table.ExpandTableColumn(MergedSource, "SourceMapping", {"Value"}, {"source_text"})
    else
        MergedSource,

    // Priority mapping table
    PriorityMappingTable = #table({"Key", "Value"}, {
        {1, "Low"},
        {5, "Medium"},
        {10, "High"},
        {20, "Urgent"}
    }),

    // Check if the "priority" column exists
    PriorityExists = List.Contains(Table.ColumnNames(ExpandedSource), "priority"),

    // Join PriorityMappingTable to ExpandedSource on priority
    MergedPriority = if PriorityExists then
        Table.NestedJoin(
            ExpandedSource, "priority",
            PriorityMappingTable, "Key",
            "PriorityMapping", JoinKind.LeftOuter
        )
    else
        ExpandedSource,

    // Expand the mapped value
    ExpandedPriority = if PriorityExists then
        Table.ExpandTableColumn(MergedPriority, "PriorityMapping", {"Value"}, {"priority_text"})
    else
        MergedPriority,

    // Rename the selected columns for clarity
    RenamedColumnsTable = Table.RenameColumns (
        ExpandedPriority,
        {
            {"ticket_number", "Ticket Number"},
            {"contact_email", "Contact Email"},
            {"subject", "Subject"},
            {"description", "Description"},
            {"description_text", "Description Text"},
            {"status", "Status"},
            {"priority", "Priority"},
            {"type", "Type"},
            {"source", "Source"},
            {"assigned_to", "Assigned To"},
            {"company_name", "Company Name"},
            {"sla", "SLA"},
            {"group", "Group"},
            {"category", "Category"},
            {"subcategory", "Subcategory"},
            {"created_on", "Created On"},
            {"updated_on", "Updated On"},
            {"resolved_on", "Resolved On"},
            {"closed_on", "Closed On"},
            {"due_date", "Due Date"},
            {"first_response_time", "First Response Time"},
            {"first_assigned_time", "First Assigned Time"},
            {"first_assigned_duration", "First Assigned Duration"},
            {"resolved_duration", "Resolved Duration"},
            {"first_replied_duration", "First Replied Duration"},
            {"closed_duration", "Closed Duration"}
        },
        MissingField.Ignore
    )
in
    RenamedColumnsTable
Once executed you will find the ticket data imported into Power BI.

Expanding the records of custom fields and survey ratings in Desk365
Power BI offers a flexible way to manage which columns are shown in your reports. If you want to expand the records of custom fields, you can do so by clicking the column icon (located at the top-right corner of the Power BI data preview window) as shown in the image below. A list of all available fields will appear, simply select the columns you want to include and then click OK. You can do the same for survey ratings as well.
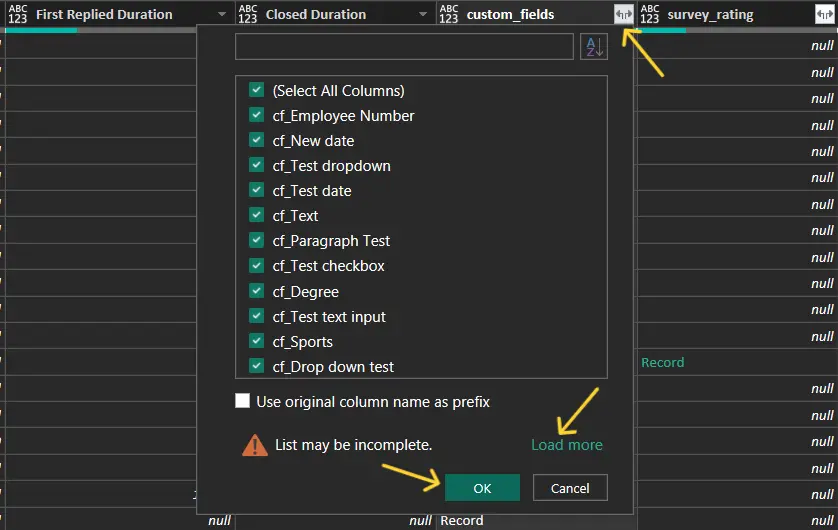
If you need to include additional fields that aren’t visible in the list, you can manually add those fields in the Power Query code. This gives you full control over how your Desk365 data is shaped and displayed, ensuring that your reports include exactly the metrics that matter to you
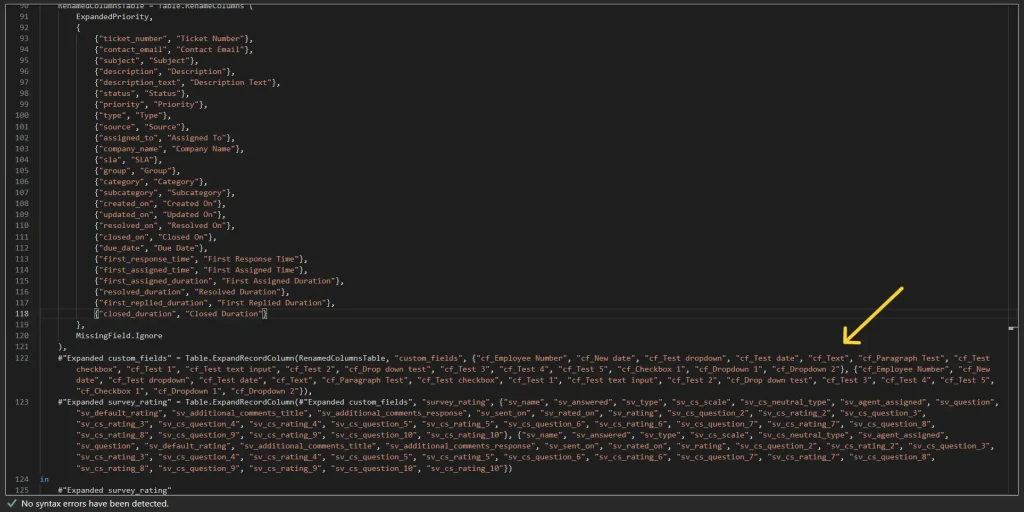
Configure and customize API queries in Power BI
1. Base URL
The Base URL is the starting point for all API requests. Replace yoursubdomain with your Desk365 helpdesk domain:
https://<<yoursubdomain>>.desk365.io/apis/v3/
2. API key
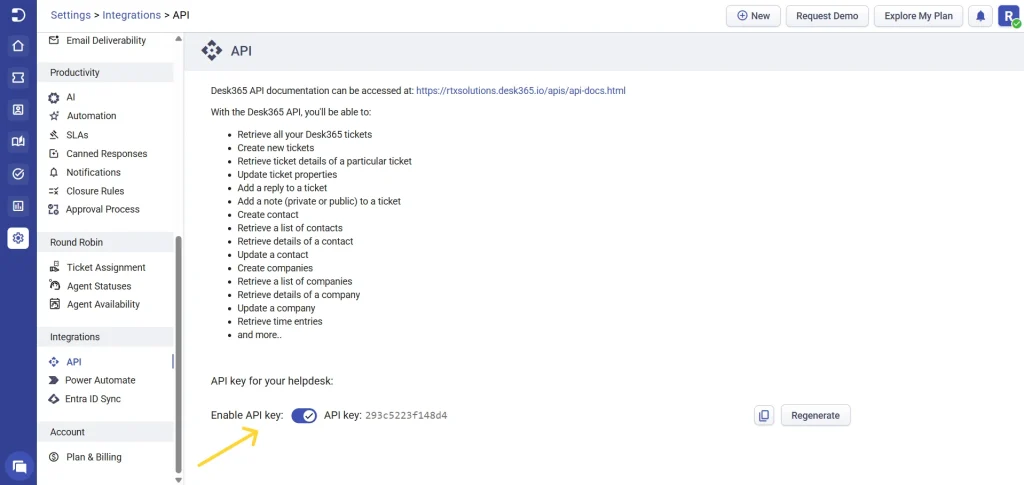
Your API key authenticates the requests to Desk365. Find your unique API key in the Desk365 portal:
- Go to Settings > Integrations > API and copy your API key.
Replace the placeholder <<YOUR-DESK365’S-API-KEY>> in the code with your actual API key.
3. Ticket count
The ticket_count parameter determines how many tickets are retrieved per API call. You can choose from the following values:
- 30, 50, or 100 tickets per API call.
- The maximum limit for ticket retrieval is 10,000 tickets per hour.
4. Query parameters
The Desk365 API includes several query parameters that allow you to retrieve and customize the data based on your reporting and analytical needs. Here’s a detailed explanation of each parameter:
- include_description
The description parameter in the Desk365 API not only controls whether ticket descriptions are included in the response but also provides flexibility in the format of the ticket details retrieved.
include_description = "1", // Include description in the response
When enabled, the API offers two distinct fields for ticket descriptions:
1. Description (HTML) – The description field contains the full content of the ticket’s description in HTML format. This field preserves any formatting applied to the text, such as bold, italic, lists, links, or other HTML elements.
2. Description text (Plain text) – The description_text field provides the plain text version of the ticket description, stripping away all HTML tags and presenting only the raw content.
- include_custom_fields
The include_custom_fields parameter enables the retrieval of additional, customized data associated with tickets in Desk365. By default, this parameter is set to 0, meaning custom fields are excluded from the API response. To include custom field data, set the parameter to 1.
include_custom_fields = "1", // Include custom fields in the response
Custom fields in Desk365 are uniquely identified by the prefix cf_ (e.g., cf_Players, cf_Sports). This ensures that these fields are easily distinguishable in the dataset and simplifies the process of mapping them to specific filters or analytics in Power BI.
Desk365 empowers users to define their own custom ticket fields to capture essential information beyond standard fields. Custom fields can be created in the Desk365 agent portal under Settings > Admin > Ticket Fields.
- include_survey_details
The include_survey_details parameter allows you to retrieve customer feedback collected through surveys as part of the API response. By default, this parameter is set to 0, meaning survey data is excluded. To include survey feedback, set this parameter to 1.
include_survey_details = "1", // Include survey details in the response
Survey fields in the API response are prefixed with sv_ (e.g., sv_rating, sv_question) for easy identification. These fields provide valuable insights into customer satisfaction, service quality, and agent performance. You have the flexibility to tailor the survey data included in your reports.
- Sorting parameters
order_by
The order_by parameter defines the attribute by which tickets are sorted. You can choose to sort tickets based on either their created_time (the date and time a ticket was opened) or their updated_time (the date and time the ticket was last modified). This helps prioritize the data display based on your reporting objectives. For instance, sorting by created_time is useful for analyzing ticket volume over a period, while sorting by updated_time helps monitor ongoing or recently resolved tickets.
order_by = "created_time", // Sort tickets by "created_time" or "updated_time"
order_type
The order_type parameter specifies the direction of sorting:
- Use asc for ascending order. This will display the oldest tickets first.
- Use desc for descending order. This will display the newest tickets first.
Combining order_by with order_type provides flexibility in how tickets are organized, making it easier to focus on specific data subsets like newly created tickets or recently updated ones.
order_type = "desc", // Specify the sorting order "asc" (ascending) or "desc" (descending)
- Filtering tickets by date and time using the “updated_since” parameter
If you want to retrieve tickets updated after a specific date and time, simply use the “updated_since” parameter in this format “yyyy-mm-dd hh:mm:ss” into your code within the advanced editor for both functions. This addition ensures that only tickets updated from the specified date will be displayed.
updated_since = "yyyy-mm-dd hh:mm:ss" // Filter tickets with activity since the specified timestamp
Note: When using “updated_since” parameter indicate the specific date and time from which you want to showcase your tickets such as “updated_since=2024-11-01 00:00:00”.
Source mapping
This Power Query code shows how numerical codes (constants) for ticket source and priority are mapped to human-readable text labels using mapping tables and joins.
In the first part of the code, the ticket source constants (like 1, 5, 6, etc.) are mapped to corresponding labels such as “Email”, “Microsoft Teams”, and “Support Portal”.
A similar approach is applied to map the priority levels.
					// Source mapping table
    SourceMappingTable = #table({"Key", "Value"}, {
        {1, "Email"},
        {5, "Microsoft Teams"},
        {6, "Support Portal"},
        {7, "Phone or Other"},
        {12, "Web Form"},
        {13, "Web Widget"}
    }),

    // Join SourceMappingTable to SelectedColumnsTable on source
    MergedSource = Table.NestedJoin(
        SelectedColumnsTable, "source",
        SourceMappingTable, "Key",
        "SourceMapping", JoinKind.LeftOuter
    ),

    // Expand the mapped value
    ExpandedSource = Table.ExpandTableColumn(MergedSource, "SourceMapping", {"Value"}, {"source_text"}),

    // Priority mapping table
    PriorityMappingTable = #table({"Key", "Value"}, {
        {1, "Low"},
        {5, "Medium"},
        {10, "High"},
        {20, "Urgent"}
    }),

    // Join PriorityMappingTable to ExpandedSource on priority
    MergedPriority = Table.NestedJoin(
        ExpandedSource, "priority",
        PriorityMappingTable, "Key",
        "PriorityMapping", JoinKind.LeftOuter
    ),

    // Expand the mapped value
    ExpandedPriority = Table.ExpandTableColumn(MergedPriority, "PriorityMapping", {"Value"}, {"priority_text"}),
Integrate Desk365 with other applications using the Desk365 API.
Explore our endpoints ranging from
Tickets
Contacts
Companies
Time entries
Surveys
Contracts
Impactful reports from raw data
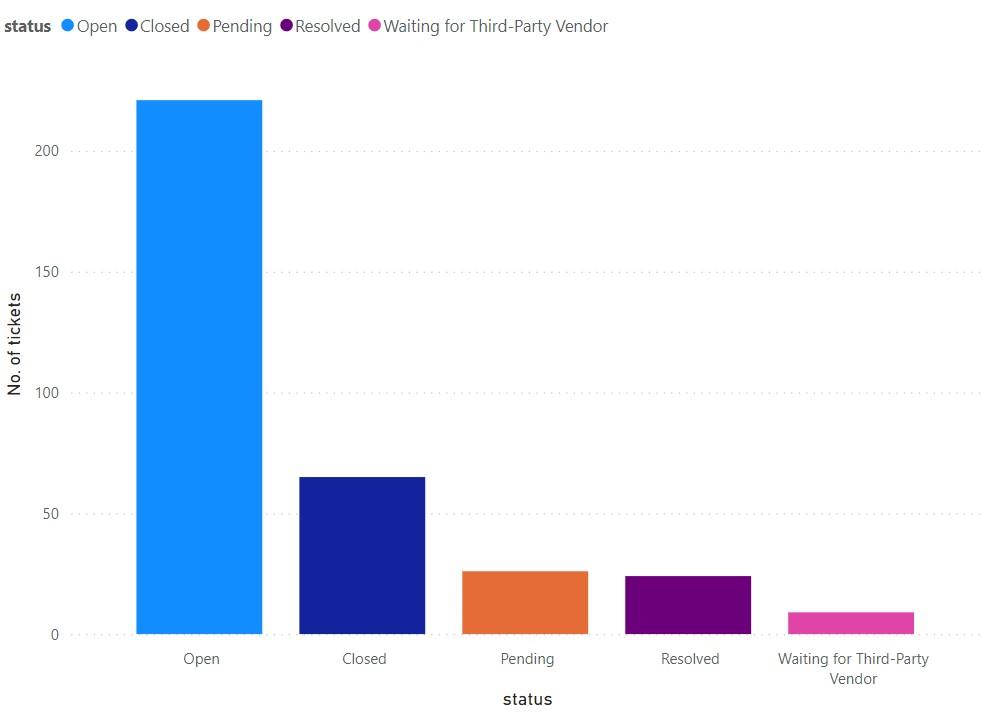
Finally, you can use the Power BI tool to transform these raw data into actionable insights, enabling better decision-making, data-driven strategies, and improved business performance.
For instance, here you may see the sample report generated for ‘No. of tickets vs status‘
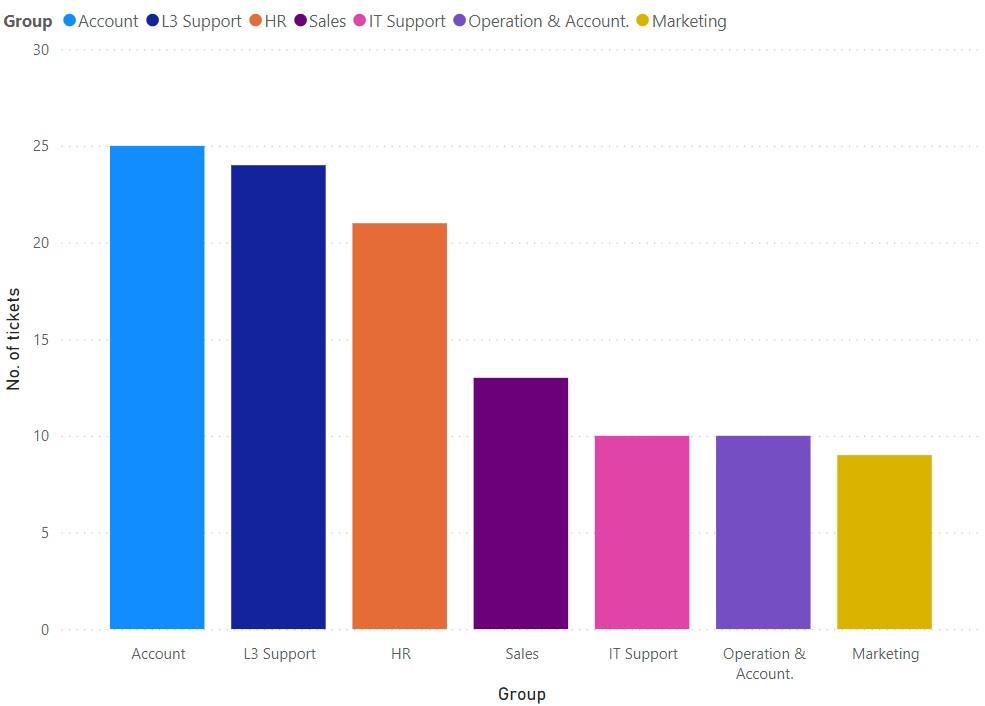
Here is another report depicting the bar graph for ‘No. of tickets vs groups‘.
Integrating Desk365 with Power BI is a strategic move for any organization looking to leverage its helpdesk data for better customer support and operational efficiency. Embrace the power of data, and watch your customer support operations reach new heights with Desk365 and Power BI integration.


