Integrate Jira with Desk365
1. Create API keys in Jira and Desk365
To integrate Jira with Desk365, you must first access the API keys in both Jira and Desk365. Follow the steps below to create API keys.
Jira:
1. Access your JIRA Account.
2. Navigate to the top-right corner of the page and click on the Settings icon, then select ‘Atlassian account settings’.
3. Go to the Security tab, and under ‘API tokens’, select ‘Create and manage API Tokens’.
4. Click the ‘Create API Token’ button to generate an API key for your account.
Here’s the direct link where you can create an API key from:
https://id.atlassian.com/manage-profile/security/api-tokens
Desk365:
Contact us by opening a support ticket via email at support@desk365.io
2. Preconfiguring Jira and Desk365
The second step to integrate Jira with Desk365 is to create some custom fields in both Jira and Desk365. Proceed with the below steps to preconfigure your platforms.
Jira:
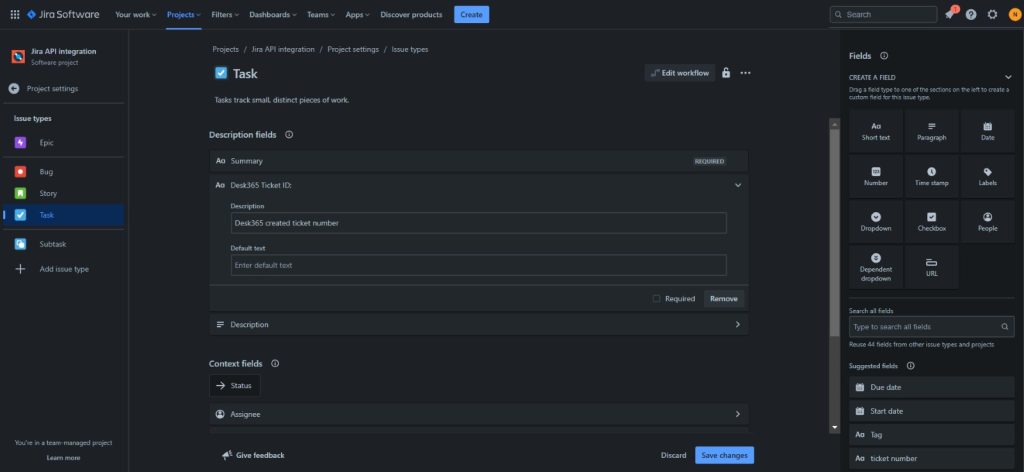
To reference the Desk365 ticket number in Jira, you need to create a custom field named ‘Desk365 Ticket ID’. Follow the steps below to create the custom field.
1. Go to your JIRA project and click on ‘Project settings’ in the left panel.
2. Select ‘Issue types’ on the left panel, where you can create a custom field under the ‘Task’ issue type.
3. Click on ‘Task’ and then choose ‘Short text custom field’ on the right side in the ‘Fields’ panel.
4. Name the field as ‘Desk365 Ticket ID,’ add a description, and leave the default text blank.
5. Finally, click on ‘Save Changes’ to save your custom field configuration.
Desk365:
In the same way, to reference the Jira issue ID in Desk365, follow these steps to create a custom field named ‘Jira ID’.
1. Access your Desk365 Agent Portal and click on ‘Settings.’
2. Under the ‘Admin’ section, select ‘Ticket Fields.’
3. Add a ‘Text Input’ custom field and label it as ‘Jira ID’ for both agents and contacts.
4. Finally, click ‘Save’ to apply the changes.

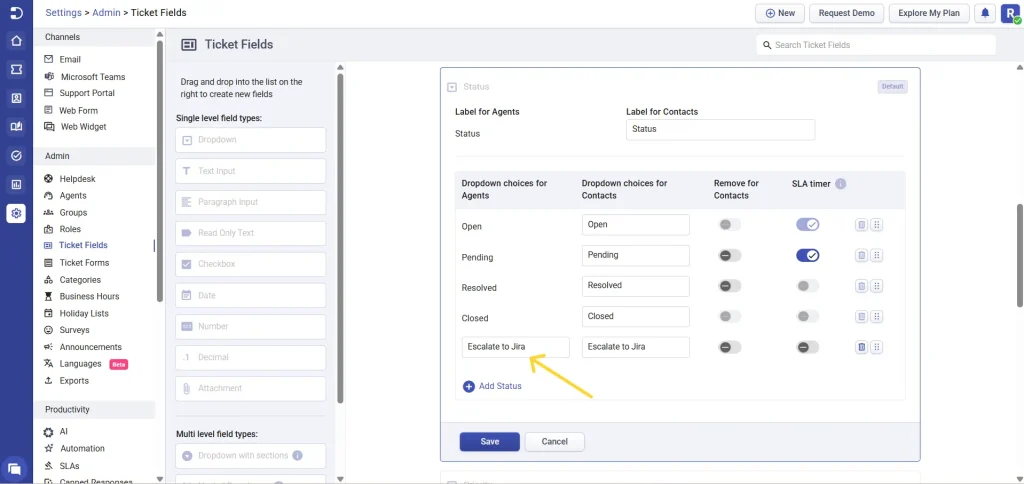
To facilitate the creation of a Jira issue from Desk365, it’s necessary to establish a custom status called ‘Escalate to Jira’. This way, when the ticket status is changed to ‘Escalate to Jira’, it will trigger the creation of a Jira issue.
1. Navigate to Settings > Ticket Fields, similar to how you created the ‘Jira ID’ field as mentioned above.
2. Select ‘Status’ and then click on ‘Add Status.’
3. Create a custom status named ‘Escalate to Jira’ and click the ‘Save’ button.
3. Create automation rules in Jira and Desk365
You need to create three Automation rules in both Desk365 as well as Jira. Follow the below steps in order to integrate Jira with Desk365 and to perform the bi-way syncing.
Desk365:
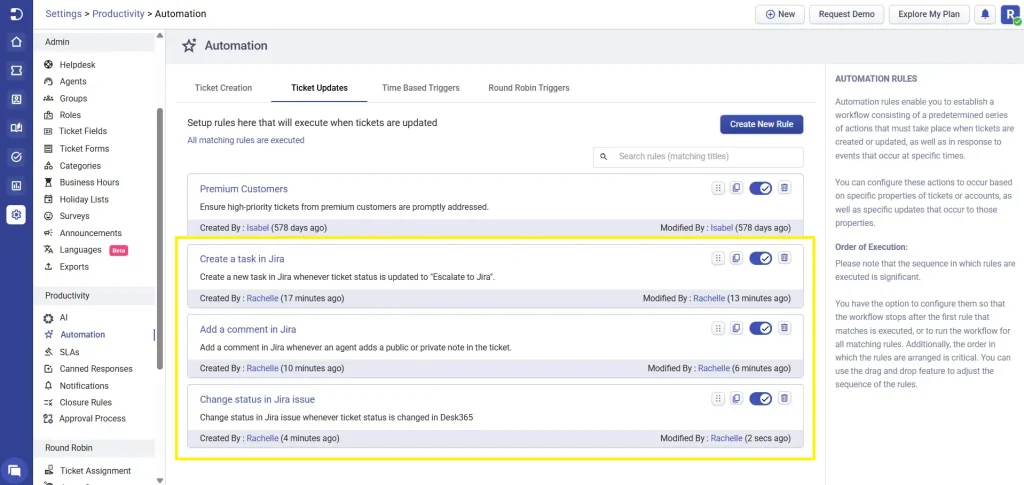
Automation Rule 1: Creating a rule to generate a Jira task whenever a ticket’s status is changed to ‘Escalate to Jira.’
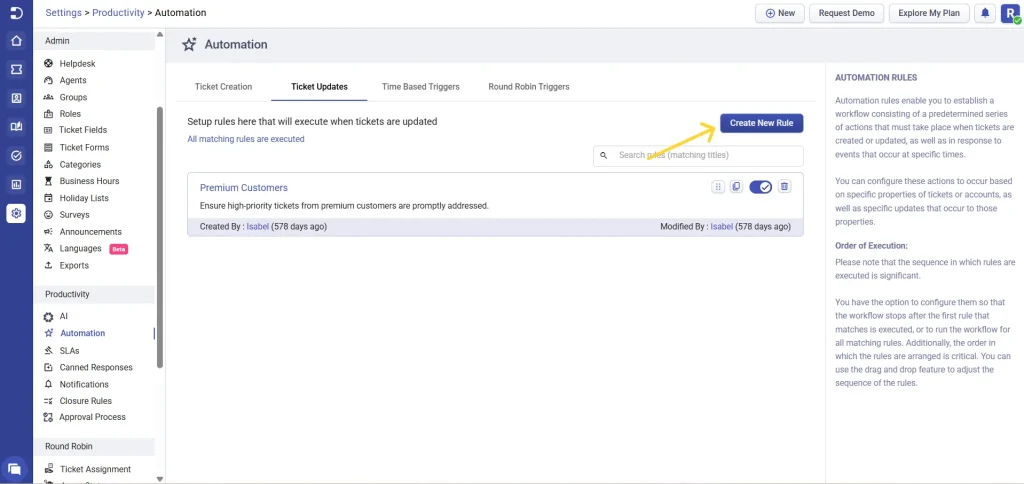
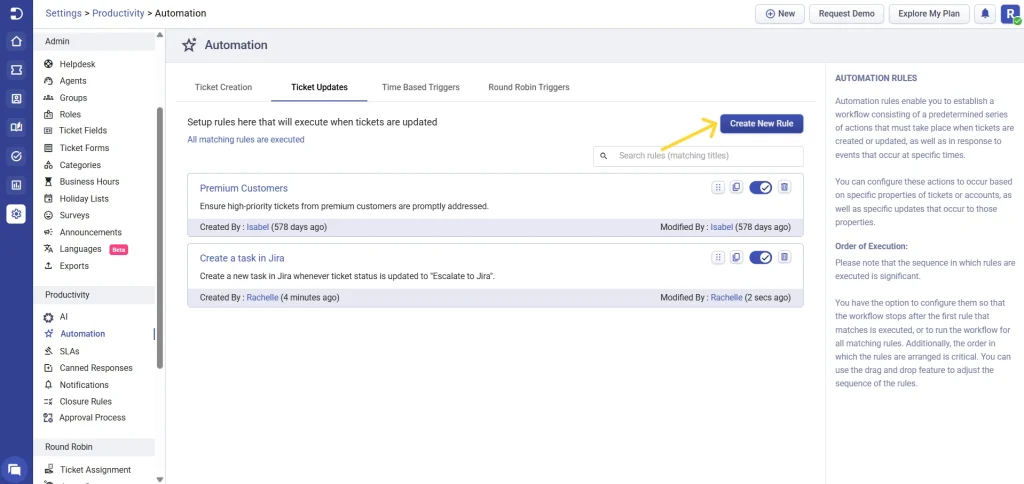
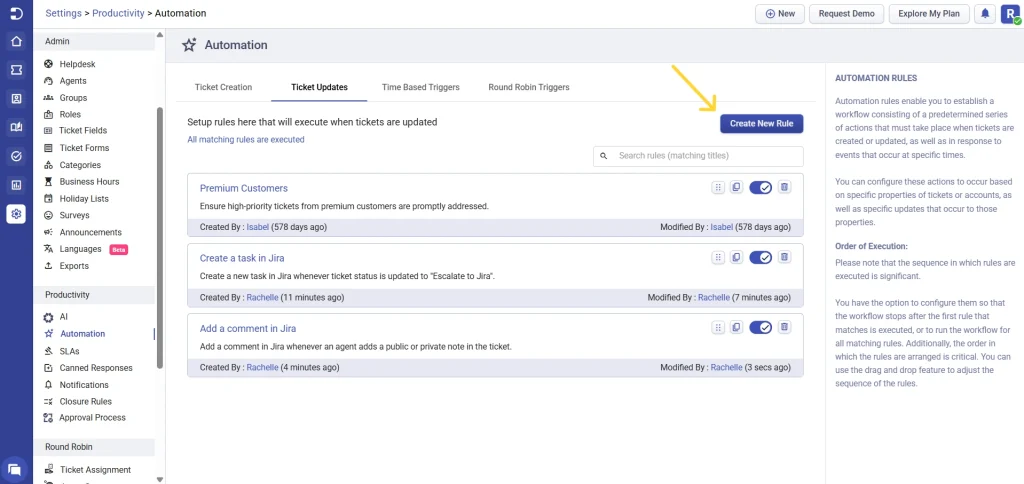
1. In Desk365, Navigate to Settings > Productivity > Automation.
2. Under Ticket Updates tab, click on ‘Create New Rule’.
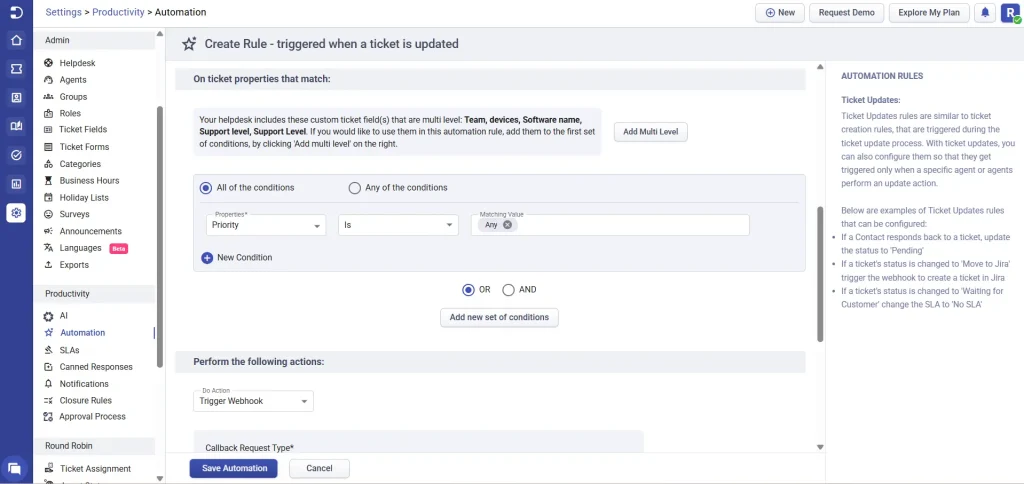
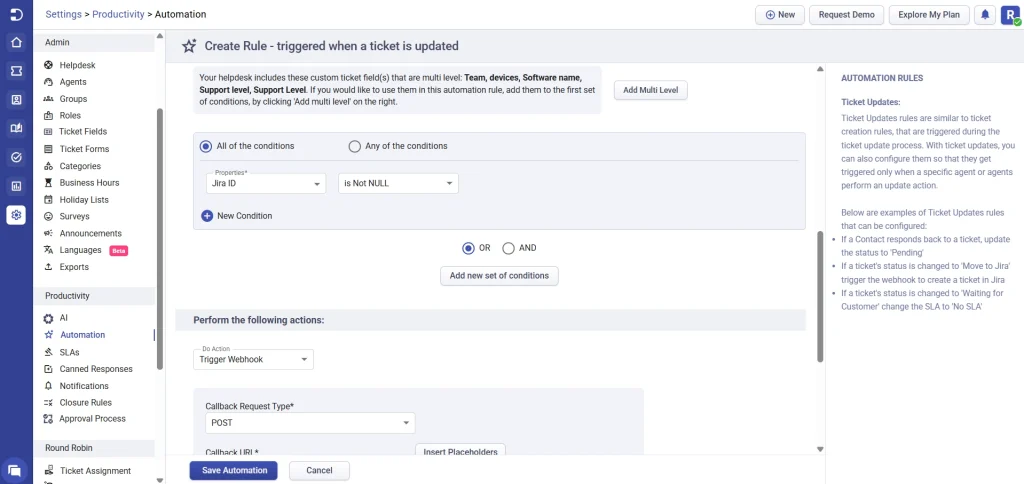
3. Enter the rule name and description and under ‘Involves any of these updates’ choose the event as ‘Status is changed’ from ‘Any Status’ to ‘Escalate to Jira’ as depicted below.

4. Select ‘Priority as Any’ under ‘On ticket properties that match’ and choose ‘Trigger Webhook’ as the action, as depicted below.
5. Configure Trigger Webhook with the help of the following steps.
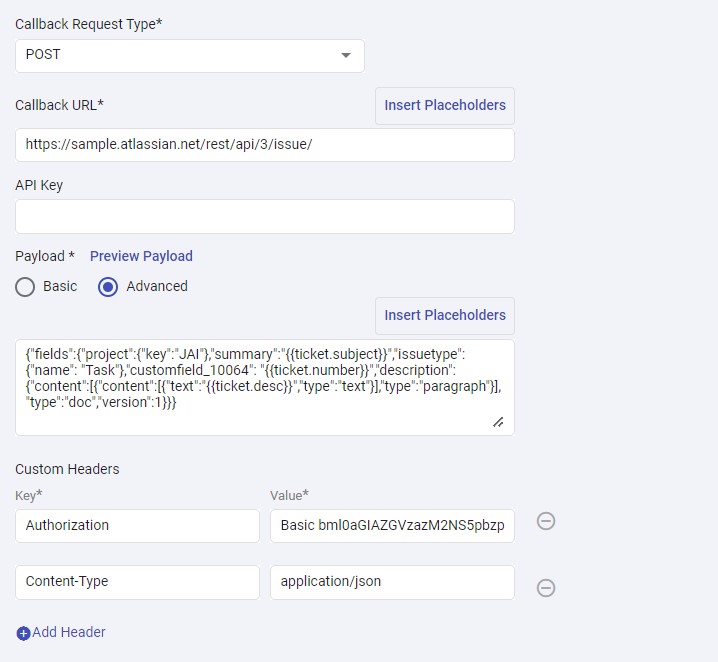
i) Select Callback Request type as ‘POST’.
ii) Enter the Callback URL as
https://<<YOURJIRADOMAIN>>.atlassian.net/rest/api/3/issue/
iii) Leave API Key field as blank and click on ‘Advanced’ under Payload section.
iv) Add Body as:
					{
	"fields": {
		"project": {
			"key": "<<PROJECTKEY>>"
		},
		"summary": "{{ticket.subject}}",
		"issuetype": {
			"name": "Task"
		},
		"<<CUSTOM FIELD NAME'S ID CREATED IN JIRA>>": "{{ticket.number}}",
		"description": {
			"content": [{
				"content": [{
					"text": "{{ticket.desc}}",
					"type": "text"
				}],
				"type": "paragraph"
			}],
			"type": "doc",
			"version": 1
		}
	}
}
(Note: PROJECT KEY – It’s the starting letters of words in your project name. For example, If your project name is ‘Jira API Integration’ then your project key is ‘JAI’. Refer to this article for more details – https://community.atlassian.com/t5/Jira-questions/How-to-get-project-key
CUSTOM FIELD NAME’S ID CREATED IN JIRA – It refers to the key of the custom field created in Jira).
v) Under Custom Headers, Add Key as ‘Authorization’ and value as ‘Basic base64encoded(<<YOUR-JIRA-EMAIL>>:<<YOUR-JIRA-APIKEY>>)’.
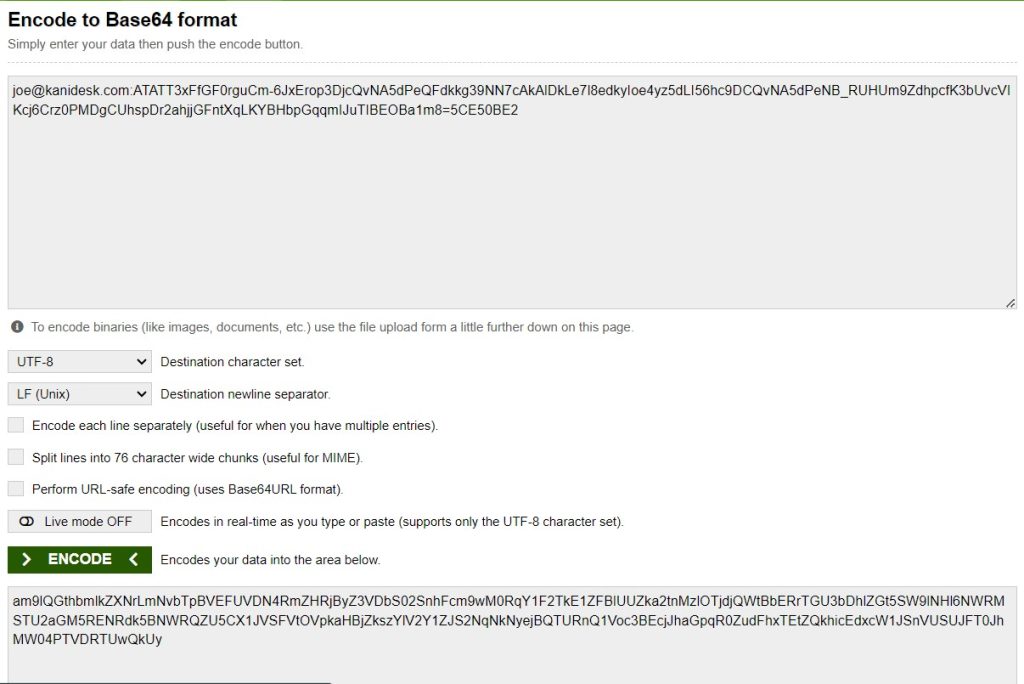
To encode: Convert Jira API key to base64 encoded format.
Steps to convert:
1. Go to this link: https://www.base64encode.org/
2. Paste in the field: <<YOUR-JIRA-EMAIL>>:<<YOUR-JIRA-APIKEY>> and click on ‘Encode’.
3. Now copy the encoded value and paste it in the value as “Basic <<copiedEncodedCode>>”.
vi) Add another key as ‘Content-Type‘ and value as ‘application/json‘.
vii) Click on ‘Save Automation’.
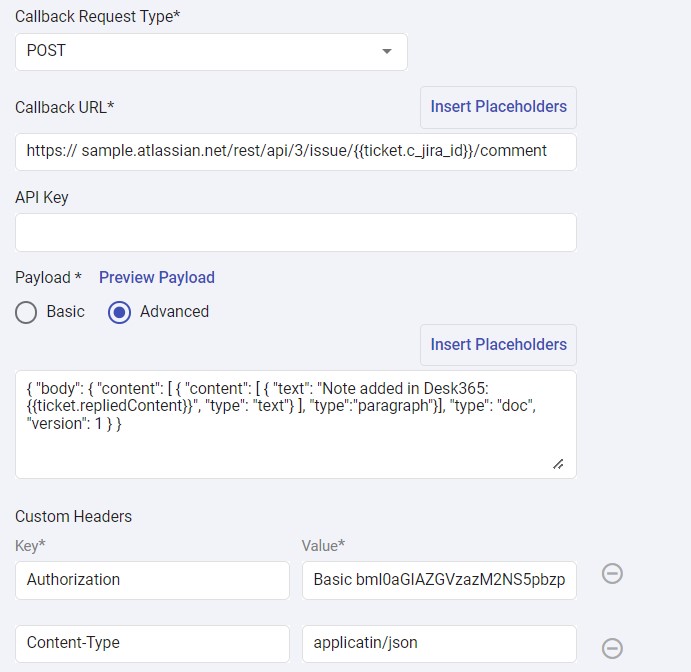
Automation Rule 2: Creating a rule which adds comment in Jira issue whenever an agent adds a private or public note in Desk365 ticket
1. In Desk365, Navigate to Settings > Productivity > Automation.
2. Under Ticket Updates tab, click on ‘Create New Rule’.
3. Enter the rule name and description and under ‘Involves any of these updates’ choose events as ‘Private Note Added’ and ‘Public Note Added’.

4. Select ‘Jira ID is Not NULL’ under ‘On ticket properties that match’ and choose ‘Trigger Webhook’ as the action in ‘Perform the following actions,’ as depicted below.
5. Configure Trigger Webhook with the help of the following steps.
i) Select Callback Request type as ‘POST’.
ii) Enter the Callback URL as
https://<<YOURJIRADOMAIN>>.atlassian.net/rest/api/3/issue/{{ticket.c_jira_id}}/comment
iii) Leave API Key field as blank and click on ‘Advanced’ under Payload section.
iv) Add Body as:
					{
	"body": {
		"content": [{
			"content": [{
				"text": "Note added in Desk365: {{ticket.repliedContent}}",
				"type": "text"
			}],
			"type": "paragraph"
		}],
		"type": "doc",
		"version": 1
	}
}
v) Under Custom Headers, Add Key as ‘Authorization’ and value as ‘Basic base64encoded(<<YOUR-JIRA-EMAIL>>:<<YOUR-JIRA-APIKEY>>)’.
To encode: Convert Jira API key to base64 encoded format as you did for the previous rule.
vi) Add another key as ‘Content-Type‘ and value as ‘application/json‘.
vii) Click on ‘Save Automation’.
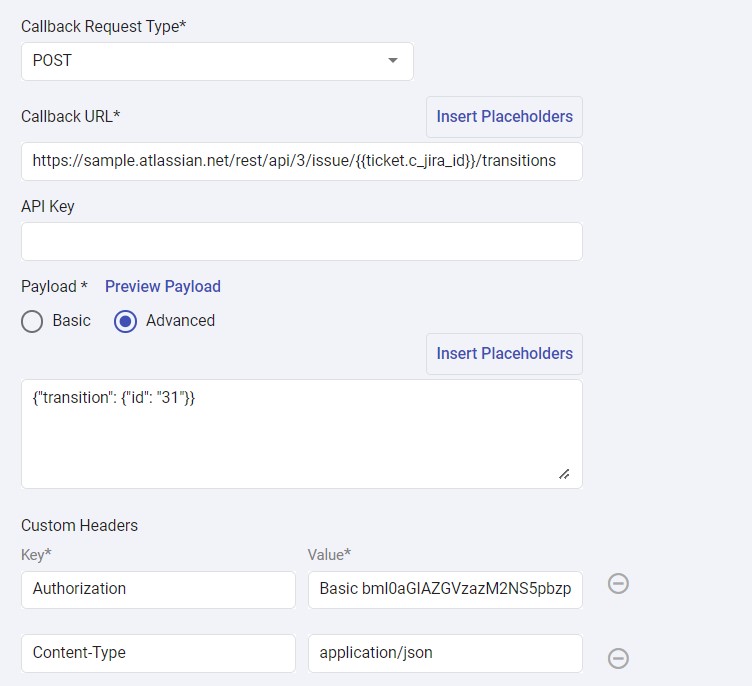
Automation Rule 3: Creating a rule which changes status to your preferred status in Jira issue whenever a ticket’s status is changed from Desk365.
1. In Desk365, Navigate to Settings > Productivity > Automation.
2. Under Ticket Updates tab, click on ‘Create New Rule’.
3. Enter the rule name and description and under ‘Involves any of these updates’ choose the event as ‘Status is Changed’ from ‘Any Status’ to ‘Resolved’.
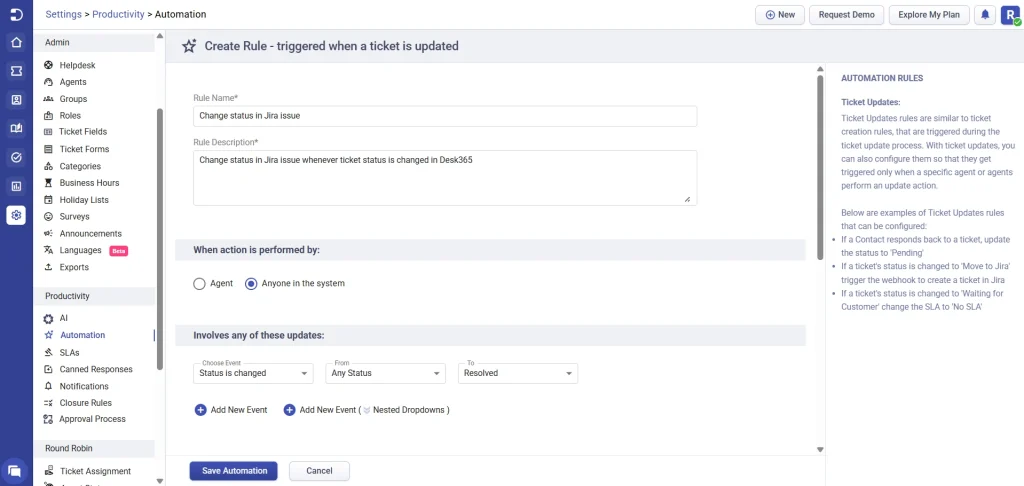
4. Select ‘Jira ID is Not NULL’ under ‘On ticket properties that match’ and choose ‘Trigger Webhook’ as the action in ‘Perform the following actions,’ as depicted below.

5. Configure Trigger Webhook with the help of the following steps.
i) Select Callback Request type as ‘POST’.
ii) Enter the Callback URL as
https://<<YOURJIRADOMAIN>>.atlassian.net/rest/api/3/issue/{{ticket.c_jira_id}}/transitions
iii) Leave API Key field as blank and click on ‘Advanced’ under Payload section.
iv) Add Body as:
					{
	"transition": {
		"id": "31"
	}
}
v) Under Custom Headers, Add Key as ‘Authorization’ and value as ‘Basic base64encoded(<<YOUR-JIRA-EMAIL>>:<<YOUR-JIRA-APIKEY>>)’.
To encode: Convert Jira API key to base64 encoded format as you did for the previous rule.
vi) Add another key as ‘Content-Type‘ and value as ‘application/json‘.
vii) Click on ‘Save Automation’.
You are all set with the automation rules in Desk365. Make sure these three rules have been set as depicted below.
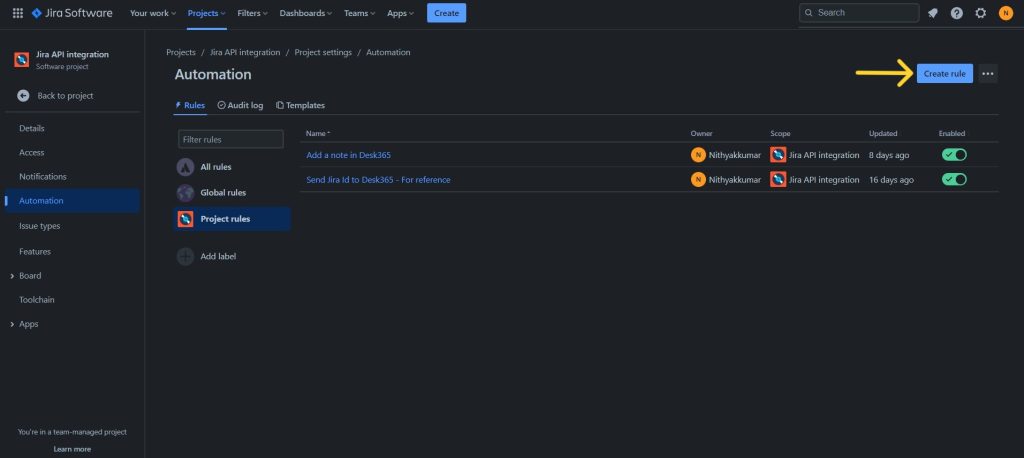
Jira:
Automation Rule 1: Creating a rule that automatically retrieves the JIRA issue ID whenever a task is generated through the Desk365 Automation rule, making it accessible for referencing within Desk365 tickets as Jira ID.
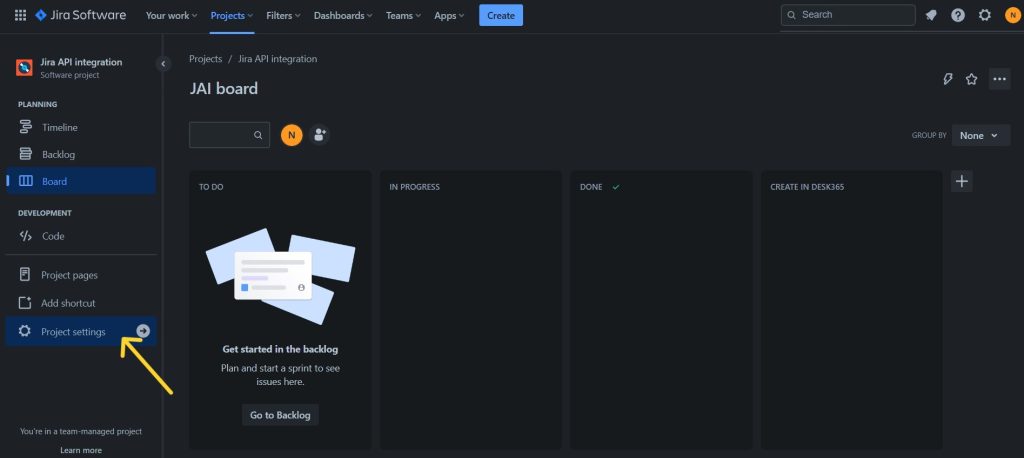
1) Navigate to your Jira Project and subsequently select the ‘Project Settings’ option
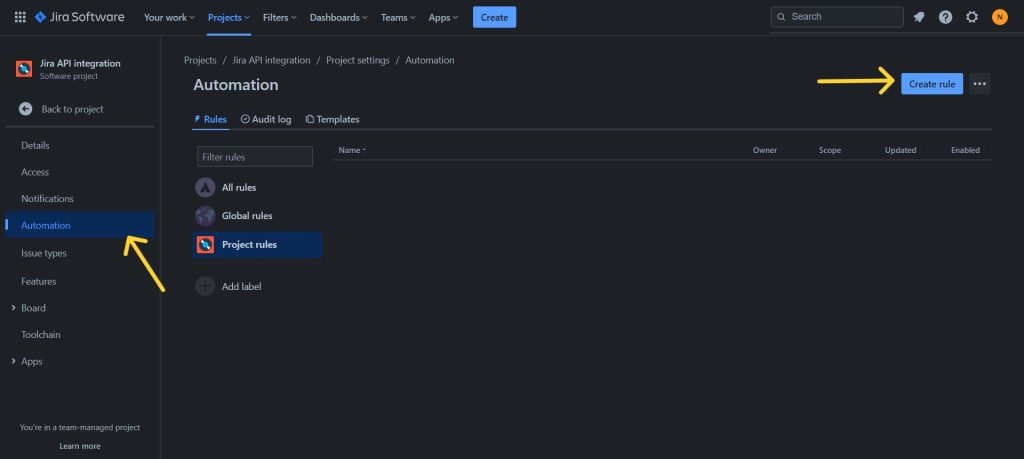
2) Select ‘Automation’ and then click on ‘Create rule’ as illustrated below.
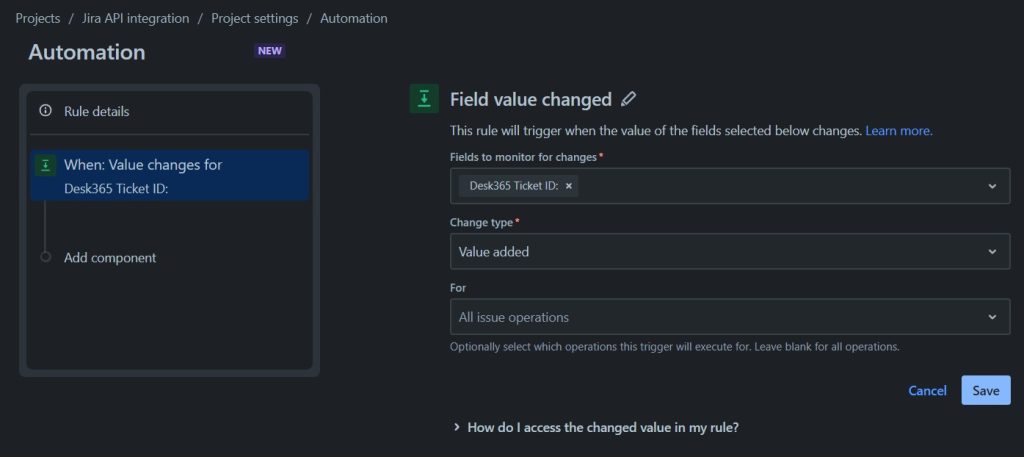
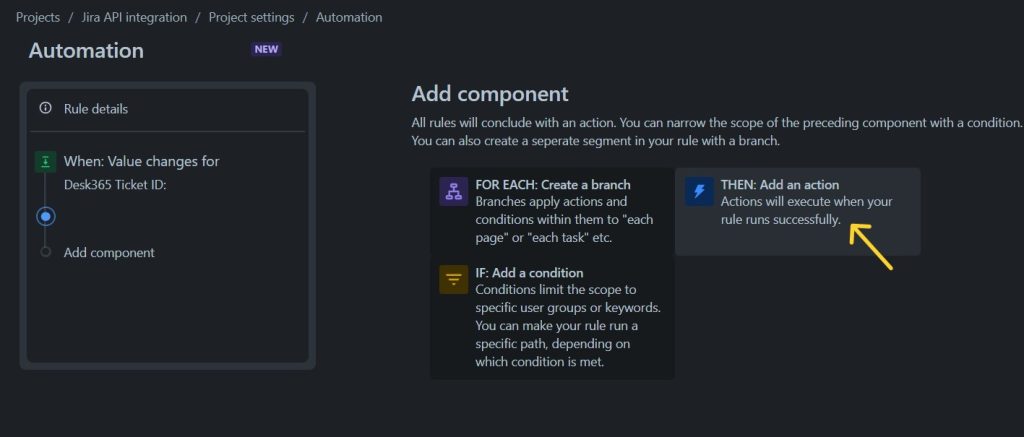
3) Choose the ‘Field value changed’ option as the event, pick the ‘Desk365 Ticket ID:’ as the field to monitor for changes, select the ‘Value Added’ option under the Change type field, and finally, click ‘Save.’
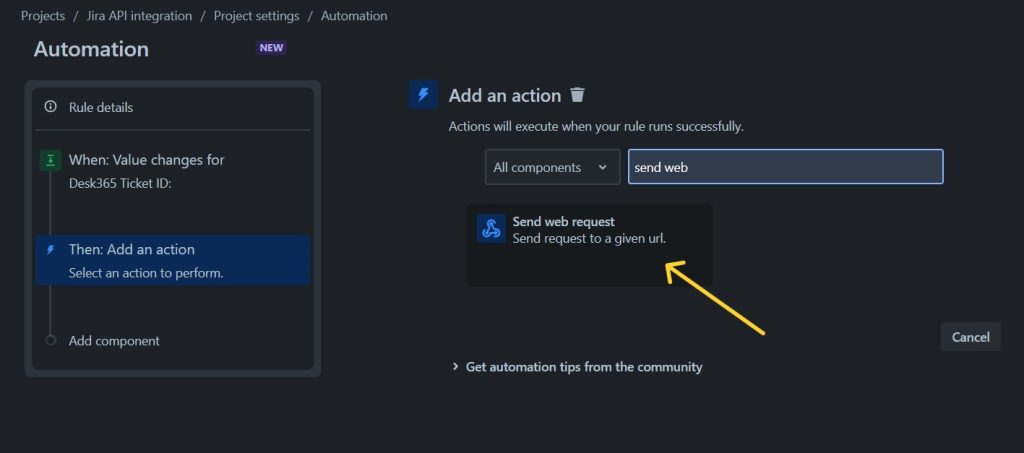
4) Now, select ‘THEN: Add an action’ under ‘Add component’.
4) Perform a search for ‘Send web request’ within the ‘Add an action’ section, and then proceed to click on it.
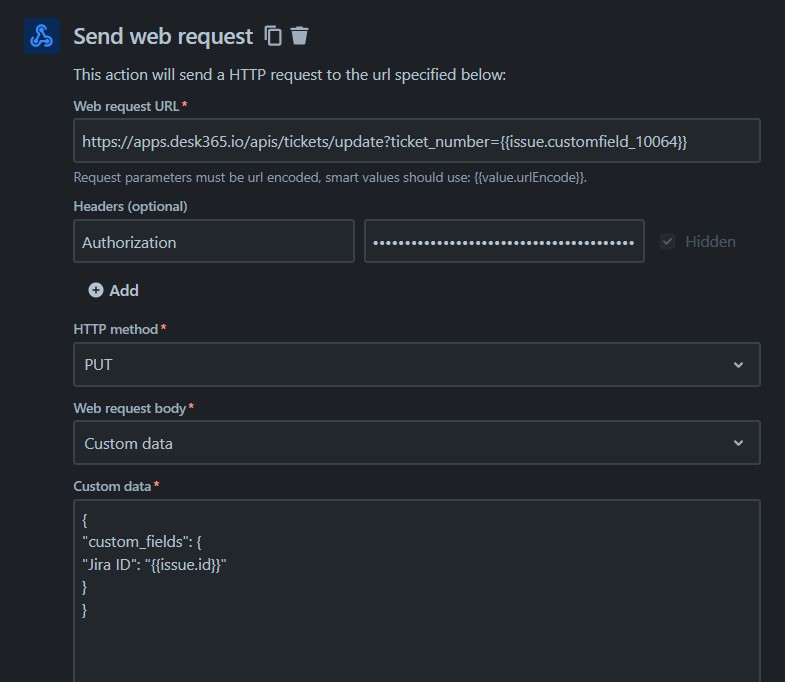
5) Now enter the details as mentioned below.
i) Enter the Web request URL as:
https://apps.desk365.io/apis/tickets/update?ticket_number={{issue.customfield_10064}}
ii) Under Headers, Give the key as ‘Authorization’ and the value as <<YOUR-DESK365-APIKEY>>
iii) Choose the Http method as ‘PUT’ and the Web request body as ‘Custom data’.
iv) In the custom data field enter the below code:
					{

	"custom_fields": {

		"Jira ID": "{{issue.id}}"

	}

}
v) Click on ‘Save’.
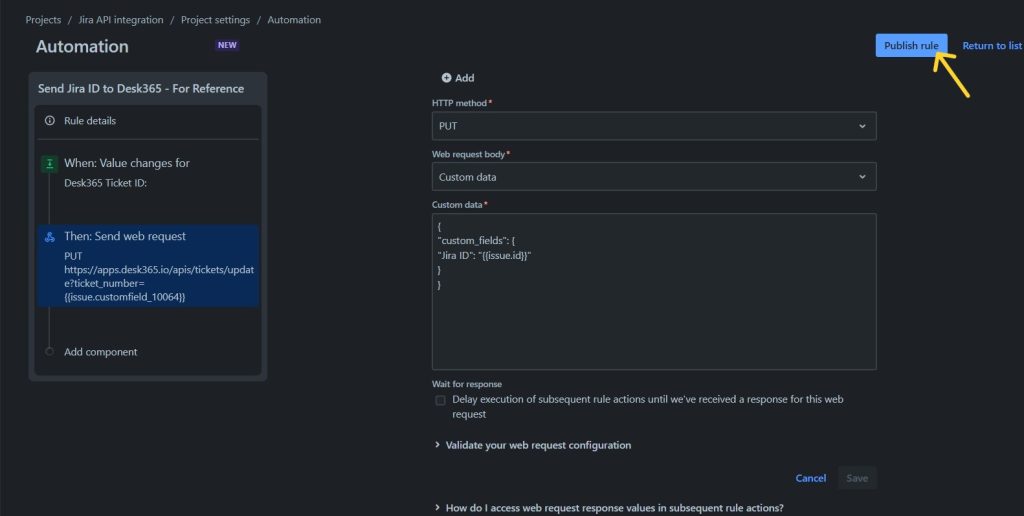
6) Add the automation rule details and give the name for your reference. Here it is given as ‘Send Jira ID to Desk365’.
7) Finally click on ‘Publish rule’.
Automation Rule 2: Creating a rule that appends a public or private note to a Desk365 ticket whenever an issue is commented from Jira.
1) Again click on the ‘Create rule’ button to create the second automation rule.

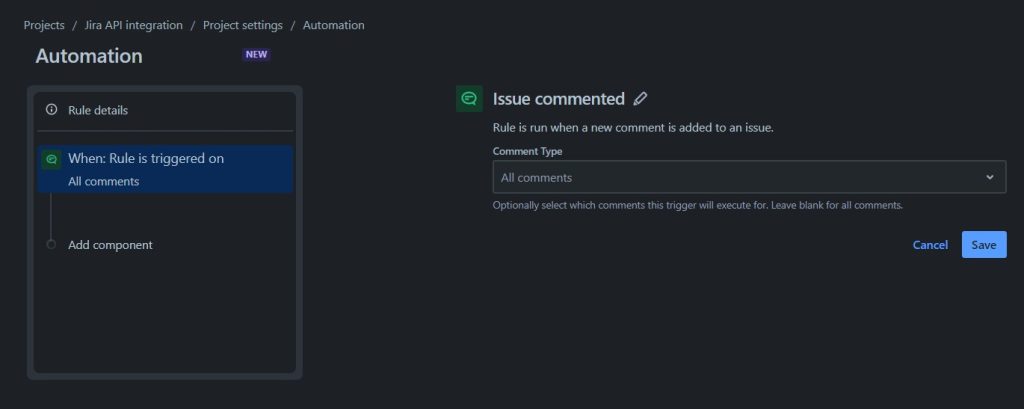
2) Choose the ‘Issue Commented’ option under Add a trigger and then choose ‘All comments’ and proceed to save.
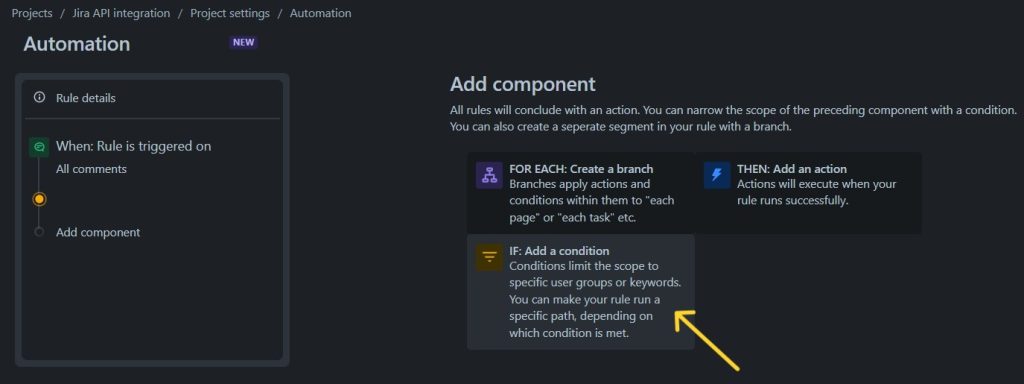
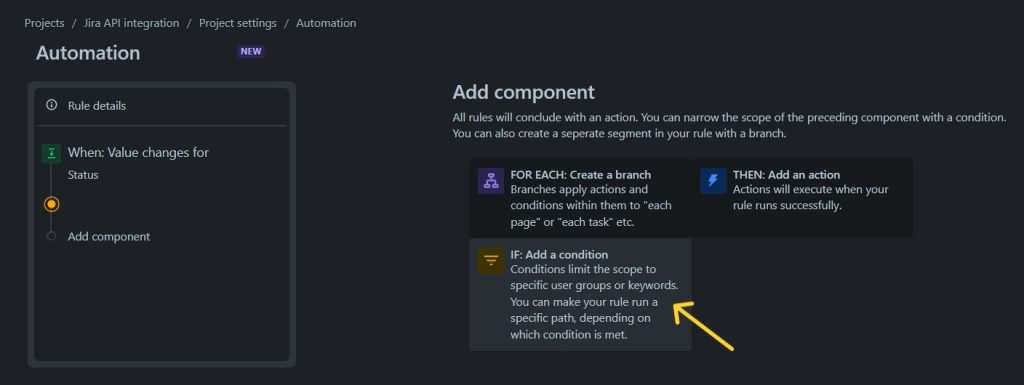
3) Select ‘IF: Add a condition’ under ‘New component’.
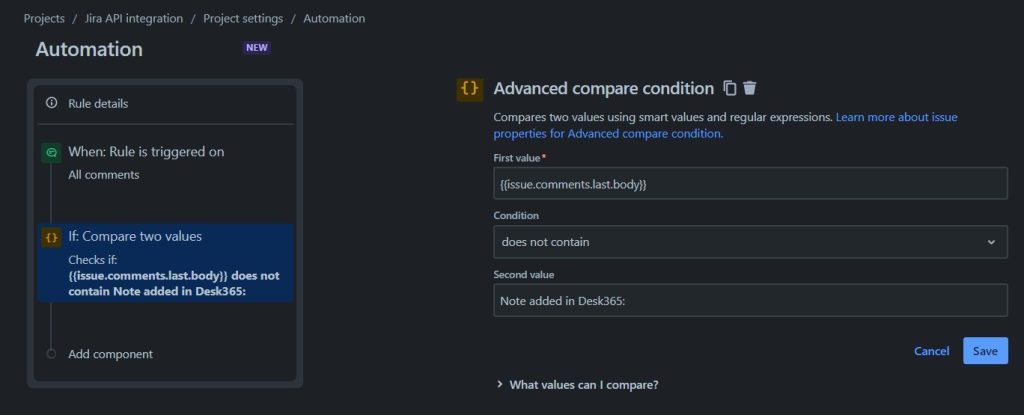
4) Proceed with ‘Advanced compare condition’. Now, enter the first value as {{issue.comments.last.body}} and second value as ‘Note added in Desk365:’ along with the condition ‘does not contain’. Click on ‘Save’.
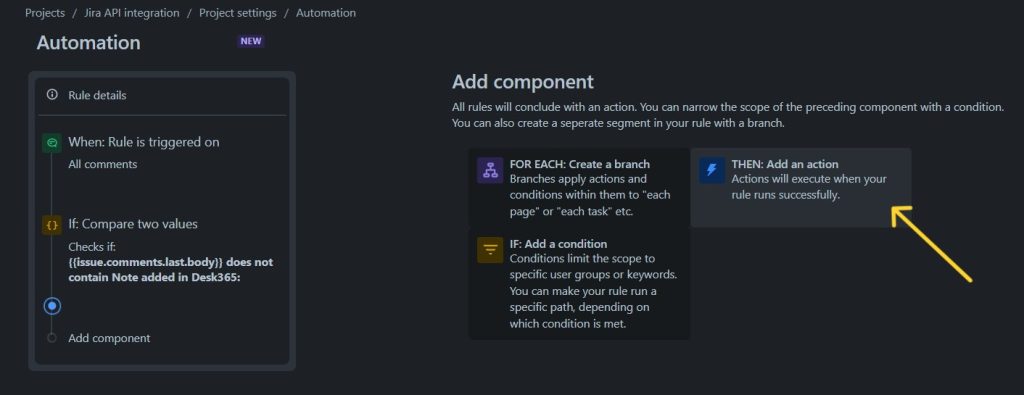
5) Now select ‘Then: Add an action’ under New component.
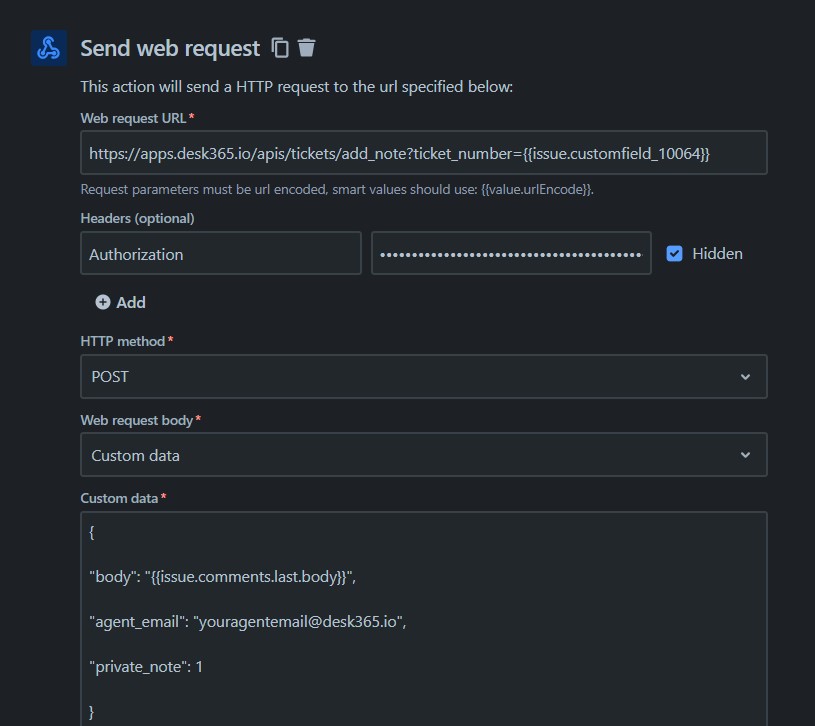
6) Select ‘Send web request’ and enter the details as mentioned below.
i) Enter the Web request URL as:
https://apps.desk365.io/apis/tickets/add_note?ticket_number={{issue.customfield_10064}}
ii) Under Headers, Give the key as ‘Authorization’ and the value as <<YOUR-DESK365-APIKEY>>
iii) Choose the Http method as ‘POST’ and the Web request body as ‘Custom data’.
iv) In the custom data field enter the below code:
					{

	"body": "{{issue.comments.last.body}}",

	"agent_email": "youragentemail@desk365.io",

	"private_note": 1

}
v) Click on ‘Save’.
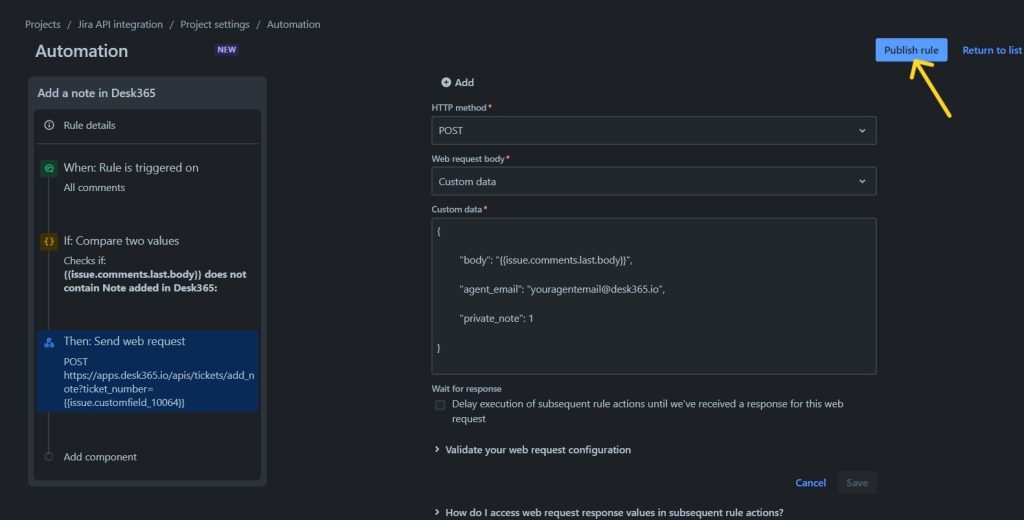
6) Add the automation rule details and give the name for your reference. Here it is given as ‘Add a note in Desk365’.
7) Finally click on ‘Publish rule’.
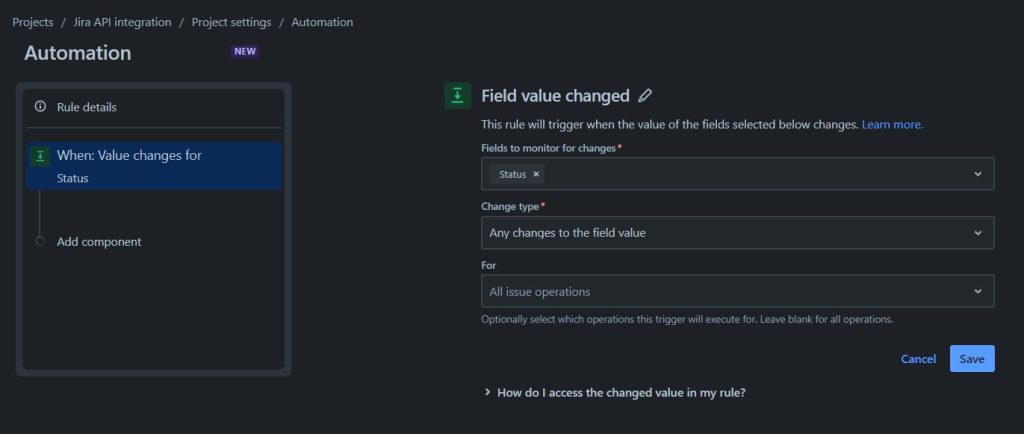
Automation rule 3: Creating a rule that updates the status of a Desk365 ticket to your preferred status whenever the status of the corresponding issue is modified in JIRA.
1) Click on ‘Create new rule’ button to create the third automation rule.
2) Choose the ‘Field value changed’ option as the event, pick the ‘Status’ as the field to monitor for changes, select ‘Any changes to the field value’ option under the Change type field, and finally, click ‘Save.’
3) Select ‘IF: Add a condition’ under ‘New component’.
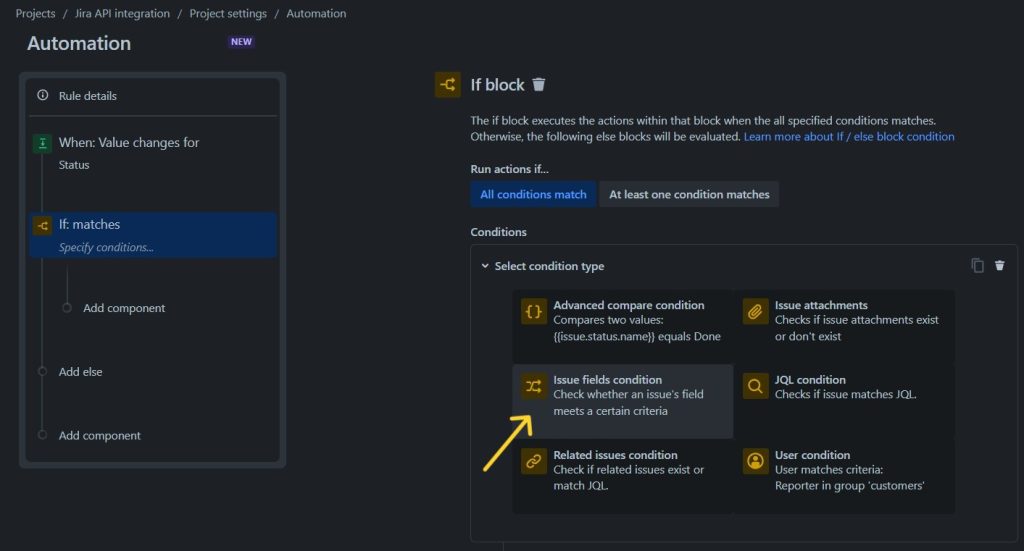
4) Proceed with ‘IF, ELSE: add condition options’ and then select ‘Issue fields condition’.
5) Choose the field as ‘Status’ and set the condition to ‘equals’ with the value as ‘IN PROGRESS’. Click ‘Save’.

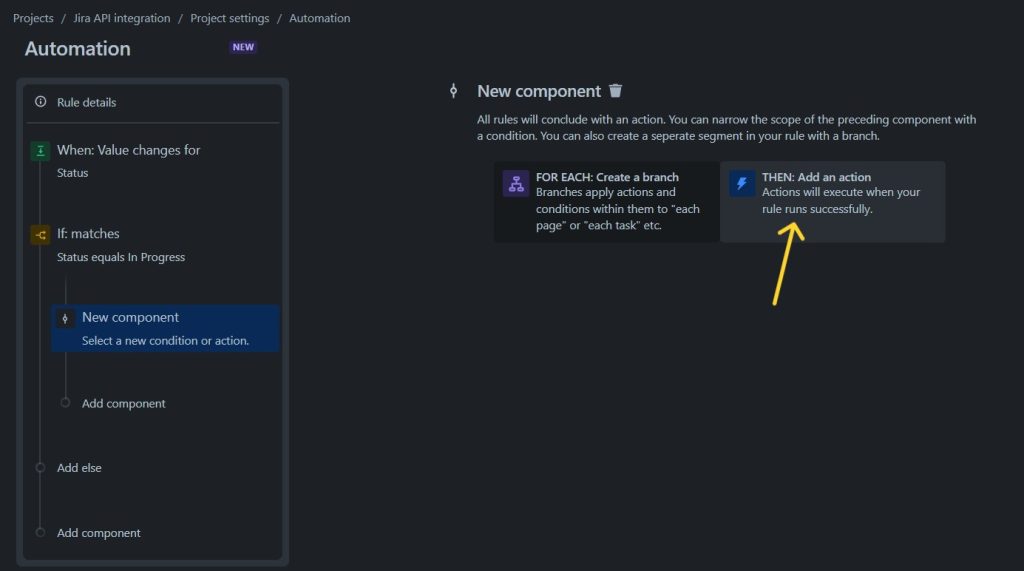
6) Under this condition add a component ‘THEN: Add an action’.
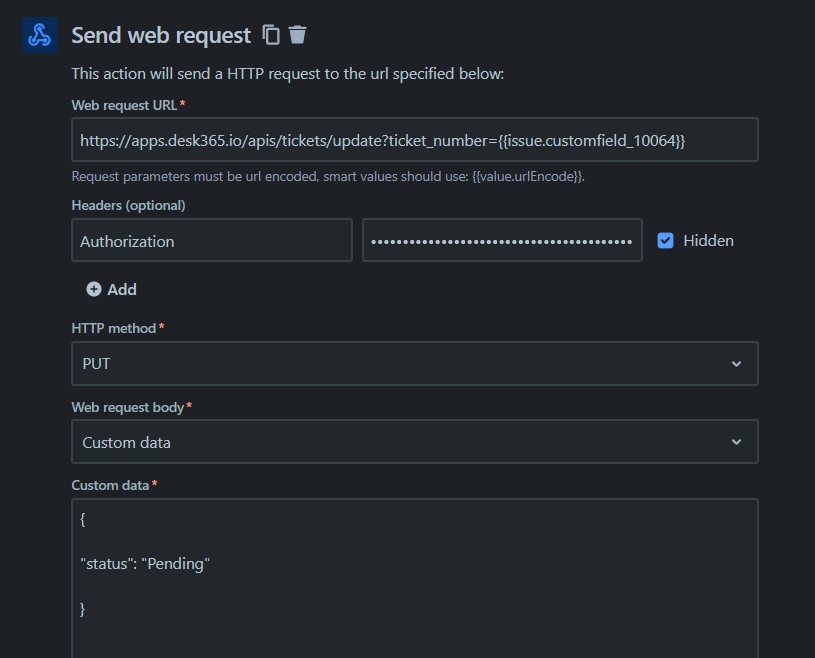
7) Select ‘Send web request’ and enter the details as mentioned below.
i) Enter the Web request URL as:
https://apps.desk365.io/apis/tickets/update?ticket_number={{issue.customfield_10064}}
ii) Under Headers, Give the key as ‘Authorization’ and the value as <<YOUR-DESK365-APIKEY>>
iii) Choose the Http method as ‘PUT’ and the Web request body as ‘Custom data’.
iv) In the custom data field enter the below code:
					{

	"status": "Pending"

}
v) Click on ‘Save’.
8) Now under Else condition choose ‘Issue fields condition’. Choose the field as ‘Status’ and set the condition to ‘equals’ with the value as ‘DONE’. Click ‘Save’
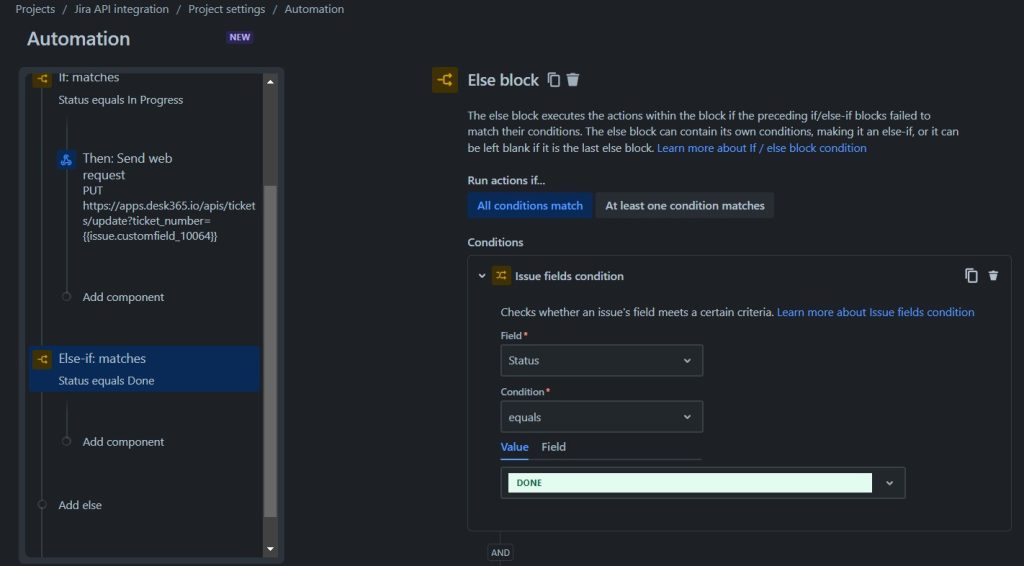
9) Repeat steps 6 and 7 by changing the custom data field to the below illustrated code.
					{

	"status": "Resolved"

}
10) Click on ‘Save’.
11) Add the automation rule details and give the name for your reference. here it is given as ‘Change the status in Desk365’.
12) Finally click on ‘Publish rule’.
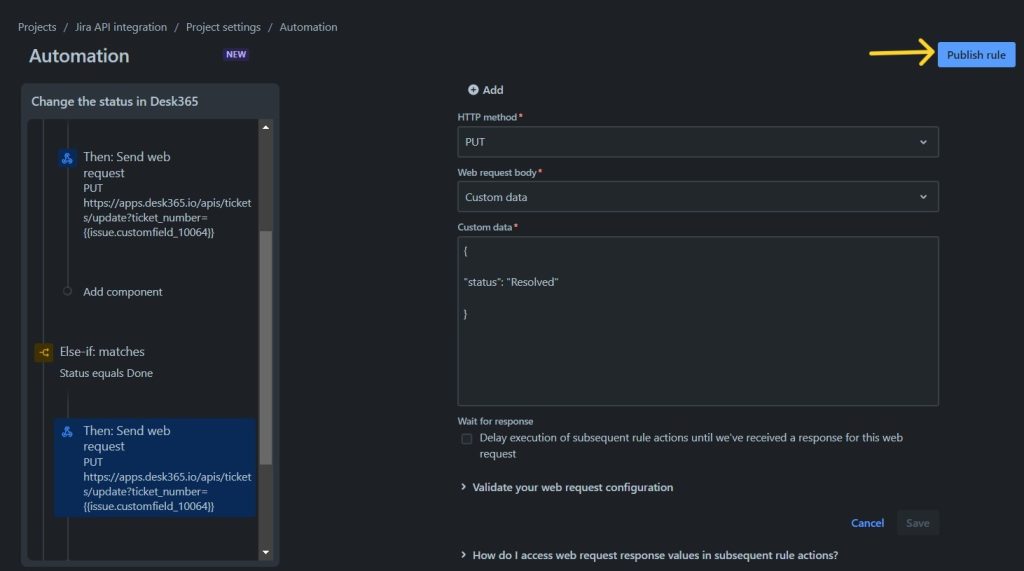
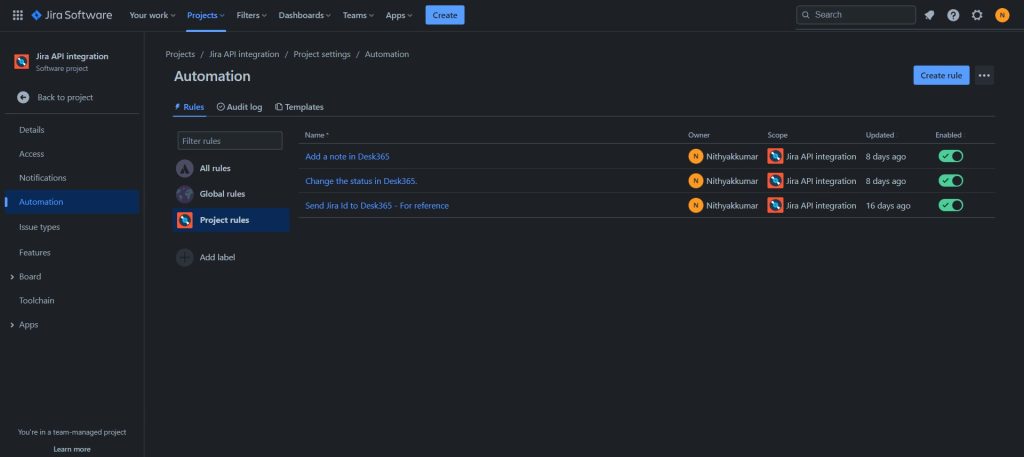
You are all set with the automation rules in Jira as well. Make sure these three rules have been set as depicted below.
Wohoo! You have successfully integrated Jira with Desk365. Enjoy your seamless experience with Desk365 integrations to the fullest!