


As a helpdesk manager, one of the key challenges you face is managing ticket volumes effectively. Your support team is responsible for handling customer enquiries and support requests, and as your business grows, the volume of tickets you receive is likely to increase.
To manage this effectively, you need insights into ticket volume trends, so you can identify patterns and make data-driven decisions about your support operations.
This is where the Ticket Trends report in Desk365 comes in. The Ticket Trends report in Desk365 gives you an overview of the overall ticket load of your helpdesk. This report allows you to view the number of tickets created within a specific time frame, and you can also customize it to compare historical data and identify patterns, trends, and areas for improvement.
With this information, you can see how ticket volumes are changing over time and identify any trends or patterns. Additionally, each metric can be analyzed based on various ticket fields, such as agent, type, priority, status, channels, category, and even custom fields that you’ve created in your helpdesk.
One of the key advantages of using a Ticket Trends report is that it allows you to identify potential issues before they become major problems. For example, if you notice a sudden spike in ticket volumes, you can investigate the cause and take action to address it before it becomes overwhelming for your team.
In addition to identifying issues, the Ticket Volume Trends report can also help you optimize your support operations. For example, if you notice that ticket volumes are increasing at certain times of day or on certain days of the week, you can adjust your staffing levels to ensure that you have enough resources to handle the increased volume.
This report gives you a comprehensive view of your support team’s performance and allows you to delve deeper into specific metrics as needed.
Some of the benefits of using a Ticket trends report are:
– Assess the performance of your support team and understand their strengths and weaknesses.
– Get valuable insights, such as how well your agents are handling high-priority tickets.
– Determine if agents are encountering difficulties with certain types of tickets and provide additional training and support as needed.
– Identify which types of tickets are taking the most time to resolve and determine if additional staffing is required to handle these types of tickets.
– Compare the number of unresolved tickets at the end of each period and quickly assess the productivity of your team.
– Allows you to track the impact of any changes you make to your helpdesk. For example, if you introduce a new Knowledge Base on your website, you can use the report to monitor if it results in a decrease in the number of tickets received.
Generating a Ticket Trends report is simple with Desk365 and well worth the effort. You can select a specific time period or date range to track your help desk metrics on a daily basis and monitor overall team performance.
Additionally, you can create custom reports based on various ticket properties, such as type, source, priority, agent, group, and custom fields, to get a quick overview of important help desk metrics through easy-to-visualize charts.
In the following section, we will provide a detailed guide on how to create a Ticket Trends Report in Desk365.
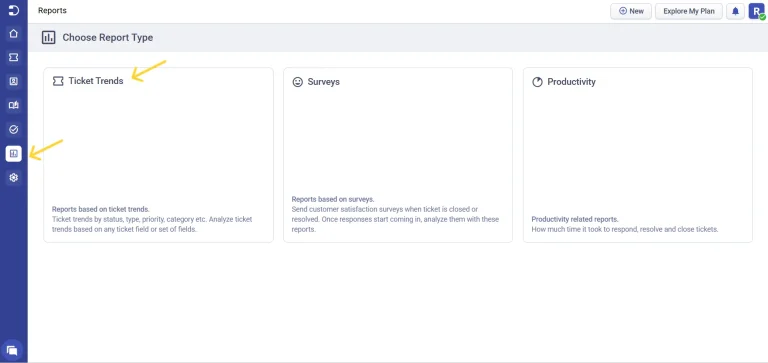
Creating a Ticket Trends Report in Desk365
Navigate to the ‘Reports’ tab in the Desk365 Agent Portal. Choose the report type as ‘Ticket Trends’.
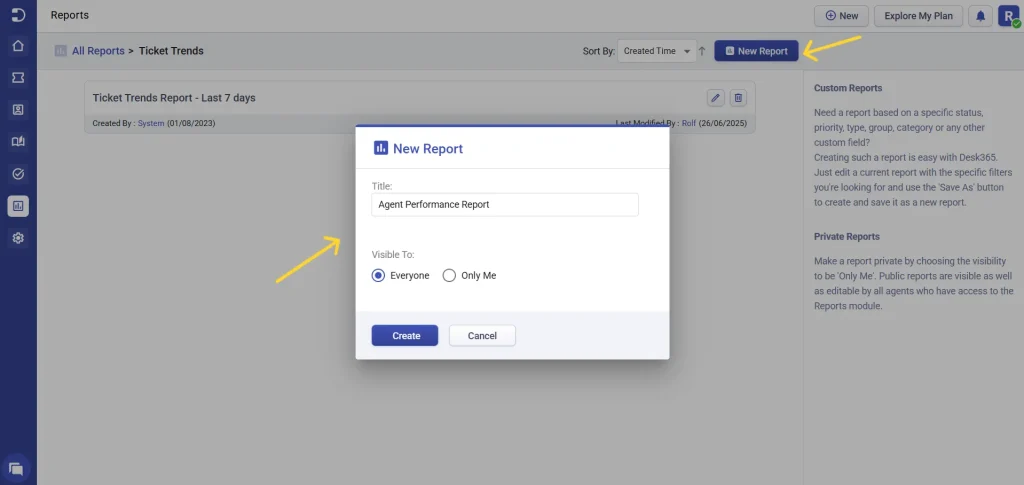
Choose the ‘New Report’ option. Provide a name for the report and click on the ‘Create’ button.
The Agent Performance report is now successfully created. You can open the report by clicking on it.
As you see in the screenshot below, this is the report default view for the last 7 days.
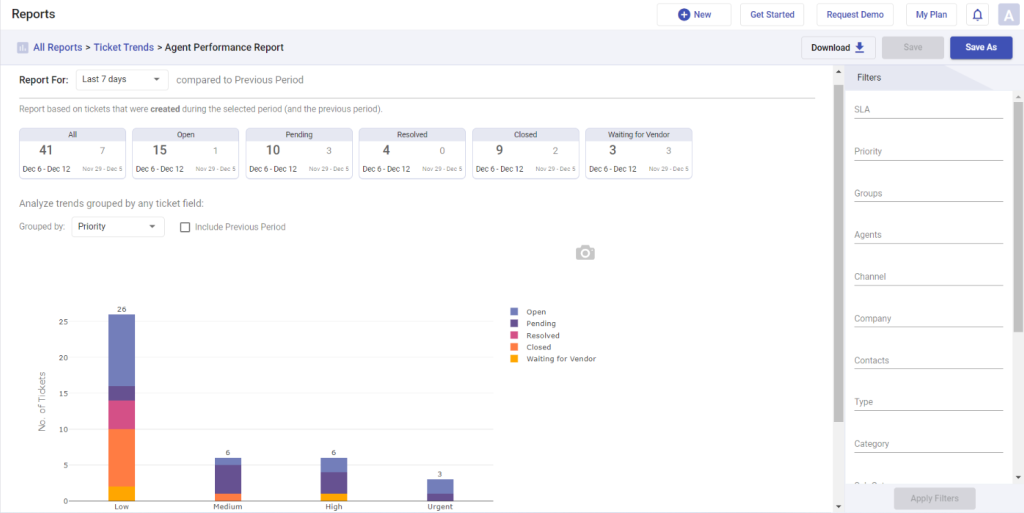
Let’s drill down on this report further by choosing the ‘Filters’ in the right side.
You can filter tickets by agents, SLA, priority, status, groups, channels, use a combination of different options, and more.
For this example, we aim to assess the performance of each agent on a monthly basis and identify patterns in the data that could indicate any challenges they are encountering.
Identifying these challenges will allow us to provide extra training and support to keep employees motivated and improve their performance.
In the right side ‘Filters’ section, choose ‘Andy’ as the agent and click on the ‘Apply Filters’ button.
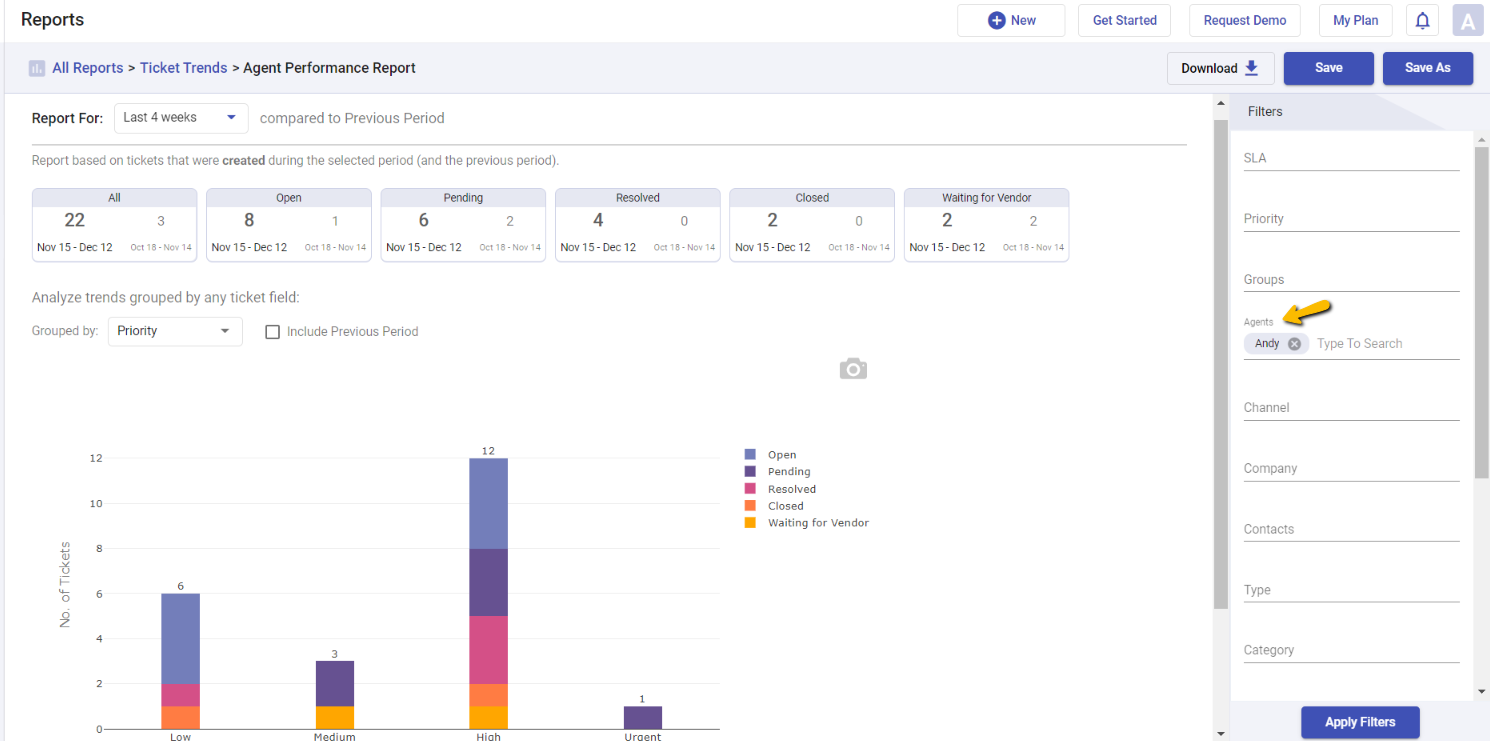
As you see in the screenshot, this is the report default view for the last 4 weeks for the Agent ‘Andy’.
The number (22), which is in bold, denotes the total number of tickets assigned to the agent ‘Andy’ in the current time period [Nov 15 – Dec 12]
The number (3), which is slightly grey colored, denotes the total count of the tickets received during the previous time period [Oct 18 – Nov 14].
You can clearly see that the number of tickets assigned to agent ‘Andy’ has significantly risen by approximately 634% during the current time period.
This is a noteworthy observation, and you should ensure that the agent is comfortable handling this increased workload. It is also clear from the report that the agent has some open and pending tickets assigned to them.
Grouped by Field
To analyze ticket trends based on a particular ticket field, select the ‘Grouped by’ field in the report.
For instance, if you want to determine which group received the highest number of tickets in the past month, you can choose ‘Groups’ from the dropdown menu in the ‘Grouped by Field’ option.
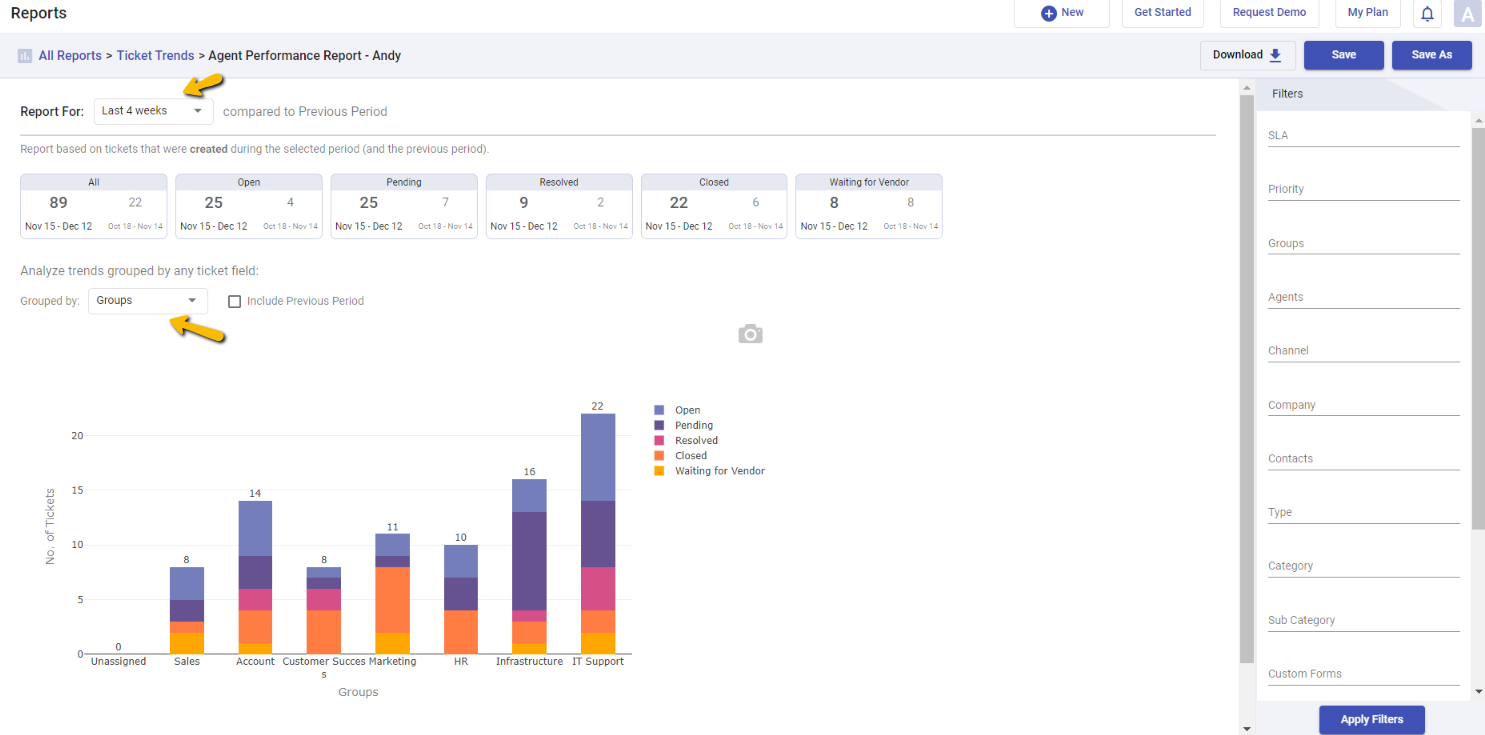
The charts clearly indicate that the ‘IT Support’ group has received the highest number of tickets, followed by the ‘Infrastructure’ and ‘Account’ groups.
To compare this data with the previous period, select the ‘Include Previous Period’ option.
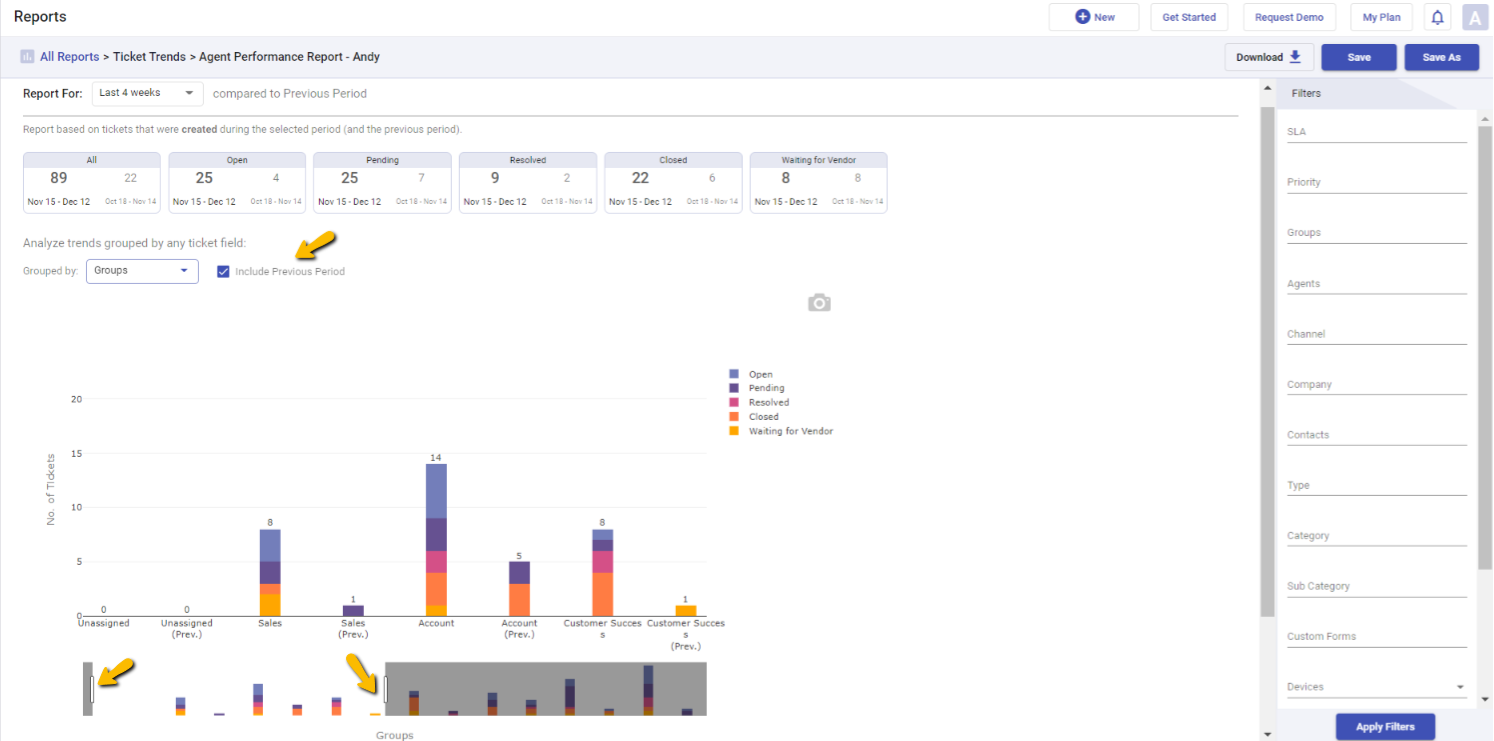
There is a drag slider feature that you can use as shown by the yellow arrows at the bottom of the screenshot.
In the first screenshot, the sliders are positioned so that all the groups appear in a single frame.
In the second screenshot, the left part of the slider is kept in the beginning. As you can see, ‘Sales’ is the first group to be displayed.
In the screenshot below, we moved the right part of the slider till the end so that the data up to the group ‘IT Support’ is displayed widely.
This enables you to view specific groups in charts in more detail.
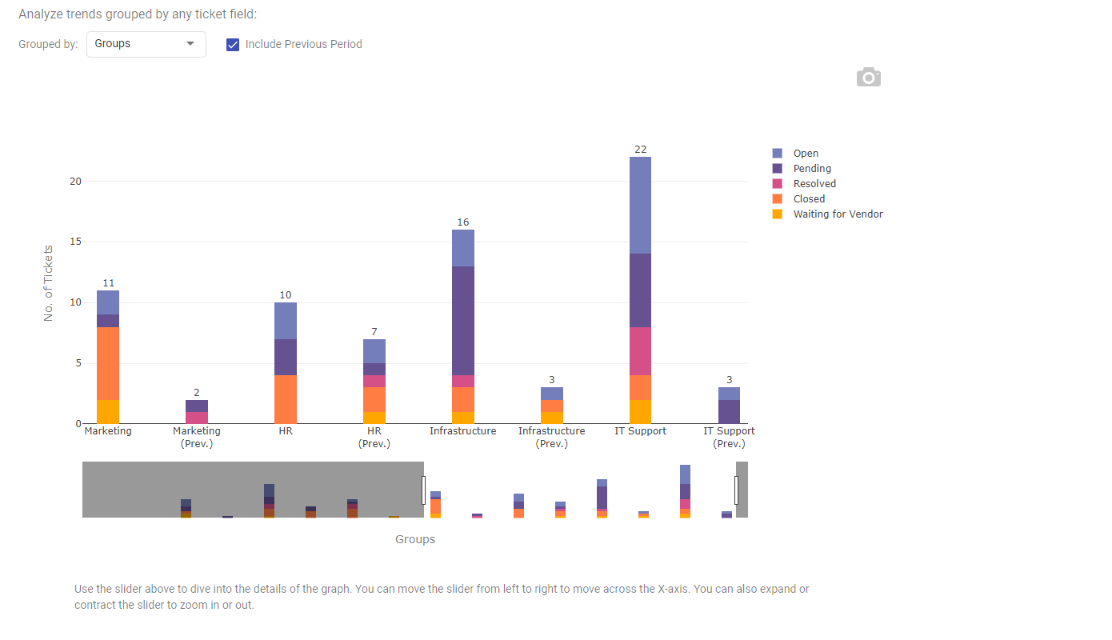
You will observe that the ‘HR’ group has received a similar number of tickets in both time periods. However, for the rest of the groups, the total number of tickets has significantly increased in the current period compared to the previous period, which is something to be observed.
Continue to monitor the data to determine if additional agents need to be recruited for other groups or if certain types of group tickets are taking longer to resolve.
Moreover, you can save the chart as a .png image by clicking on the camera icon.
Overall, the ticket trends report allows you to identify problem areas within your helpdesk and determine where you should focus your efforts to improve performance and better serve customers.
By identifying these trends, we can prioritize our resources and work to resolve these issues more efficiently in the future.
With this information at your fingertips, you can make data-driven decisions that will help you provide better support to your customers and improve your team’s efficiency and productivity.
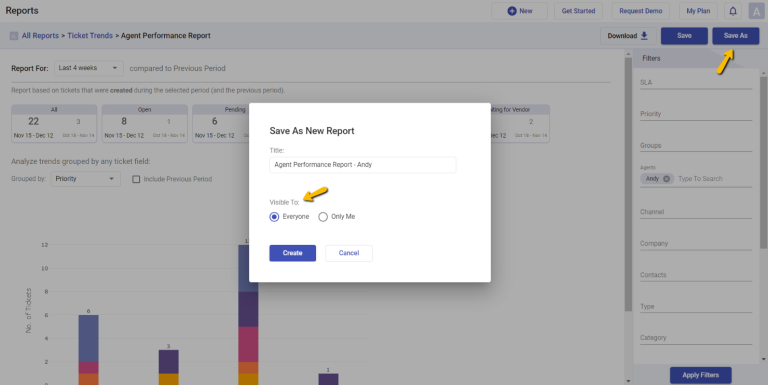
'Save As' option to create new reports
Since we have modified the original report to display only the ticket volume data of Agent ‘Andy’, let’s save this report so that you don’t need to recreate the report from scratch manually.
Click the ‘Save As’ button located at the top to save the report as a new one.
After clicking the ‘Save As’ button, a dialog box named ‘Save As New Report’ will appear.

Provide a name for the report and choose the visibility settings for it. Click on the ‘Create’ button to create the ‘Agent Performance Report – Andy’.
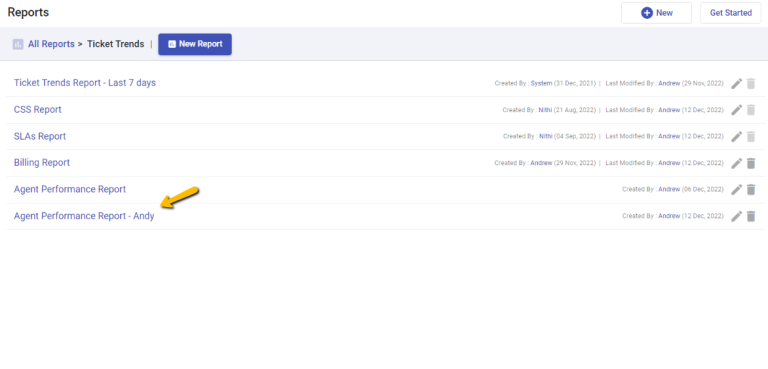
‘Agent Performance Report – Andy’ is now successfully created and available in the reports section along with the other reports that you’ve created in your helpdesk.
You can click on it to open and view the report.
You’ll notice that the settings are automatically saved and you don’t need to create a report from scratch again. It saves a ton of precious time for you.

Suppose you want to further refine the report to show only tickets with ‘Urgent’ and ‘High’ priority assigned to the agent ‘Andy’ within the past 4 weeks.
In that case, you can simply add ‘Urgent’ and ‘High’ to the ‘Priority’ filter and then click on the ‘Apply Filters’ button to accomplish this.
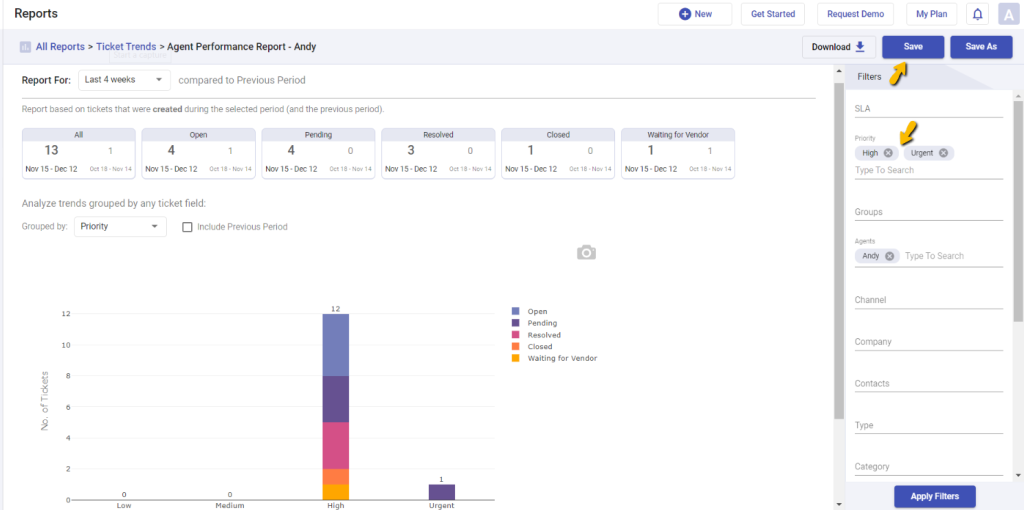
You’ll notice that the data has now been modified as we have added extra conditions in the ‘Filters’ menu.
By clicking on the ‘Save’ button, you can save this report and update the current version. This means you don’t need to apply these conditions again in the report, as they will be automatically saved for future use.
When you reopen the ‘Agent Performance Report – Andy’, you will see that the configurations you made earlier have been automatically saved and are now correctly displayed in the report.

This is just a single report that we’ve created. You can also create multiple reports for individual agents and track their help desk metrics to analyze ticket trends over time. This will help you identify if they require any assistance to improve their support performance.
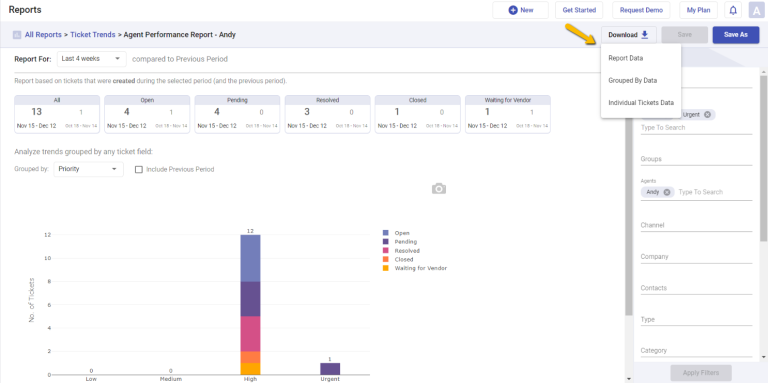
Downloads
There are three download options available for you to choose from.
(i) Report Data: Get the summary of the report data in an Excel sheet in .csv format.
(ii) Individual Tickets Data: Get a detailed overview data of the filter you applied in an Excel sheet.
(iii) Grouped By Data: Get grouped by data of any particular ticket field you want to collect in an Excel sheet in .csv format.
Private Reports
Make a report private by choosing the visibility settings to be ‘Only Me’. Public reports are accessible to all members of the support team who have access to the Reports module and can be edited by them. On the other hand, a private report is exclusively available to you.
Note: Archived tickets are fully available in Ticket Trends reports and included in the closed tickets status. This means they are accounted for in any data or performance analyses involving closed tickets.
Understanding and analyzing ticket volume trends is an important helpdesk best practice that can empower you to make data-driven decisions for optimizing your support operations.


