

The Desk365 Support Bot lets users create tickets, check ticket status, and communicate with your support team directly from Microsoft Teams. Before deploying it across your organization, you can customize the bot so it matches your company’s branding.
In this guide you’ll learn how to:
Prerequisites
Before getting started, ensure you have:
- Admin access to your Desk365 account.
- Admin permissions in the Microsoft Teams Admin Center.
- Microsoft Teams enabled as a support channel in Desk365.
Note: If you don’t have permission to upload custom apps in Microsoft Teams, contact your Microsoft Teams admin.
1. Customize and download the Desk365 Teams Support Bot
Navigate to Settings > Channels > Microsoft Teams and open the Support Bot tab.
Click Modify Support Bot.
You can customize:
- Bot name
- Short and full descriptions
- Bot icon
- Outline icon
- Accent color
- Message extension title
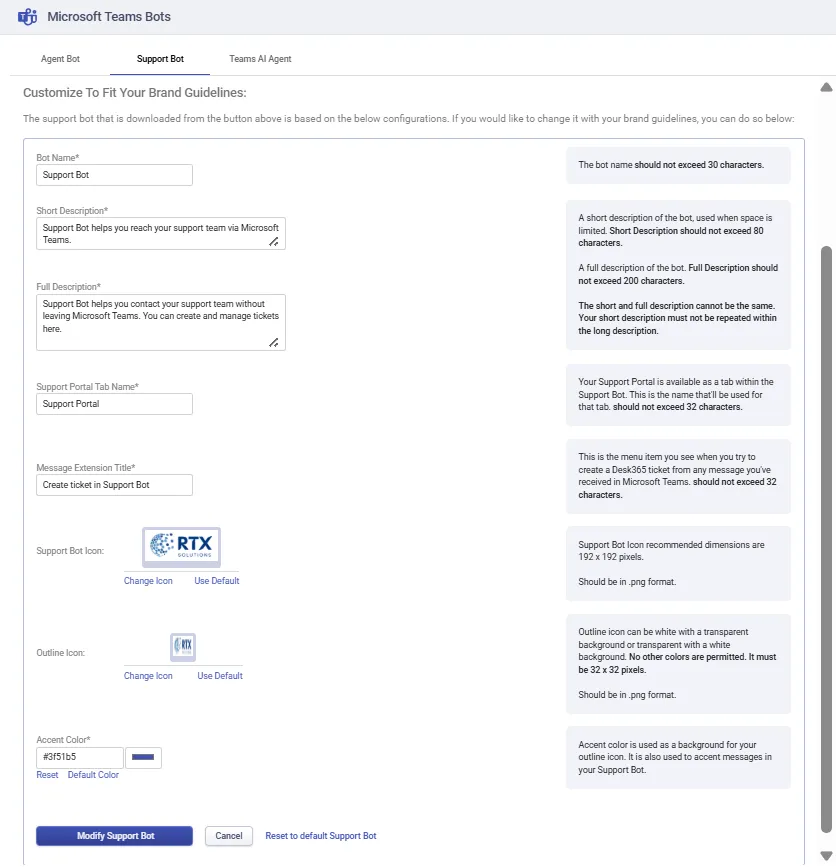
Once you’ve finished customizing, click ‘Modify Support Bot’.
Then, select the ‘Download Support Bot’.
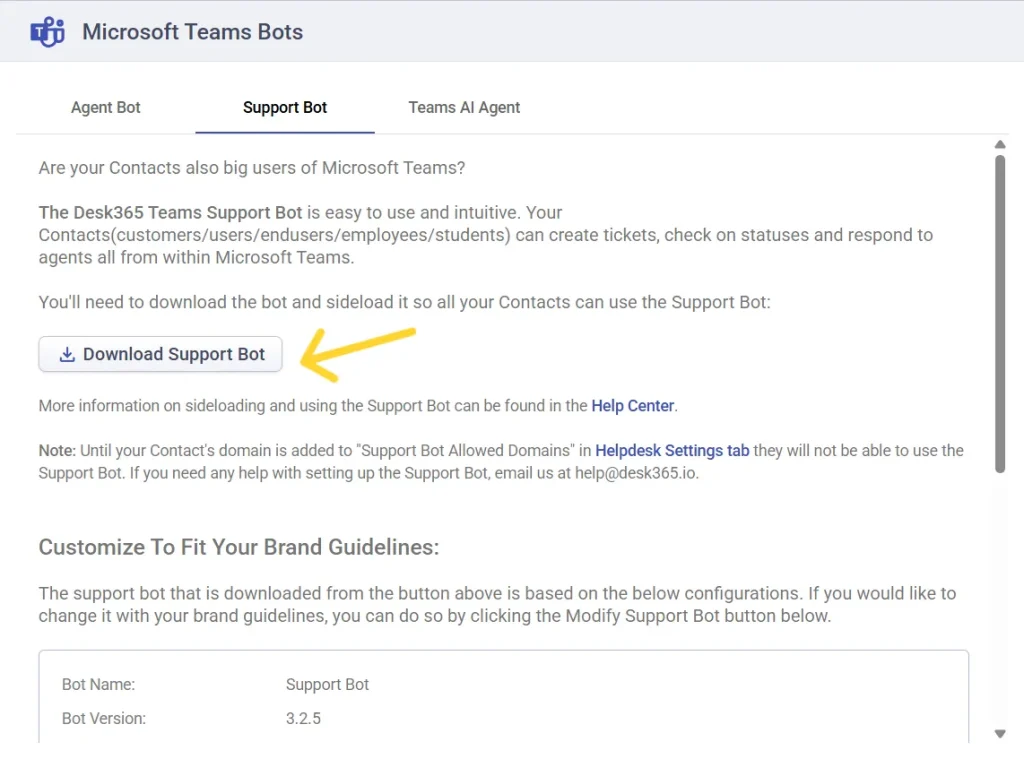
For step-by-step instructions about customizing the Desk365 Teams Support Bot read here.
2. Upload the customized Support Bot
Upload the downloaded package to your Microsoft Teams tenant.
- Navigate to the Microsoft Teams Admin Center:
- Open Teams apps > Manage apps.
- Click Actions > Upload.
- Select the customized Support Bot (.zip) package downloaded from Desk365.
- Wait for the upload to complete.
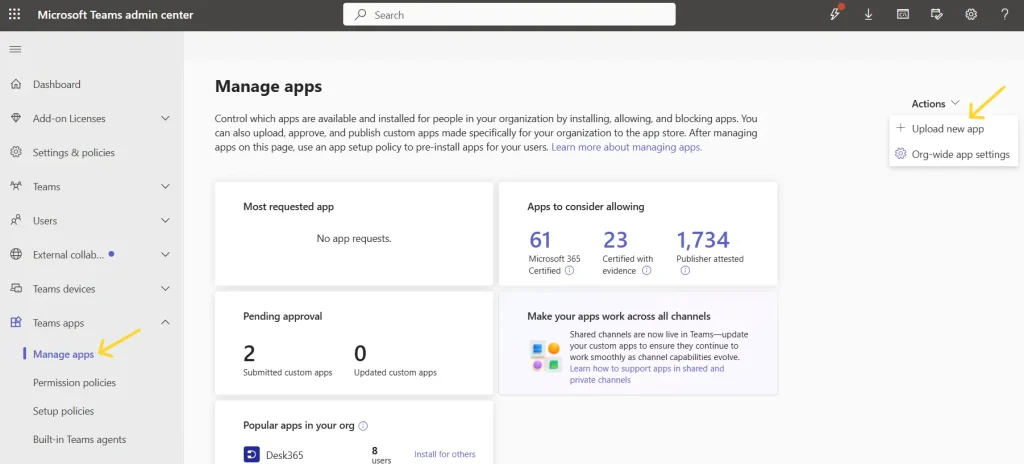
Once uploaded, the customized Support Bot becomes available in your Microsoft Teams tenant.
3. Test and deploy the Support Bot
Before deploying the Support Bot, test it with a small group of users or support agents. This allows you to verify the branding, installation experience, and ticket creation flow before a wider rollout.
Test with a few users first
- In the Microsoft Teams Admin Center, open Teams apps > Manage apps.
- Select the customized Support Bot.
- Open the Users and groups tab.
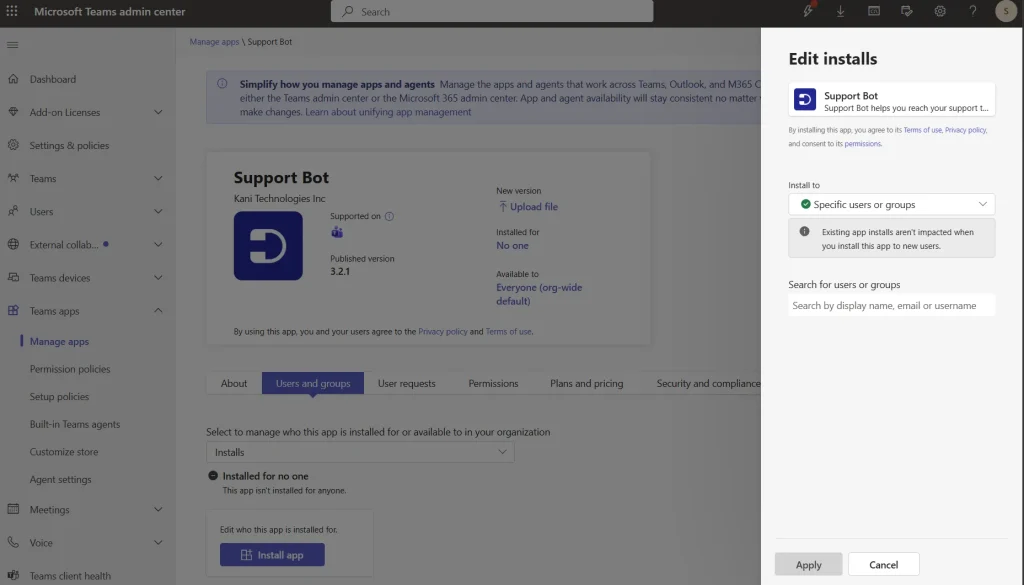
- Under Installs, click Install app.
- Choose Specific users or groups.
- Select the users or groups who should receive the app.
- Click Apply.
Ask the pilot users to verify if:
- The customized name, icon, and branding appear correctly.
- They can open the Support Bot.
- They can create a support ticket.
- Notifications and conversations work as expected.
Once you’ve confirmed everything is working as expected, proceed with the organization-wide deployment.
Roll out the Support Bot organization-wide
After successful testing, deploy the customized Support Bot to everyone in your organization.
- Open Teams apps > Manage apps.
- Select the customized Support Bot.
- Go to Users and groups.
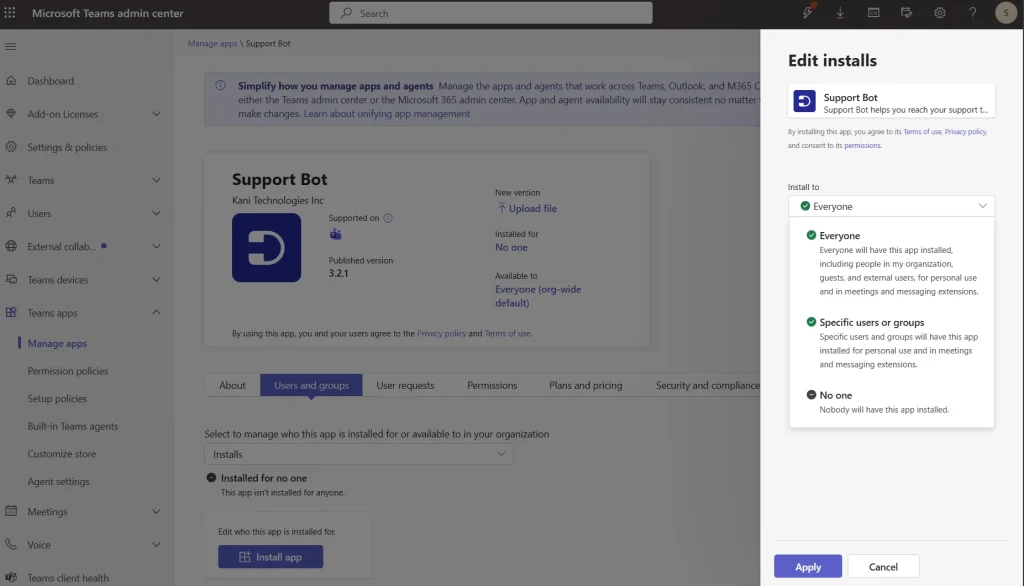
- Under Installs, click Install app.
- Choose Everyone.
- Click Apply.
If you’d also like the app to appear automatically in users’ Teams app bar, configure a Teams App Setup Policy to pin the Support Bot.
4. Install the Bot in Microsoft Teams
After the app has been uploaded, users can install it from Microsoft Teams by:
- Opening Microsoft Teams.
- Selecting Apps.
- Searching for the customized Support Bot.
- Clicking Add.
Once installed, users can create support tickets, check ticket status, and communicate with your support team directly from Microsoft Teams.
Note: Microsoft Teams may take some time to propagate branding changes. If you don’t see the updated branding immediately, wait a few minutes or restart the Teams client.
5. Configure Allowed Domains for the Support Bot
Allowed Domains let you control which users can interact with the Desk365 Support Bot by validating their email domain.
By default, your Desk365 Support Bot domain is automatically added to the Allowed Domains list. If you’d like to allow users from additional domains, you can add them by following the steps below.
- Navigate to Settings > Admin > Helpdesk Settings.
- Locate the Support Bot Allowed Domains section.
- Enter one or more approved email domains.
- Click Save.
For example:
@contoso.com
@fabrikam.com
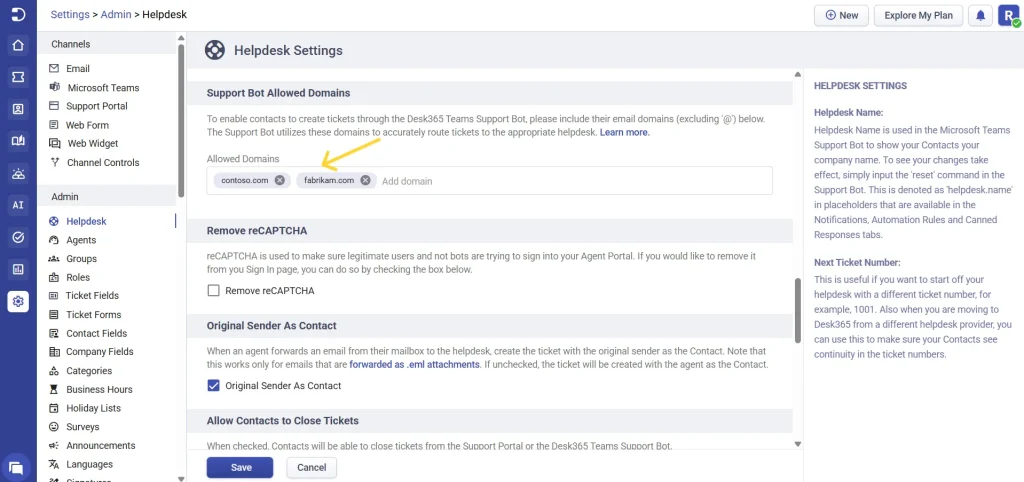
Only users whose email addresses match one of the configured domains will be able to access and use the Support Bot.
Using multiple Desk365 helpdesks
If multiple Desk365 helpdesks are configured with the same email domain, users may be prompted to choose the appropriate helpdesk before creating a ticket.
This ensures that tickets are routed to the correct support team.
Learn more about setting up allowed domains for the support bot
Updating an existing customized Support Bot
If you’ve customized the Support Bot again, for example, after changing the bot name, icon, descriptions, or branding, download a new customized package from Desk365 and upload it to Microsoft Teams using the same steps described above.
After the updated package is uploaded, test the changes with a few users before rolling them out organization-wide.
If users encounter an “Application cannot be found” error after updating the bot, see Application cannot be found message in Teams Bots for troubleshooting.
Frequently Asked Questions
Yes. You can update the bot’s name, icon, descriptions, accent color, and other branding options in Desk365. After making the changes, download the updated Support Bot package and upload it to the Microsoft Teams Admin Center.
Yes. You can install the customized Support Bot for specific users or groups in the Microsoft Teams Admin Center. This lets you verify the branding, ticket creation, notifications, and overall experience before rolling it out to your entire organization.
Yes. You can use ‘Allowed Domains‘ in Desk365 to restrict access to users with approved email domains. This is useful when you want to limit Support Bot access to users from specific organizations or domains.
Microsoft Teams may take some time to propagate branding changes. If the updated name, icon, or other branding does not appear immediately, wait a few minutes and restart the Teams client.
This can occur after uploading a newer version of the customized Support Bot. Check the troubleshooting guide for the “Application cannot be found” message in Teams Bots to resolve the issue.