


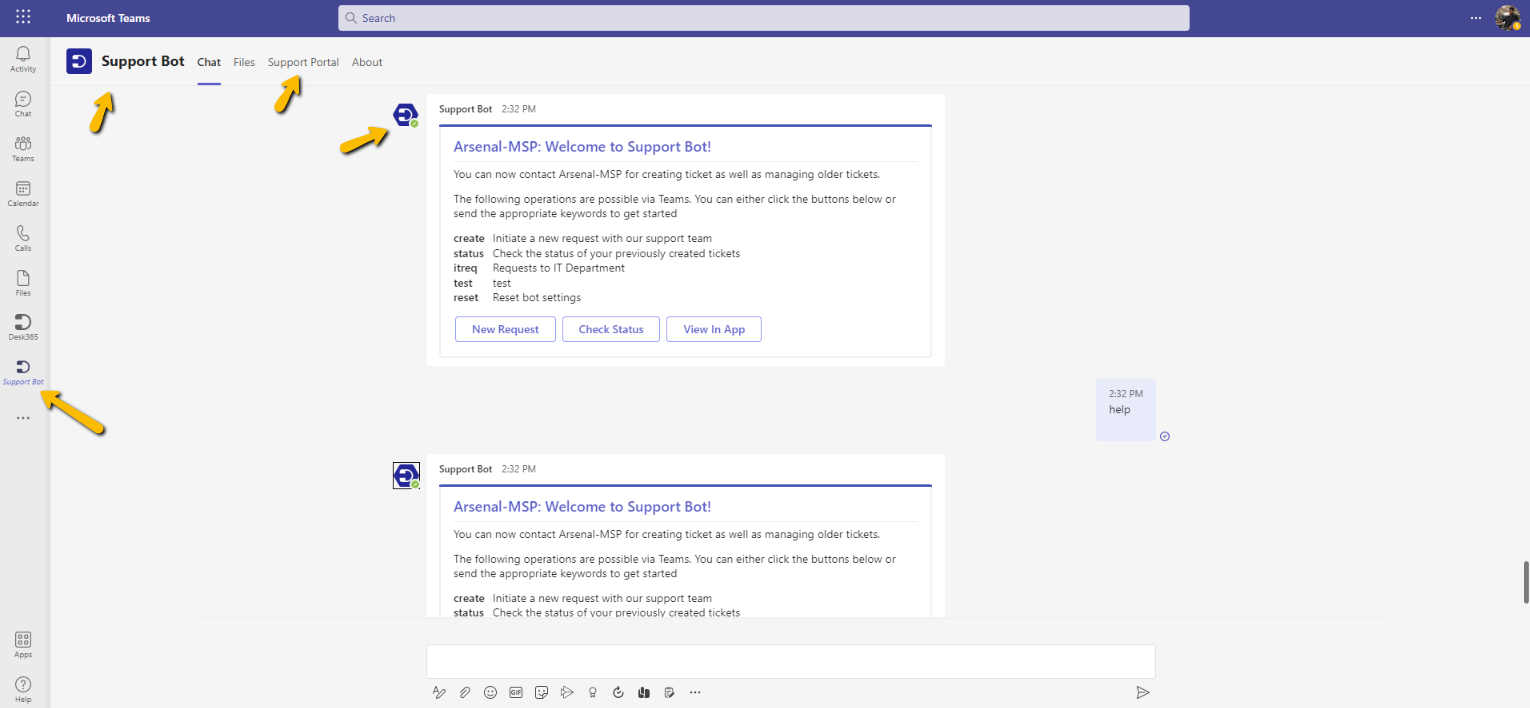
Desk365 Teams Support Bot is used by your Contacts (customers/users/end-users/employees/ students) to create tickets, check on statuses, and respond to agents all from within Microsoft Teams.
The Support Bot can be customized according to your brand guidelines.
In this help center article, let’s take a look at the customizations that you can make to the Teams Support Bot in detail below.
Modify the Support Bot to reflect your brand guidelines
You can customize the Desk365 Teams Support Bot according to your brand themes and colors. This helps adoption of the Support Bot among your users who are already familiar with your brand and it’s colors.
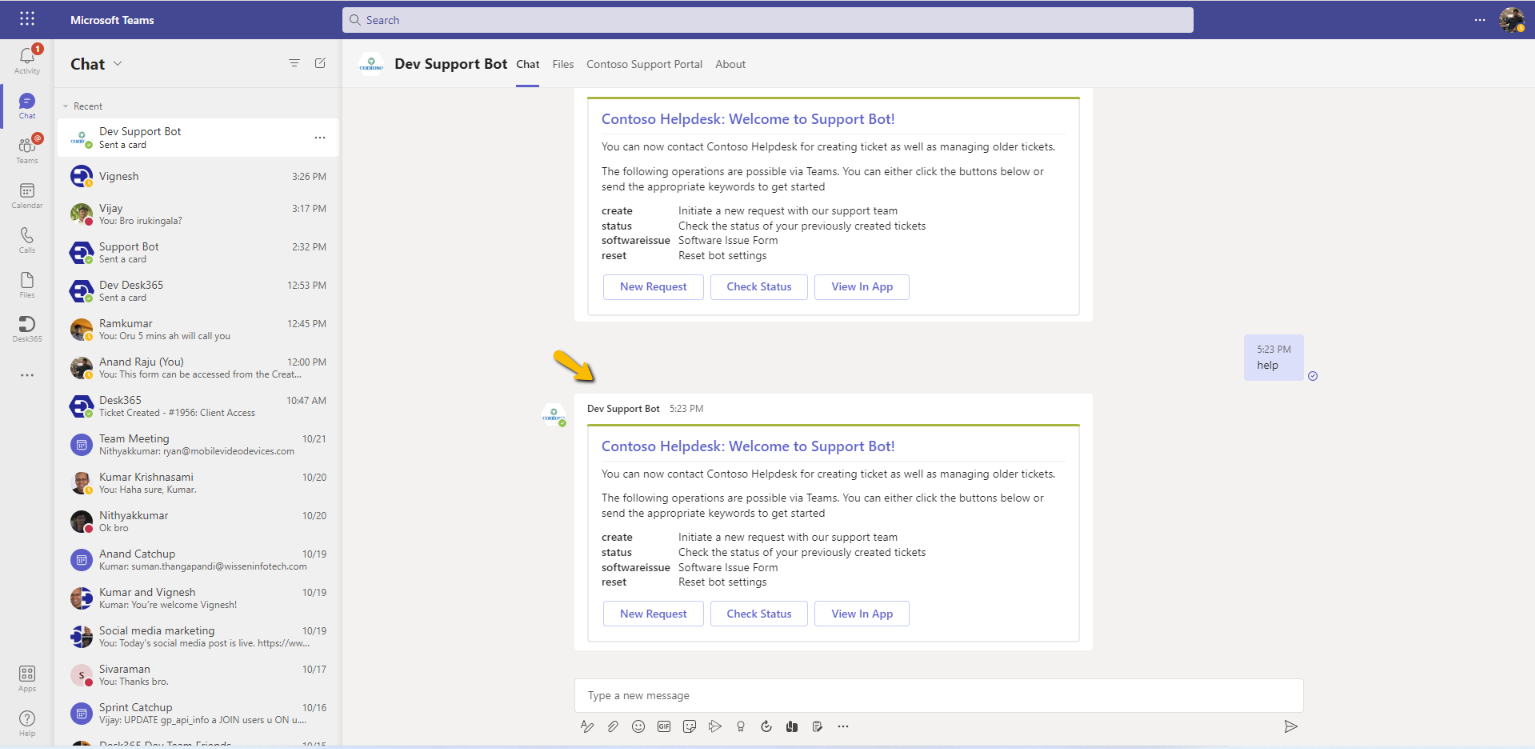
Currently, you’ll notice that Desk365 Support Bot appears like this (see the screenshot below) in your help desk. You were not able to make any customizations until now.
Now, let’s take a look at all the customizations that you can do in Support Bot in detail below.
1. To get started, go to Settings > Channels > Microsoft Teams.
2. Select the ‘Support Bot’ Tab.
3. Click on the ‘Modify Support Bot’ button found below.
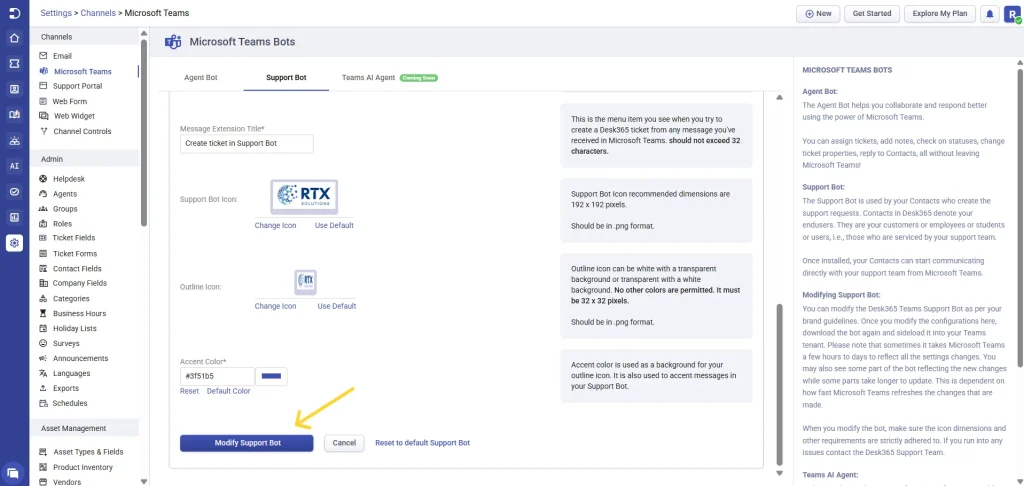
Here, you can make all the customizations with respect to your brand guidelines and make the Support Bot appear as your own brand bot.
1. Bot Name
By default, you’ll notice the name for the bot as ‘Support Bot’. You can change the name of the bot and provide your brand name so that so that users will love the native experience and it doesn’t look like an external product to them.
Note: The bot name should not exceed 30 characters.
2. Bot Description
Provide a short and full description for the bot. The users will notice the description when they place the cursor on the support bot on the Teams browser.
Note: A short description of the bot is used when space is limited. The short description should not exceed 80 characters.
The full description should not exceed 200 characters. The values of short and full decsription shouldn’t be the same. Your short description must not be repeated within the long description.
3. Support Portal Tab Name
Your Support Portal is available as a tab within the Support Bot. This is the name that’ll be used for that tab.
Note: The tab name should not exceed 32 characters.
4. Message Extension Title
This is the menu item you see when you try to create a Desk365 ticket from any message you’ve received in Microsoft Teams.
Note: The Message Extension Title should not exceed 32 characters.
5. Support Bot Icon & Outline Icon
You can upload your brand icons here.
Note: Support Bot Icon recommended dimensions are 192 x 192 pixels.
Outline Icon can be white with a transparent background or transparent with a white background. No other colors are permitted. It must be 32 x 32 pixels.
Icons should be in .png format.
6. Accent Color
Accent color is used as a background for your outline icon. It is also used to accent messages in your Support Bot.
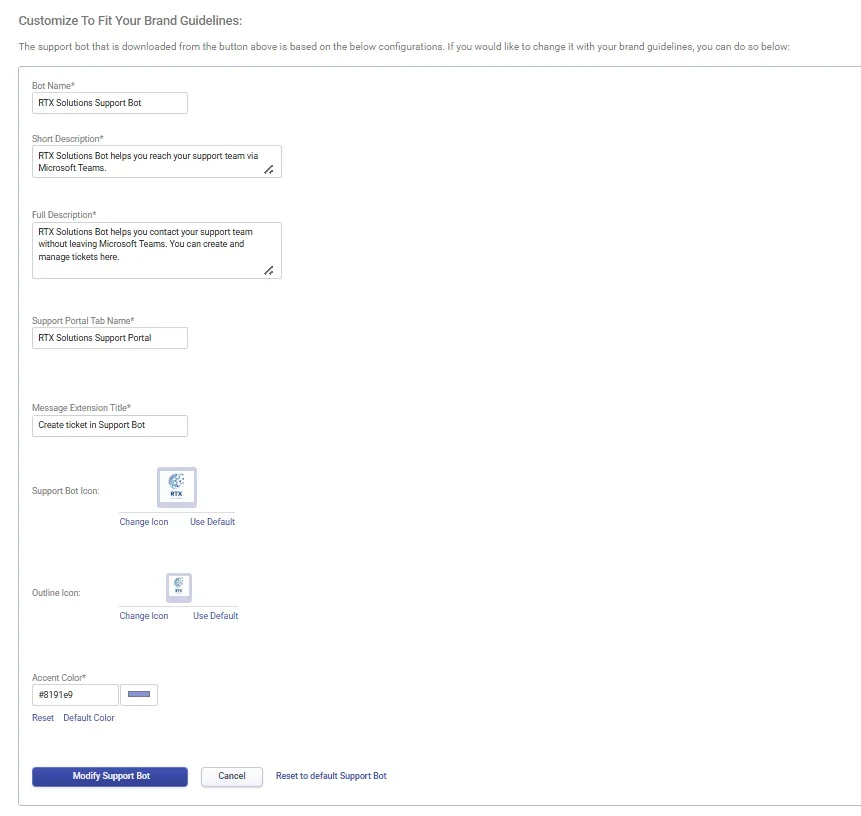
After entering your brand details, click on the ‘Modify Support Bot’ button to make the Support Bot appear according to your brand guidelines.
Finally, click on the ‘Download Support Bot’ button.
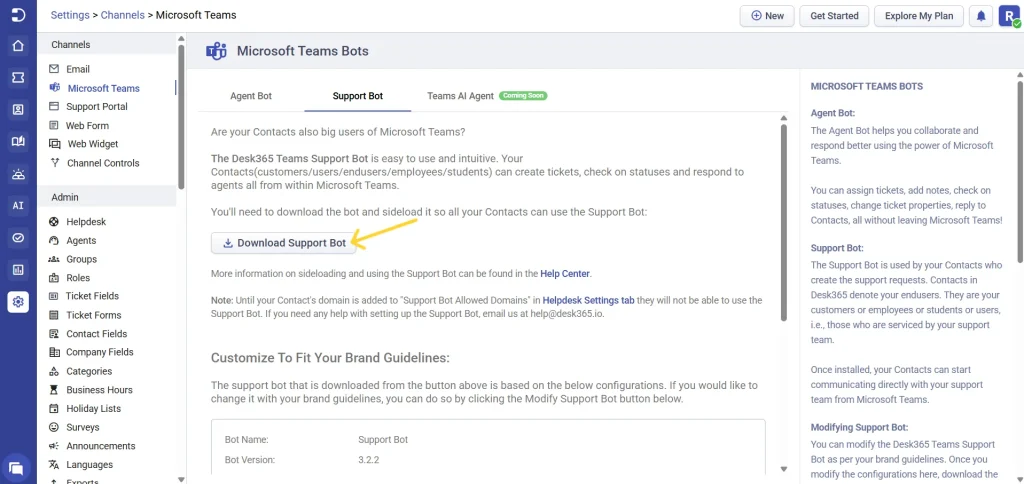
Now, the Support Bot that you customized has been downloaded and you can upload the Support Bot as a custom app in your Microsoft Teams Apps instance.
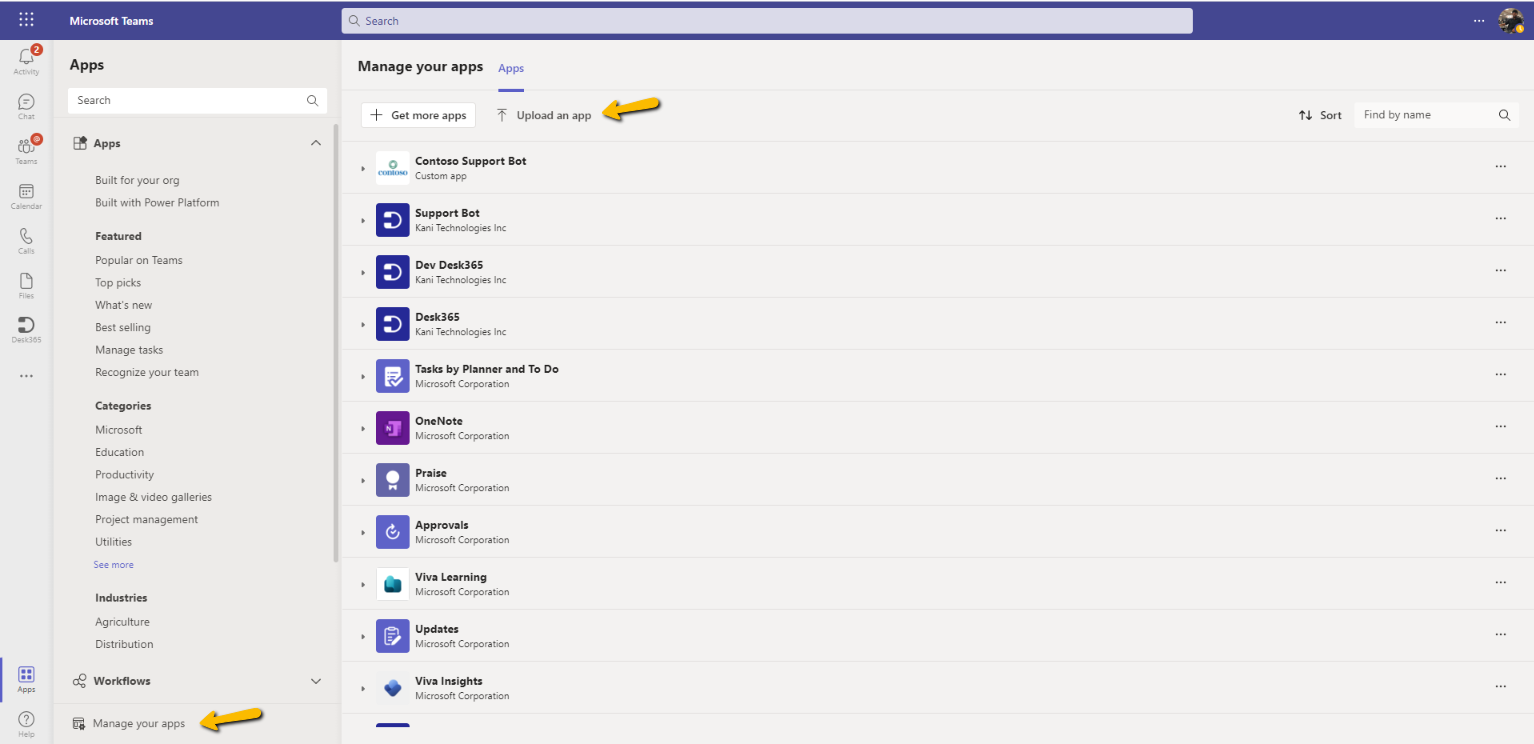
Click on ‘Manage your apps’ and select the ‘Upload an app’ option.
Choose ‘Upload a custom app’ and upload your new version of the Support Bot.
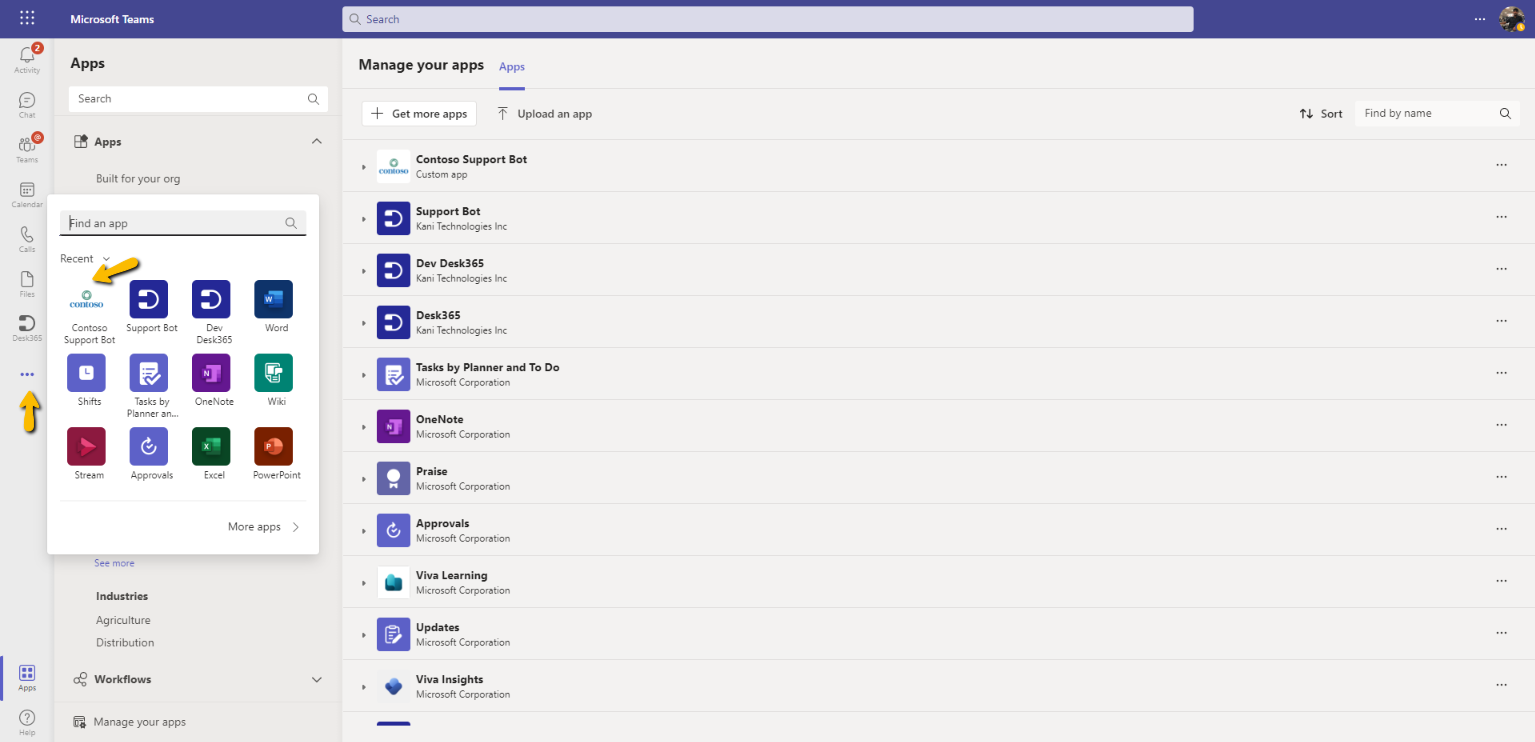
Now, you can add the new version of the Support Bot in your Microsoft Teams Instance by clicking on the ‘More added apps’ button and add your customized version of the Support Bot.
The customized version of the Support Bot is successfully added and it’s looking great reflecting your brand guidelines.
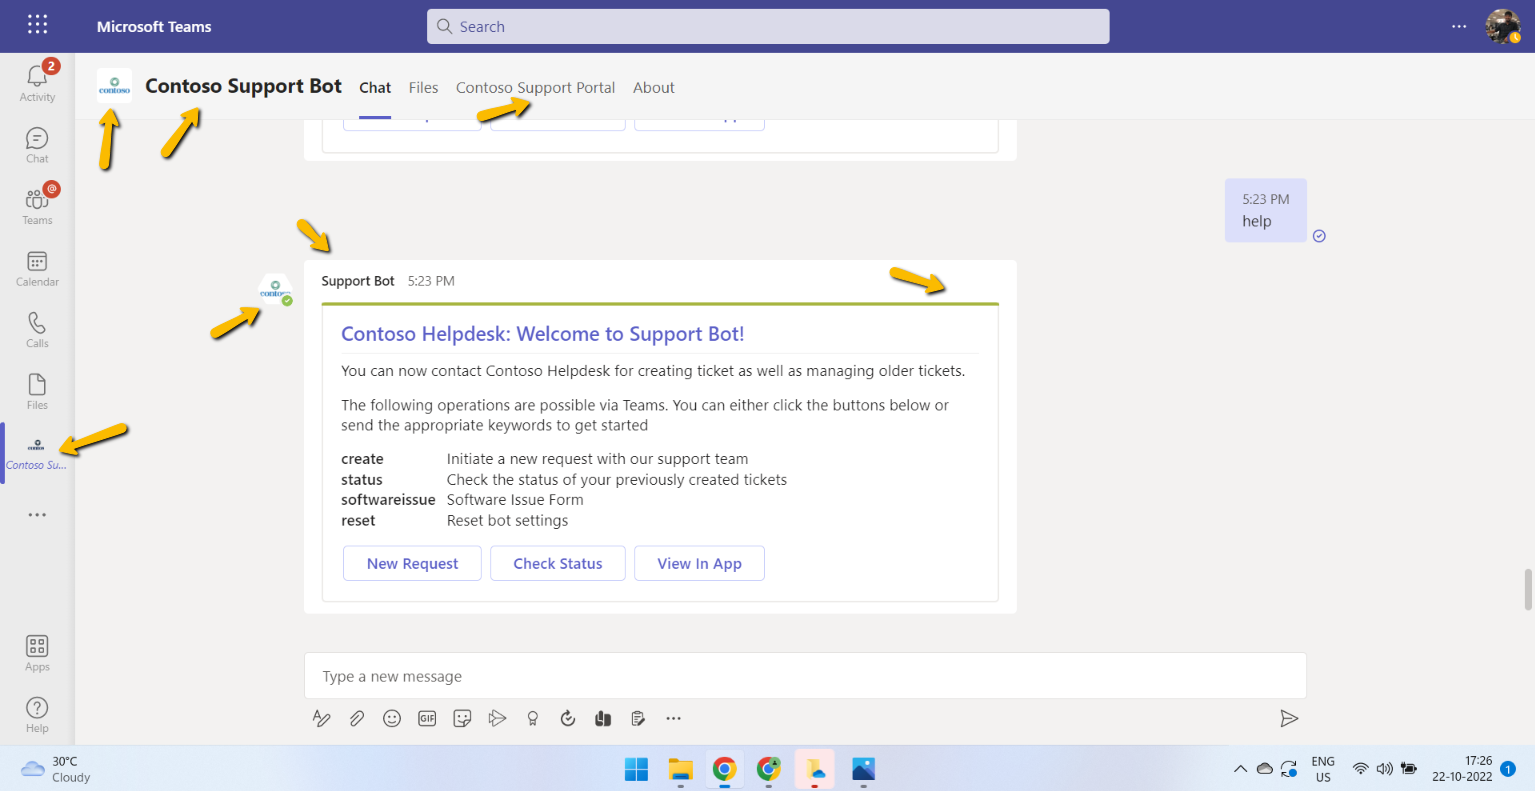
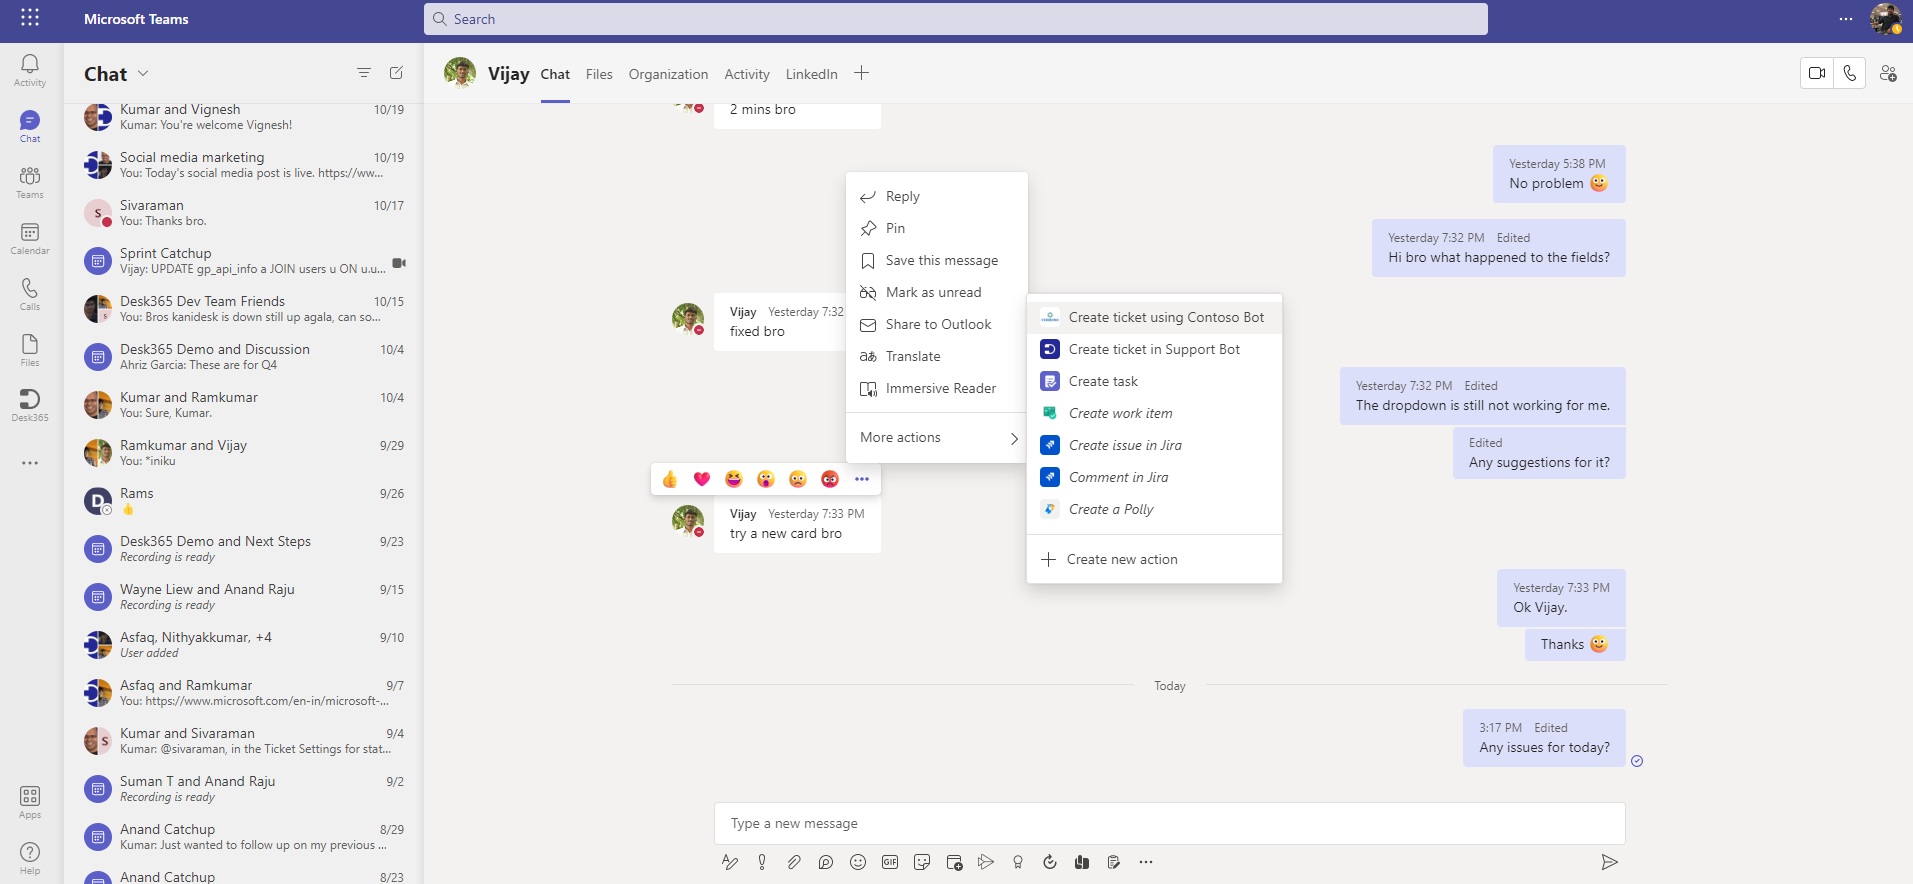
Also, when you create a ticket in Microsoft Teams Chat, you’ll notice the ‘Message Extension Title’ that you have given reflecting here.
Uploading the newly customized Support Bot
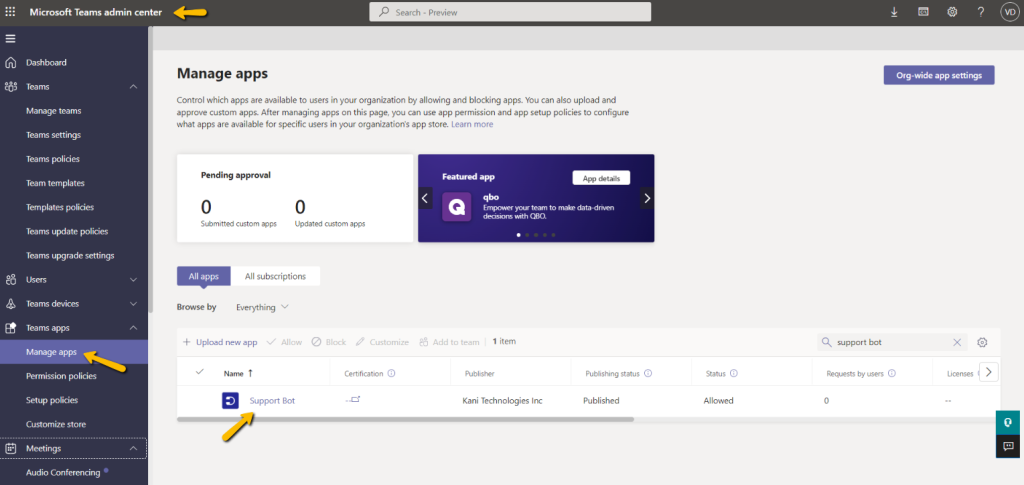
Go to Microsoft Teams admin center > Teams apps > Manage apps.
Search for ‘Support Bot’ and click on it as shown in the image below.
If the version of your newly customized Support Bot and the one which is already present in your Teams tenant are different, then a simple upload will work.
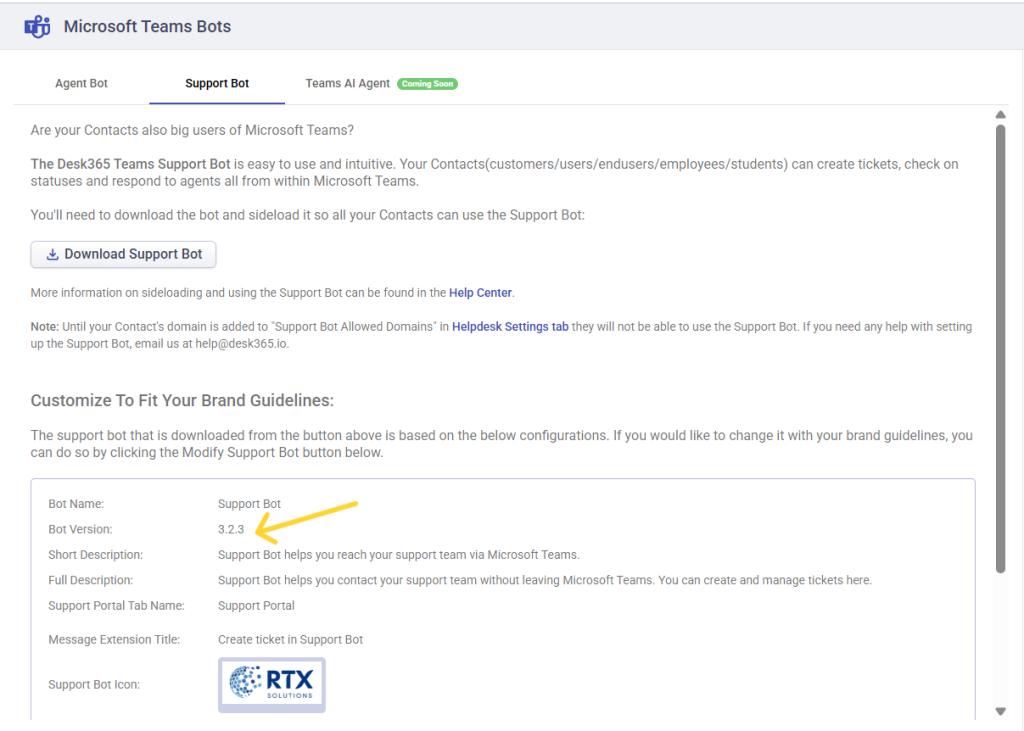
Otherwise, you’ll need to delete the previous version and upload the new version. You can identify the version of the Support Bot you’re planning to upload from the Agent Portal as shown below.
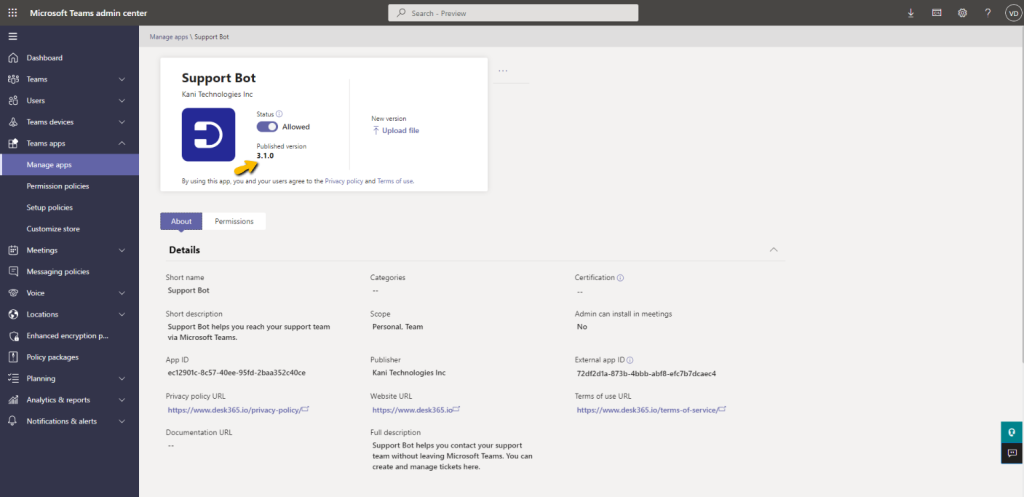
You can also identify the version of your current Support Bot from the Microsoft Teams admin center as shown below.
If the customized Support Bot has a different version number:
In this case, you can just choose the ‘Upload file’ option in the Microsoft Teams admin center and upload your newly customized Support Bot.

Note: You may notice the logo and color changes reflect immediately in some windows while it doesn’t fully reflect the changes in some other areas of Teams. This is dependent on the Microsoft Teams servers. We suggest waiting a few hours to see it reflected uniformly everywhere.
If the newly customized Support Bot has the same version number:
In this case of the customized Support Bot having the same version number as the currently installed bot, we suggest you delete the current bot and newly install the customized Support Bot.
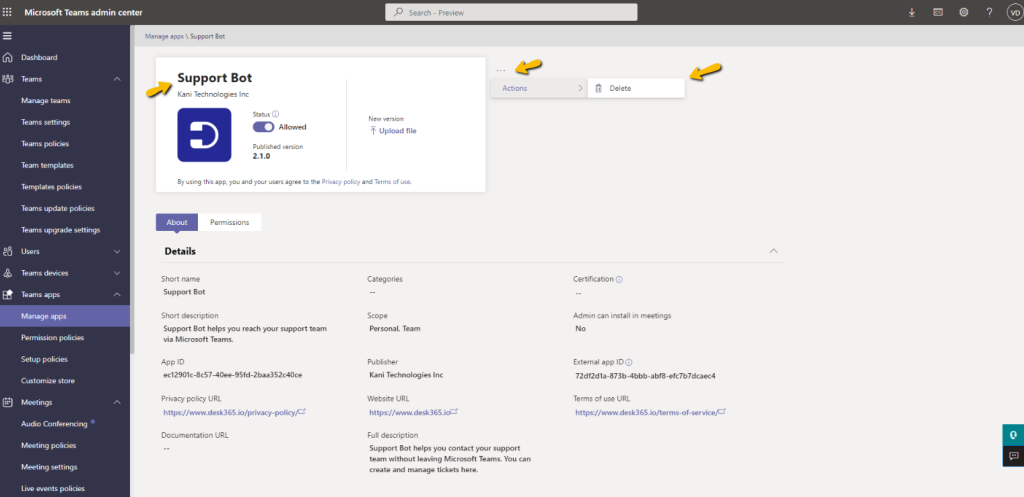
1. Delete your previous version of the Support Bot that you had installed previously as shown in the image below.
Note: Make sure it is deleted properly, if not refresh the page once or please log off once and log in back again.
2. Now go back to the ‘Manage apps’ section. Choose the ‘Upload new app’ option.

3. Here you can upload the modified Support Bot.
Things to note
We wanted to mention a few things which we thought will be useful for you.
1. Sometimes, it takes more time for all the changes to get reflected in your Teams instance. We highly recommend you to log off once and log in back again after you finish uploading the custom Support Bot.
2. In the ticket card view, sometimes the name is not reflecting properly.
Please note that sometimes it takes Microsoft Teams a few hours to days to reflect all the settings changes. You may also see some part of the bot reflecting the new changes while some parts take longer to update. This is dependent on how fast Microsoft Teams refreshes the changes that are made.
Play around with the Desk365 Teams Support Bot customizations and try the best Microsoft Teams ticketing system for your business starting today.


