

Create and track tickets from Microsoft Teams chats and channels with Desk365, without switching away from the tools your team already uses. Ticket requesters can create help desk tickets in Microsoft Teams, track support tickets, reply to agents, and receive updates through the Support Bot or Support Portal. Support agents can use the Agent Bot and Agent Portal to find tickets, respond to contacts, add notes and attachments, and update ticket details.
How does ticketing in Microsoft Teams work?
Desk365 provides four components for handling support requests in Microsoft Teams. Each serves a different role, as outlined below.
| Who | App | What they can do |
|---|---|---|
| Ticket requesters | Support Bot | Create tickets, check status, reply to agents, and receive notifications. |
| Ticket requesters | Support Portal | Create and track tickets, review updates, and browse the knowledge base. |
| Support agents | Agent Bot | Find tickets, reply to contacts, add notes and attachments, and update ticket details. |
| Support agents | Agent Portal | Access a portal-based workspace to manage support tickets within Teams. |
For example, if a ticket requester reports an email access issue in a Teams chat, the message can be converted into a Desk365 ticket. The support team can then track the issue, assign responsibility, and follow up through the ticket instead of relying on the original conversation.
Before you start
Requirements
Before creating or managing Desk365 tickets in Microsoft Teams, make sure you have the following:
- A Desk365 subscription: The Microsoft Teams bots are available with the Standard, Plus, and Premium plans.
- Microsoft Teams access: You must be able to access Microsoft Teams and the relevant Desk365 app.
- The Support Bot available in Teams: An administrator must set up the Support Bot and make it available to you. See the admin setup checklist below.
- Microsoft Entra ID sign-in for the Support Portal: The organization must be synced with Microsoft 365, and users must sign in with Microsoft Entra ID to access the portal inside Teams.
- The Agent Bot configured: Use the Agent Bot for support agent workflows. See the Agent Bot setup guide.
- Appropriate Desk365 permissions for agents: Support agents need the required access to use the Agent Bot and Agent Portal.
- Administrator access: Permission to set up the bots, configure Microsoft Entra ID consent, and manage Teams app setup policies. See the admin setup checklist below.
Admin setup checklist
Complete the following setup steps before making Microsoft Teams ticketing available to your users.
- Set up the Support Bot. Follow the Support Bot setup guide to configure the bot.
- Configure user consent in Microsoft Entra ID. Use the user consent configuration guide to configure the required application consent settings.
- Pin and auto-install the Support Bot. Use Teams app setup policies to make the bot accessible to the users covered by the policy.
- Configure allowed domains. Follow the allowed domains setup guide to control which domains can access the Support Bot.
- Configure optional features. Enable Allow Contacts to Close Tickets if ticket requesters should be able to close their own tickets. You can also create custom ticket forms for different request types.
How can you create a ticket in Microsoft Teams?
You can create help desk tickets in Microsoft Teams through the Support Bot, use a custom ticket form, convert a chat, or channel message into a ticket, or submit a request through the Support Portal. The following sections explain each workflow.
Create a ticket from the Support Bot
The Support Bot is a direct way to create help desk tickets in Microsoft Teams. Use it to report an issue, submit a service request, or provide information that the support team needs to investigate.
Follow these steps:
- Open Microsoft Teams and select the Desk365 Support Bot from the app bar.
- Type Help to display the welcome card.
- Type create or select Create Ticket.
- Complete the ticket form with the required details.
- Attach supporting files if needed.
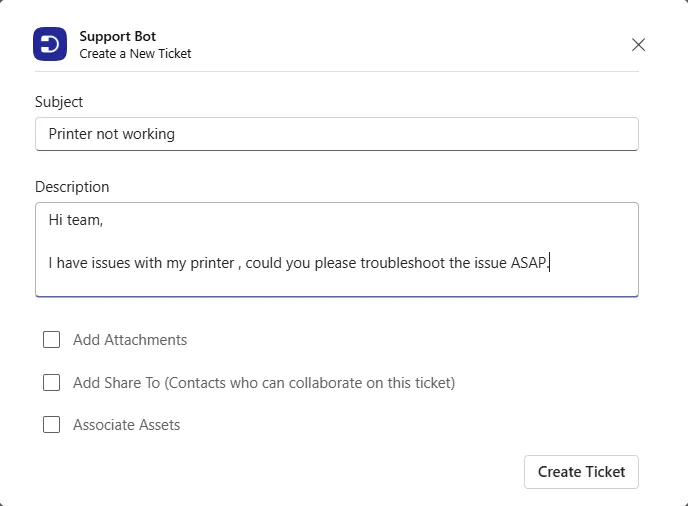
- Select Create Ticket to submit the request.
- Wait for the Support Bot to confirm that the ticket was created.
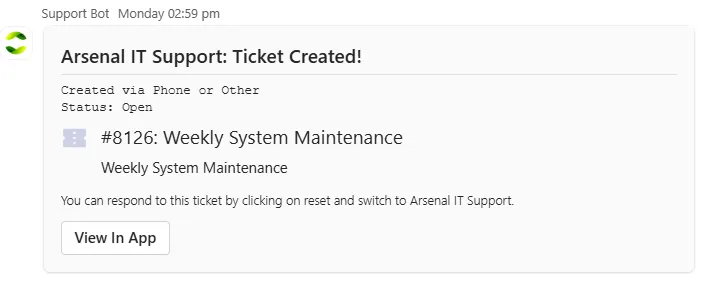
Once the ticket is submitted, the support team can review and work on the request through Desk365.
Pro tip: Include a clear description of the issue, the steps that led to it, and relevant screenshots or files. For example, when reporting an error, explain what you were trying to do and what happened instead. Useful details at submission help the support team understand the issue and reduce unnecessary follow-up questions.
Use a custom ticket form
If your organization uses custom ticket forms, you can use them to collect information needed for specific requests. Each custom form can have its own command or button on the Support Bot welcome card.
For example, entering itsupport can open an IT request form. Another form can collect different details for a separate request type.
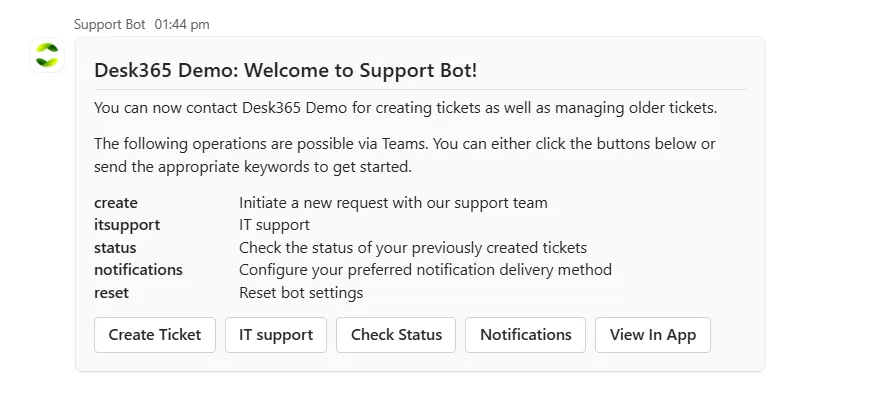
Custom forms standardize ticket submissions by collecting the information needed to review and route each request through the appropriate workflow.
To configure these forms, see Creating custom ticket forms in Desk365.
Turn a Teams chat or channel message into a ticket
Not every support request starts with a formal ticket. A contact might report an email access issue in a one-on-one chat, mention a problem in a group conversation, or post a question in a Teams channel.
Instead of leaving an issue buried in a conversation, convert the relevant message into a Desk365 ticket. The support team can then track the issue, assign it, and follow up.
Follow these steps:
- Open the relevant one-on-one chat, group chat, or channel in Microsoft Teams.
- Find the message you want to convert into a ticket.
- Open the message’s More actions (…) menu.
- Select Create ticket in Support Bot.
- Review the ticket details populated from the message.
- If you are a support agent, check the Contact field and select the person who sent the original message if they should be the ticket requester. This field is visible to agents.
- Review the details and create the ticket.
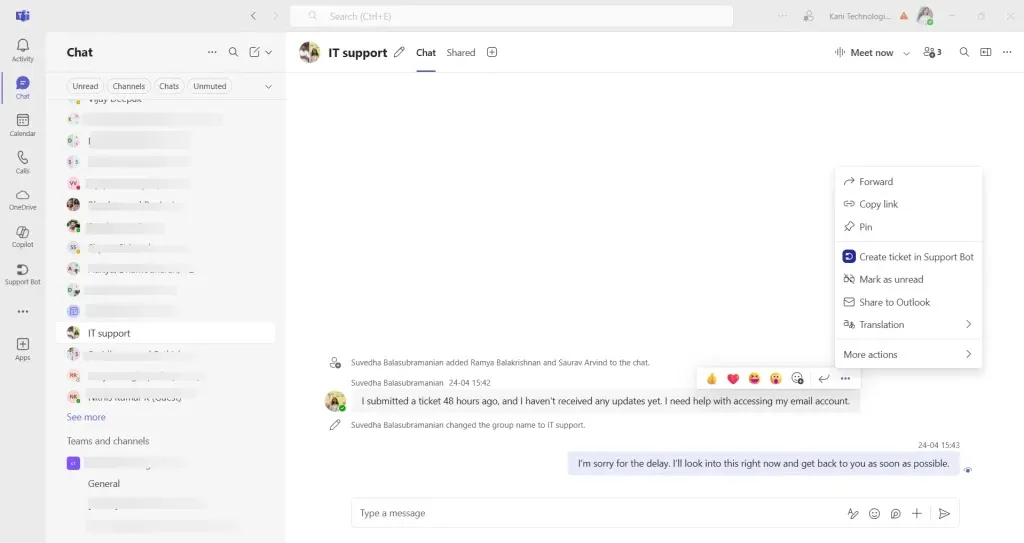
Pro tip: Convert a conversation into a ticket whenever an issue needs investigation, ownership, or follow-up. Keep the ticket updated as work progresses, so the support team has a reliable record of the request, even when the original chat moves out of view.
Create a ticket from the Support Portal in Teams
The Desk365 Support Portal lets ticket requesters submit requests through a form in Microsoft Teams instead of using the Support Bot.
To create a ticket:
- Open the Support Portal from the Teams menu or select View in App, where available.
- Sign in using Microsoft Entra ID.
- Open the ticket creation form.
- Enter the required details and submit the request.
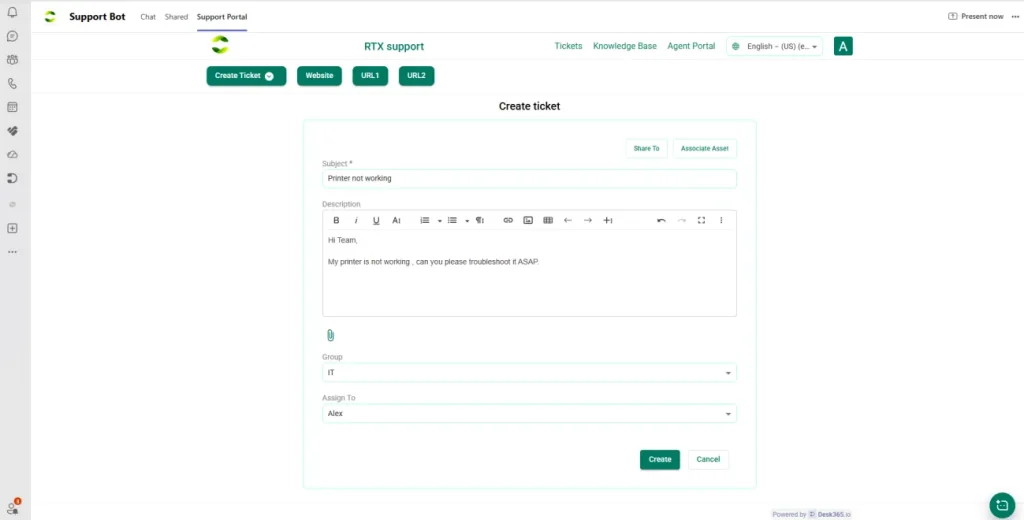
For information about accessing the portal and its other features, see Access the support portal within Teams.
How can you track tickets in Microsoft Teams?
After submitting a ticket, requesters can check its status, respond to support agents, provide additional information, and close the ticket when the issue is resolved, and the required setting is enabled.
Check ticket status
To check the current status of a ticket in Microsoft Teams, follow these steps:
- Open the Desk365 Support Bot.
- Type status or select Check Status.
- Review the list of tickets displayed.
- Select the ticket you want to check.
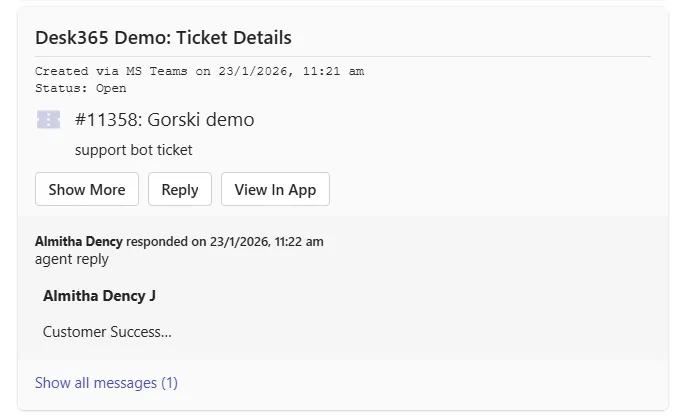
- Review its current status and the actions taken by the support team.
- Select Reply if you need to provide an update or additional information.
Get notified when an agent replies
The Support Bot notifies ticket requesters when a support agent responds. To continue the conversation:
- Open the Desk365 Support Bot.
- Review the agent’s response.
- Reply through the bot or open the Support Portal tab in Teams.
Reply and add attachments to an open ticket
If the support team needs more information, you can reply to the ticket from Microsoft Teams. You can also attach files to help explain the issue.
To add attachments while replying:
- Open the relevant ticket in the Support Bot.
- Select Reply.
- Select Add Attachments.
- Choose the files you want to share and send your reply.
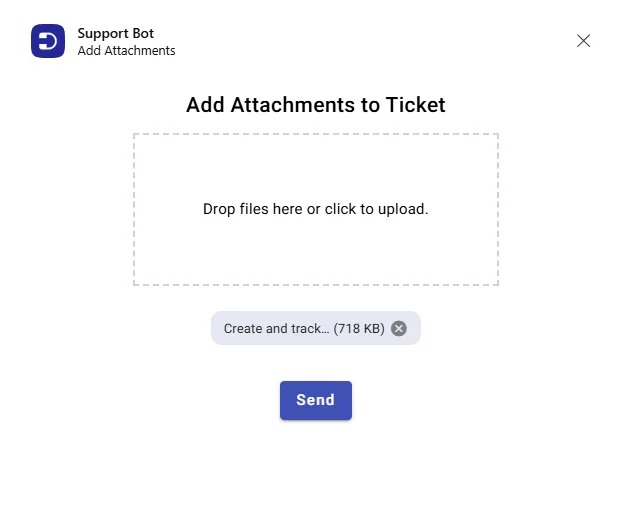
Use screenshots, relevant documents, or other supporting files when they help explain the problem. Avoid sending unrelated information.
Close a ticket from Teams
Ticket requesters can close a resolved ticket through the Support Bot if the administrator has enabled Allow Contacts to Close Tickets.
To close a ticket:
- Open the relevant ticket in the Support Bot.
- Select Show more.
- Select Close ticket.
If the option is unavailable, ask your Desk365 administrator to verify the setting.
For configuration instructions, see Allowing contacts to close tickets.
Track tickets in the Support Portal tab
The Support Portal tab in Microsoft Teams provides a convenient way to organize and review ticket requests.
You can sort tickets by creation time, status, channel, or subject to find a specific request. You can also browse the knowledge base for solutions to recurring issues before submitting a new ticket.
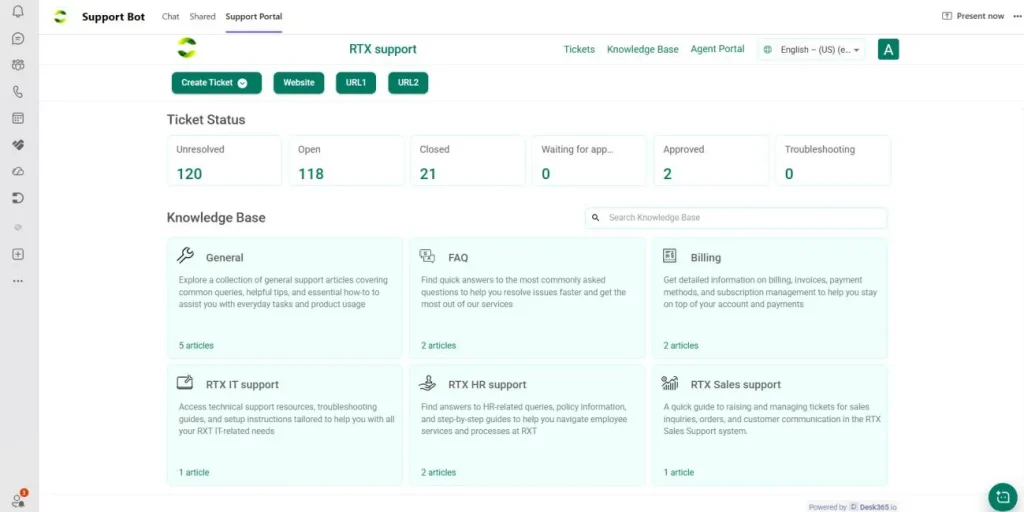
For setup and access details, see Access the support portal within Teams.
How can support agents manage tickets in Microsoft Teams?
The Desk365 Agent Bot lets support agents manage tickets directly in Microsoft Teams. Agents can find assigned and unassigned tickets, respond to contacts, add notes and attachments, and update supported ticket fields.
View assigned and unassigned tickets
Use the Agent Bot to find tickets that need your attention.
- Type tkmy or use My Tickets to view tickets assigned to you.
- Type tkun or use Unassigned Tickets to find tickets that have not been assigned.
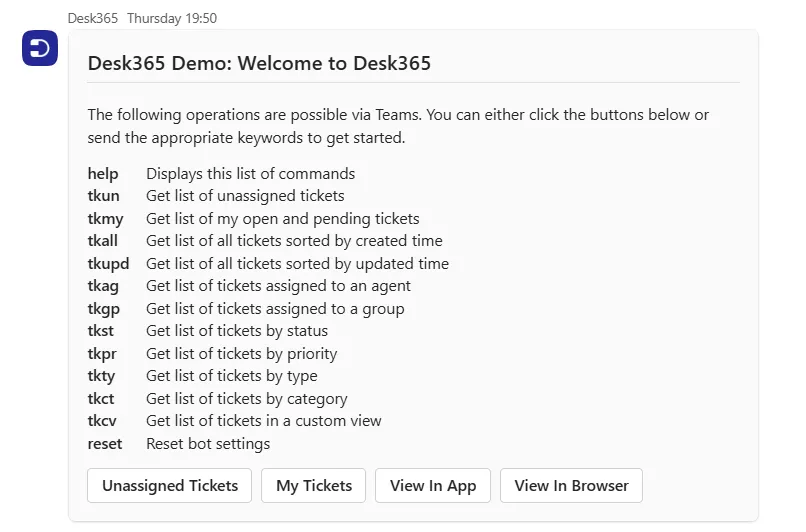
Review the ticket details before acting. For unassigned requests, follow your team’s process for determining ownership and assigning the ticket to the appropriate agent.
Reply to contacts and add notes
Support agents can respond to ticket requesters through the Agent Bot and add public or private notes to support ticket handling.
- Public replies communicate information to the contact.
- Private notes help the support team record internal context without presenting the note publicly.
Agents can also attach files when working on a ticket. Before sending a response, check that the message is intended for the contact or the internal team, as appropriate.
Update ticket details
The Agent Bot supports ticket field updates, letting agents manage ticket progress from Microsoft Teams.
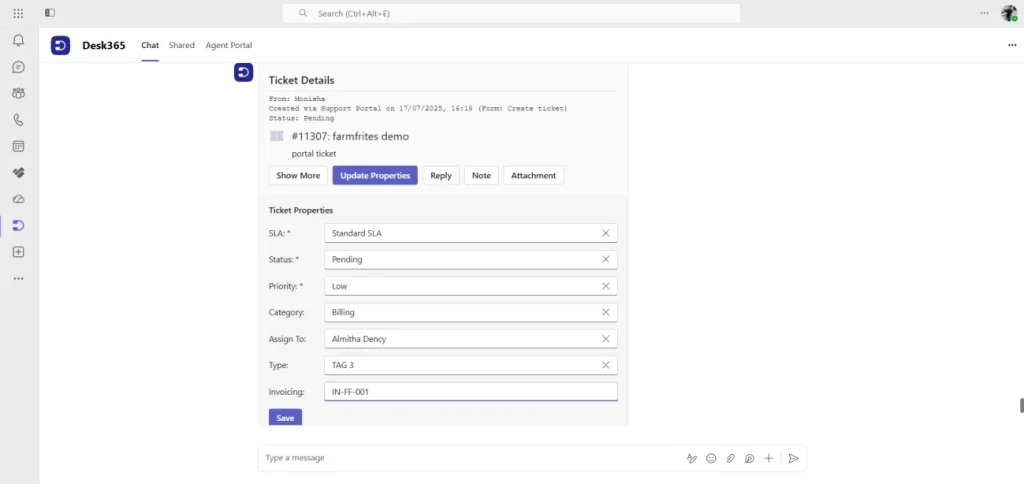
Depending on the available fields and workflow, agents can update:
- Ticket status
- Priority
- Assignee
- Service-level agreement (SLA)
- Category
- Custom fields
Keeping ticket details current helps the support team understand what needs attention and who is responsible for the next step.
Access the Agent Portal within Microsoft Teams
The Agent Portal provides a portal-based workspace for managing Desk365 tickets within Microsoft Teams. Use the Agent Bot for commands and quick ticket actions or open the Agent Portal when you prefer to work through the portal interface.
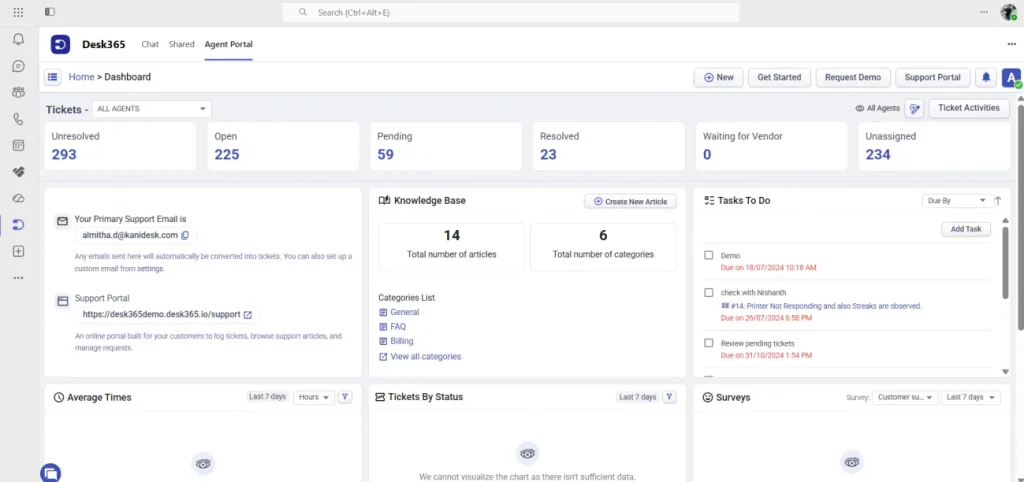
Pro tip: During onboarding, demonstrate common ticket tasks in both the Agent Bot and Agent Portal. This helps agents understand which interface works best for different support tasks.
Receive agent notifications
The Agent Bot can notify support agents about:
- Replies from contacts
- Ticket assignments
- New notes
Review the relevant ticket to understand the latest context before responding.
For setup instructions, see the Agent Bot setup guide and the Agent Bot commands reference.
Support Bot and Agent Bot commands at a glance
Use this reference to find common Desk365 commands for creating tickets, checking status, and managing the support team’s workload in Microsoft Teams.
| Command or option | Bot | What it does |
|---|---|---|
| create | Support Bot | Opens the ticket creation workflow. |
| status | Support Bot | Lists tickets for status checks. |
| Custom form command, such as salesform | Support Bot | Opens the configured custom ticket form. |
| reset | Support Bot | Resets the current bot interaction. |
| tkmy | Agent Bot | Lists tickets assigned to the agent. |
| tkun | Agent Bot | Lists unassigned tickets. |
Some commands and buttons depend on the bot, configuration, and workflow available to your organization. For the full command list, see Support Bot commands and Agent Bot commands.
Troubleshooting
If Desk365 does not work as expected in Microsoft Teams, check the following common issues.
- Teams display an “Application cannot be found” message. Review the Application cannot be found troubleshooting guide.
- The Support Portal does not load inside the bot. Follow the Support Portal loading troubleshooting guide.
- The bot displays the old language or an outdated interaction. Try the reset command and start the interaction again.
- You cannot add or access Teams apps. Contact your Microsoft Teams administrator to check your organization’s app permissions and policies.
- The Support Bot is missing for some users. Ask your Teams administrator to review the app setup policy and confirm that the affected users are covered.
If the issue continues, share the error message and the steps that led to it with your administrator or support team.
Related articles
Frequently Asked Questions
Yes. Open the Desk365 Support Bot, type create or select Create Ticket, complete the form, and submit it. The bot confirms when the ticket is created.
Yes. Open the message’s More actions (…) menu and select Create Ticket in Support Bot. Review the ticket details before creating it. Support agents can use the Contact field to select the ticket requester.
The Support Bot and Agent Bot are available with the Standard, Plus, and Premium plans.
Type status in the Support Bot or select Check Status. Choose a ticket to view its current status and reply if needed.
Yes. The Support Bot notifies ticket requesters when a support agent responds. You can review the response and reply through the bot or the Support Portal tab in Teams.
Yes. Attach files when creating a ticket or add them later by opening the ticket in the Support Bot, selecting Reply, and choosing Add Attachments.
Yes, if your administrator has enabled Allow Contacts to Close Tickets. Open the ticket in the Support Bot, select Show more, and then select Close ticket.
Yes. The Agent Bot lets support agents find tickets, reply to contacts, add notes and attachments, and update supported fields. The Agent Portal provides an alternative portal-based workspace within Teams.
A Microsoft Teams administrator can configure an app setup policy in the Teams admin center to install and pin the Support Bot for the users covered by that policy.
See Using app setup policies to pin and auto-install the Support Bot in Teams.
No. Desk365 automatically creates a contact record when someone submits their first ticket through the Support Bot.
Yes. The Desk365 Support Portal opens within Microsoft Teams and lets ticket requesters create and track tickets, review updates, and browse the knowledge base. Users sign in using Microsoft Entra ID, and the organization must be synced with Microsoft 365.
Yes. Each configured custom ticket form can have its own Support Bot command, such as salesform, or a button on the welcome card.
Desk365 has change/approval management functionality. Check the current Change and approval management guide for the supported approval workflow and available actions.