Managing multiple contacts within an organization often requires giving specific individuals access to all tickets associated with the company. This can be especially useful for managers, team leads, or stakeholders who need visibility into ongoing and resolved issues. Desk365 simplifies this process with its “Automation Rule” and “Share To” features. Below is a detailed guide to help you configure organization-wide ticket access for a specific contact.
Why grant organization-wide ticket access?
Enabling a contact to view all tickets tied to their company has several benefits:
- Improved visibility: Provides a centralized view of all tickets, enhancing accountability for issues across the organization.
- Streamlined tracking: Empowers managers and key stakeholders to monitor progress without relying on individual updates.
- Better collaboration: Facilitates seamless communication and coordination across departments or teams.
Step-by-step guide to configure access
Step 1: Access the automation rule settings
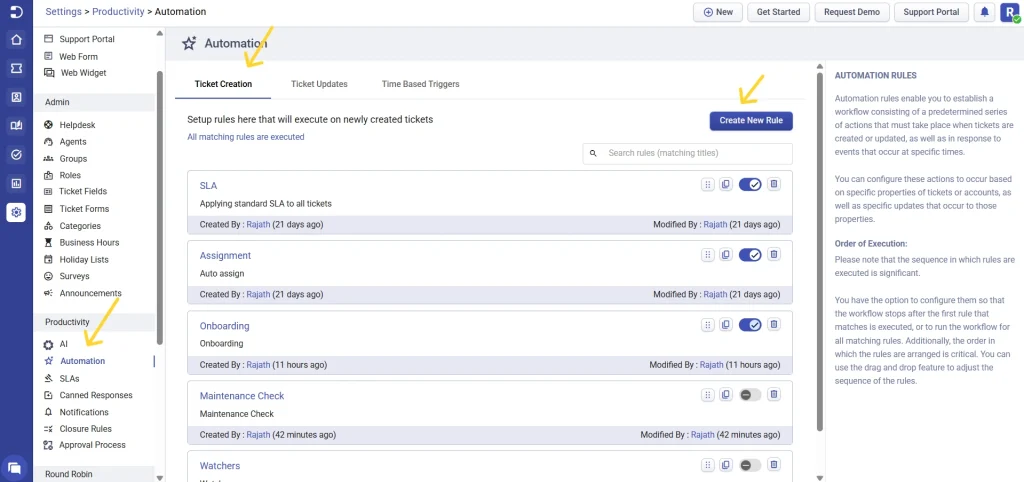
Navigate to Settings > Productivity > Automation. In the Ticket Creation category, click on Create New Rule.

Step 2: Define ticket properties
In the automation rule creation page:
- Give your rule a name and a description.
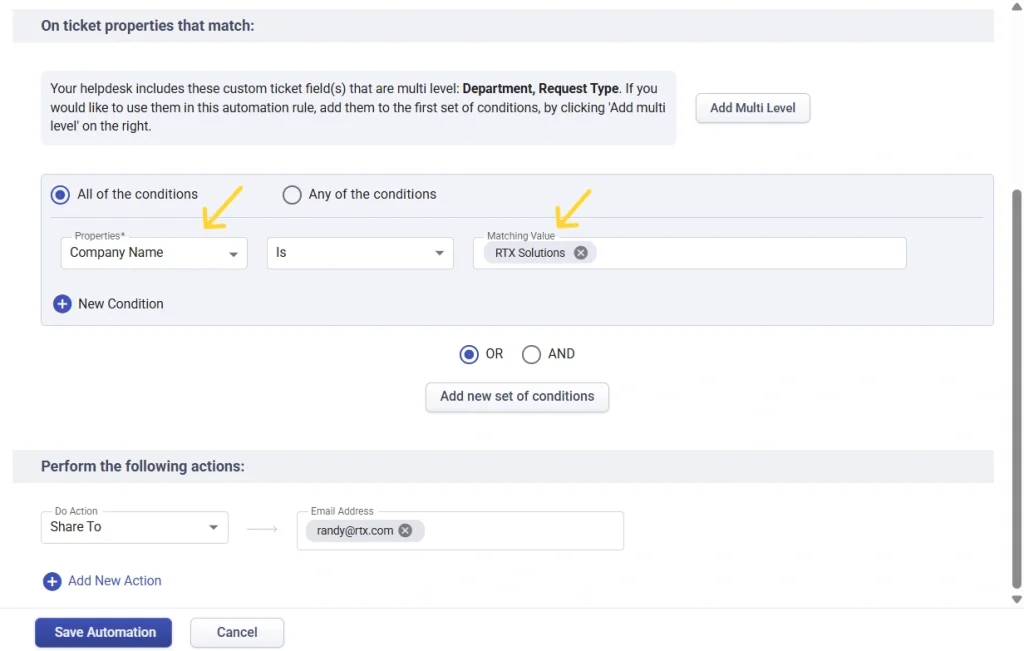
- Go to the “On ticket properties that match” section.
- Choose one of the following options from the dropdown menu:
– Company name: Select the specific company name whose tickets the contact should access.
– Company domain: Select the domain associated with the company to include tickets created with matching email domains.

Step 3: Configure the action
- Under the “Do Action“ section, select Share To from the available options.
- Enter the email address of the contact you want to grant access to all tickets associated with the company.

Step 4: Save and activate the rule
- Review the settings to ensure the rule is configured correctly.
- Click Save to activate the automation rule.
Key considerations
- Ensure active accounts: The contact must have an active account in your Desk365 system to receive access.
- Role and permissions: Confirm that the contact’s role aligns with your organization’s security and access policies.
- Regular audits: Periodically review and update the automation rules to ensure they reflect current business needs and permissions.
By using the automation rule and “Share To” functionality in Desk365, you can efficiently provide organization-wide ticket access to key contacts. This approach ensures transparency, simplifies tracking, and fosters better collaboration across teams.


