


Automation rules in Desk365 help you define a workflow with a predefined set of actions that have to occur during ticket creation as well as during ticket updates.
These actions can be triggered based on specific ticket or account properties and updates that happen to them.
By implementing workflow rules to automate ticket creation, updates, and time-based triggers, businesses can streamline operations, reduce errors, and enhance productivity.
Setting up automation rules in Desk365
Setting up automation rules in Desk365 is a straightforward process. First, you’ll need to define the trigger that will activate the rule, such as a new ticket being created or an existing ticket being updated.
Next, you can specify the conditions that must be met for the rule to take effect, such as the type of ticket or the status of the ticket.
Finally, you’ll define the actions that should occur when the rule is triggered, such as assigning the ticket to a particular agent or group, notifying an agent, adding notes, establishing SLAs, sending email notifications, and more.
With Desk365’s intuitive interface, you can easily configure automation rules to fit the unique needs of your business.
Setting up automation rules to run on ticket creation
This automation rule is triggered by the creation of a new ticket and will only be executed for newly created tickets.
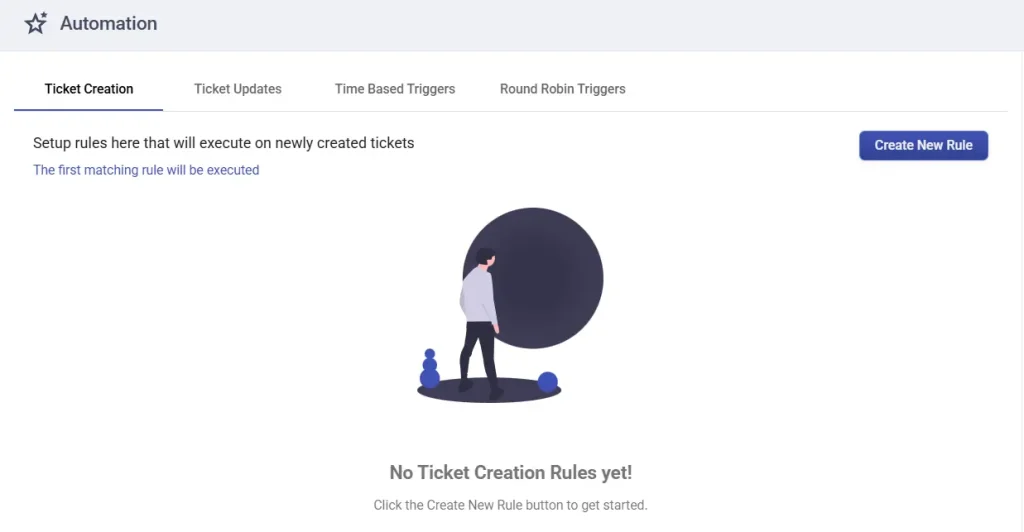
You can easily configure these rules by going to Settings > Productivity > Automation tab in Desk365 and choose the ‘Ticket Creation’ tab to get started.
From there, you can specify the ticket, account, or custom properties that must match in order for the rule to be triggered.
Once triggered, the actions you have defined will be executed automatically, streamlining your customer support process and saving you time and effort.
Automation rules for ‘Ticket Creation’ in Desk365 let you automate various tasks to simplify your customer support process. Here are some simple examples:
– Assigning tickets to specific agents based on ticket properties like category or priority.
– Setting ticket properties such as priority, type, status, and category.
– Updating the ticket status to ‘Waiting for Vendor’ or ‘On Hold’ based on specific criteria.
– Routing tickets to specific teams or departments based on their content or properties.
– Deleting tickets based on specific conditions and more.
Now, let’s explore the process of creating an automation rule in Desk365 that will be executed when a new ticket is created.
1. To get started, log in to your Desk365 account and go to the Settings > Productivity > Automation tab. From there, click on the ‘Create New Rule’ from the Ticket Creation tab.
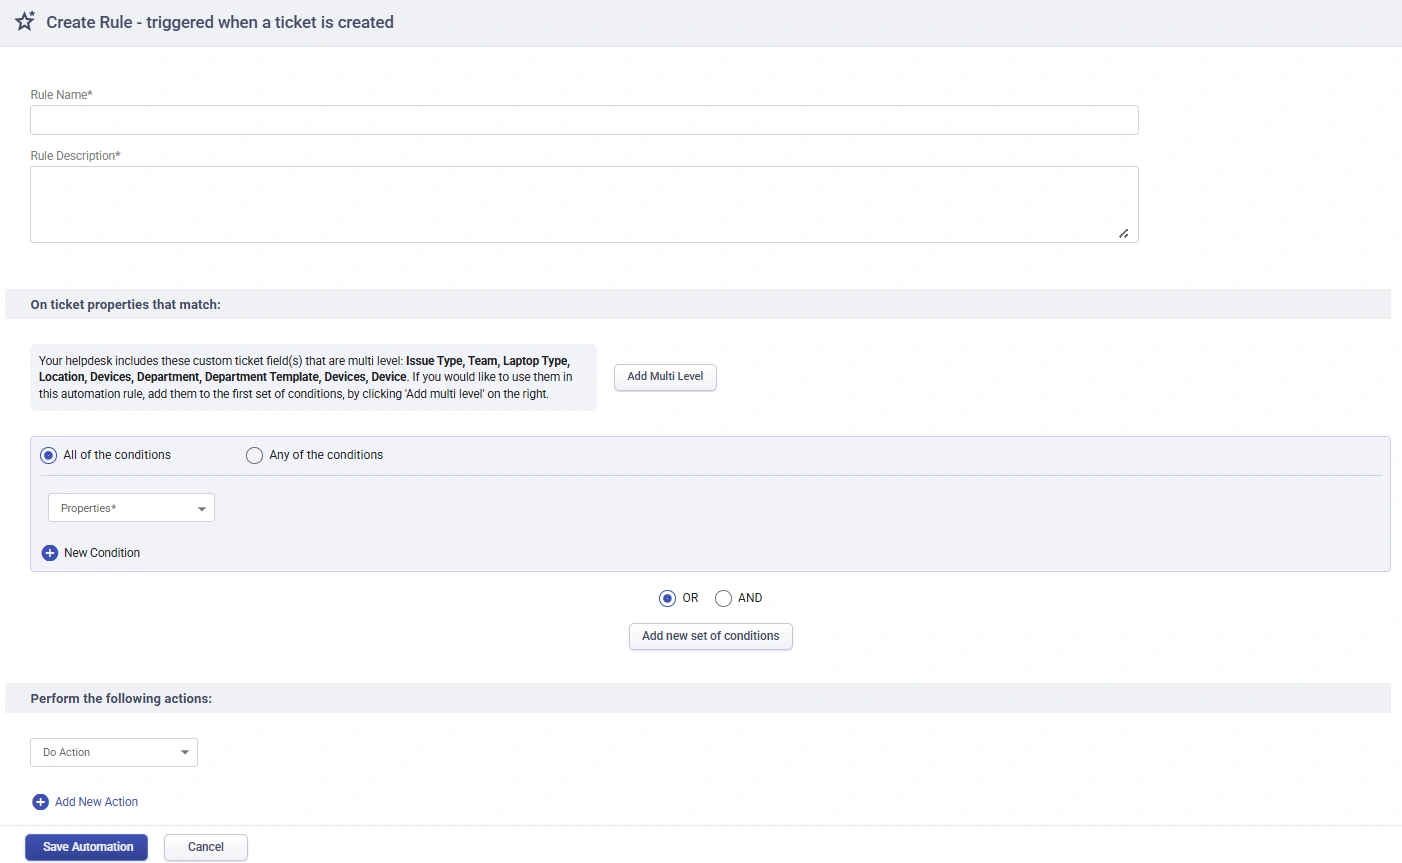
2. Provide a name for the rule and enter the description if you have any in the below box.

3. Set up Conditions which act as a trigger for this specific rule. You have two options here: ‘All of the conditions’ and ‘Any of the conditions’.
‘All of the conditions’ means that the ticket will only be triggered if all of the conditions are met. If any of the conditions are not met, the ticket will not be triggered.
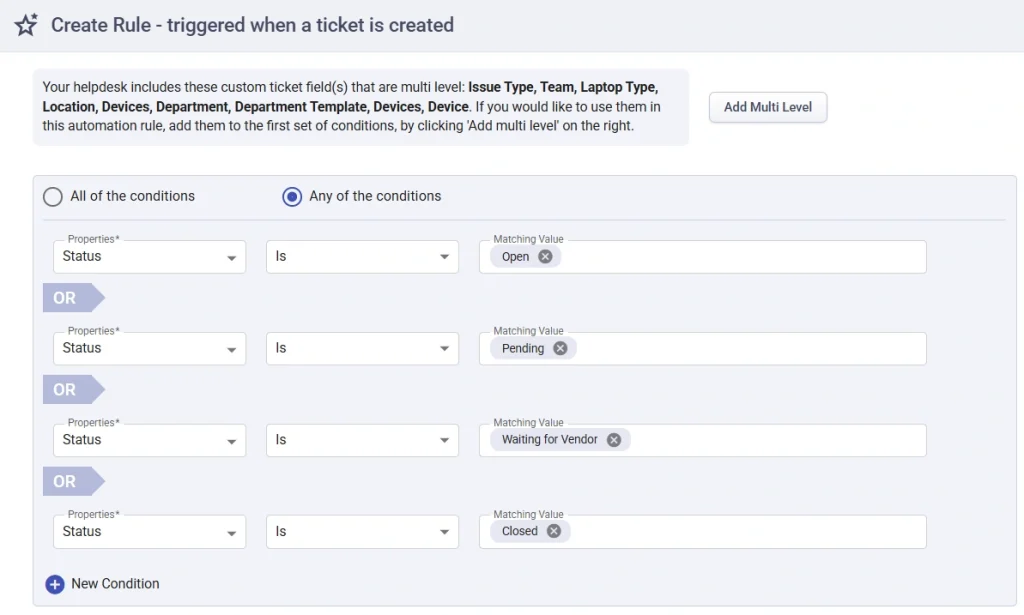
‘Any of the conditions’ means that the ticket will be triggered when any one of the properties or at least one of the properties matches with the properties of the ticket.
You can also use multi-level fields (such as dependent or hierarchical fields) as part of your conditions. When selected, these fields appear as part of the condition set, allowing you to define more granular rules based on layered selections. This helps you create more precise and context-aware automation workflows.
4. Choose the type of field you want from the dropdown list (ticket, custom or accounts).

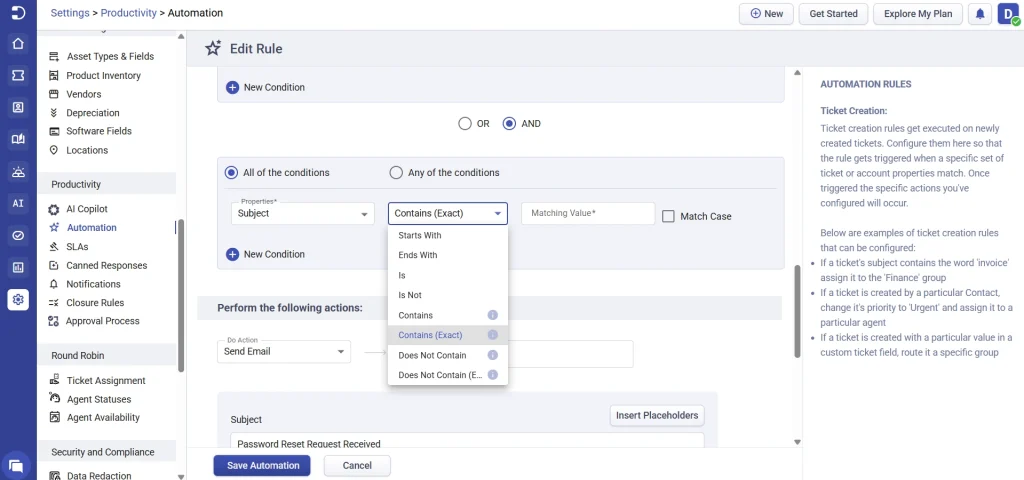
Use the Contains (Exact) and Does Not Contain (Exact) operators for the Subject, Description, Custom Text, and Custom Paragraph fields to make your automation rules more accurate. Unlike the existing Contains and Does Not Contain operators, these options match only complete words or complete phrases instead of partial text, helping avoid unintended matches.
Use Contains (Exact) when you want the rule to match only if the specified word or phrase is present as a complete word or phrase. Use Does Not Contain (Exact) when you want the rule to match only if the specified word or phrase is not present as a complete word or phrase.
Now, let us look into the different ticket properties we have in detail below:
Type: This property allows you to set the type of ticket as Question, Incident, Problem, Request, None, or Any.
Priority: Each ticket can be assigned a priority level of Low, Medium, High, Urgent, or Any to determine its resolution order.
Status: This property allows you to set the status of ticket as Open, Pending, Resolved, Closed, or Any.
Group: This property categorizes each ticket into different groups such as Sales, Finance, Tech Support, Marketing, L1 Support, or None.
Category: Tickets can be categorized as Billing, Hardware, Software or None.
Sub Category: Each category is divided into different subcategories.
Assign To: This property indicates which agent the ticket is assigned to.
CC Address: This property contains a CC Address associated with the ticket.
Subject: This property helps to identify tickets that contain certain keywords in the subject title.
Description: This property helps to identify tickets that contain certain keywords in the description.
Channel: A ticket can be created through different channels such as Microsoft Teams, Support Portal, Email, Web Form, Web Widget, Phone or Other.
Ticket Form: A ticket can be created through different forms such as IT Form, HR Form, Onboarding Form, and more.
Created: This property allows you to set-up rules tailored to when tickets are created, be it during business hours, outside regular hours, or even on holidays.
Custom Fields: If you’ve created any custom fields in your helpdesk, you can use them to establish an automation rule.
Now, let us look at the different Account Properties we have in Desk365:
Contact Name: This property refers to the name of the contact, where contacts are end-users who will be associated with a company.
Contact Email: This property is the email address of the contact.
Company Name: This property indicates the name of the company to which the ticket belongs to and can be used as a condition for filtering.
Company Domain: This property refers to the domain to which the company belongs.
You can also add more conditions if needed by clicking on the ‘New Condition’ button.
You can also use conditions that apply to a set of criteria collectively, where we use both ‘AND’ and ‘OR’. This can be done by clicking on the ‘Add new set of conditions’ button, as shown in the screenshot below.

Now, configure the actions to be executed on the ticket after the specified conditions have been met.
There are several actions that can be performed when the ticket is triggered. Let’s look at them below:
Set Priority: When a new ticket is created, it will be assigned a default priority level based on the matching value (low, medium, high, or urgent).
Set Type: If all the conditions are met, the type of the ticket will be changed according to the matching value field input.
Set Status: When the specified conditions are met, the status of the newly created ticket will be automatically set to the specified value.
Set Category: If all the conditions are met, the category of the ticket will be changed to the value specified in the field.
Add Public Note: When a ticket meets the specified criteria, a public note can be attached to it.
Add Private Note: When a ticket meets the specified criteria, a private note can be attached to it.
Add a CC: Contacts whose email addresses are specified in the matching value field will be added in CC when a ticket meets the criteria.
Assign to Agent: Tickets that meet the criteria will be assigned to a specific agent.
Assign to Group: Newly created tickets that meet the criteria will be directly assigned to the specified group.
Delete the ticket: If a ticket meets the criteria, it can be deleted. This action should only be used if you are certain that the ticket is false.
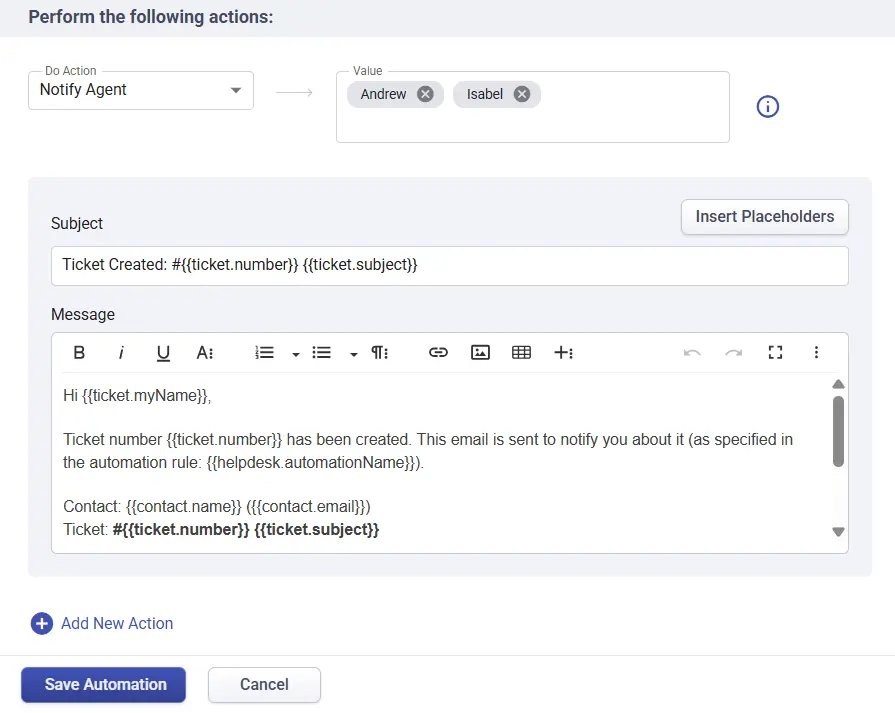
Send Email: When a ticket meets the specified criteria, you have the option to send an email to the ticket requester, select any contact from the available list or add a new contact.
You can also include any CC recipients that were added during ticket creation, these will be automatically included in the email regardless of the primary recipient selected.
Notify Agent: Whenever a ticket is created, one or more agents can be notified.
Notify Group: Whenever a ticket is created, the ticket assigned group or one or more groups can be notified.
Request Approval: When a ticket meets the specified conditions, the system will automatically trigger the relevant approval workflow to ensure the right process is followed
Forward: When a ticket meets the specified criteria, you have the option to forward an email to the ticket requester, choose any contact from the list or add a new contact.
Set SLA: When a ticket meets the specified criteria, you have the option to assign an SLA specifically for that ticket.
Trigger Webhook: If the required conditions are satisfied, you can send an HTTP POST request to a specified URL, which can trigger an external application or service.
Add Tasks To Do: Enable actionable tasks to be added to tickets, ensuring efficient workflow management and timely task completion.
Add Time Entries: Facilitate accurate tracking and reporting of time spent on resolving tickets for better resource utilization.
Add Watcher: Automatically include relevant team members as watchers to ensure timely updates and foster collaboration.
Share To: Share tickets with designated contacts to streamline teamwork and expedite issue resolution processes.
Set Sub Category: Organize tickets more effectively by assigning specific subcategories for detailed tracking and management.
Set Ticket Subject: If all the conditions are met, the subject of the ticket will be updated to the specified value automatically
Notify Contact via Teams: Keep ticket requesters informed in real-time by sending automated notifications through Microsoft Teams.
Choose the desired action from the ‘Do Action’ dropdown menu. If needed, you can also add multiple actions by clicking on the ‘Add New Action’ button and remove an action at any point of time using the ‘Remove’ (-) icon.
After configuring all the conditions and actions, click the Save button to create your automation rule.
Once the rule is created, you’ll notice it appearing on the ‘Ticket Creation’ tab in Desk365.

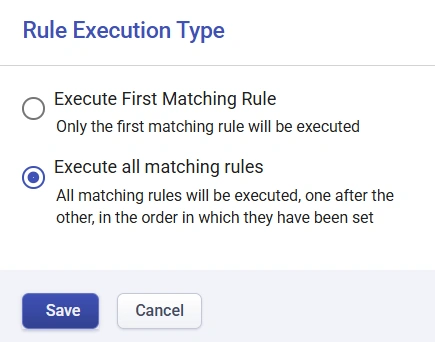
How rules are executed
Please note that the order in which the rules are executed is important. You can set them so that the workflow stops after the first matching rule is executed or run the workflow for all the matching rules. Also, the order of the rules is important.
Examples of automation rules that you can set-up during ticket creation
There are several automation rules that you can set up during ticket creation that can automate tasks such as ticket assignment, adding notes to a ticket, sending email notifications, and more.
Let’s explore some examples of automation rules that you can set up during ticket creation to improve your workflow.
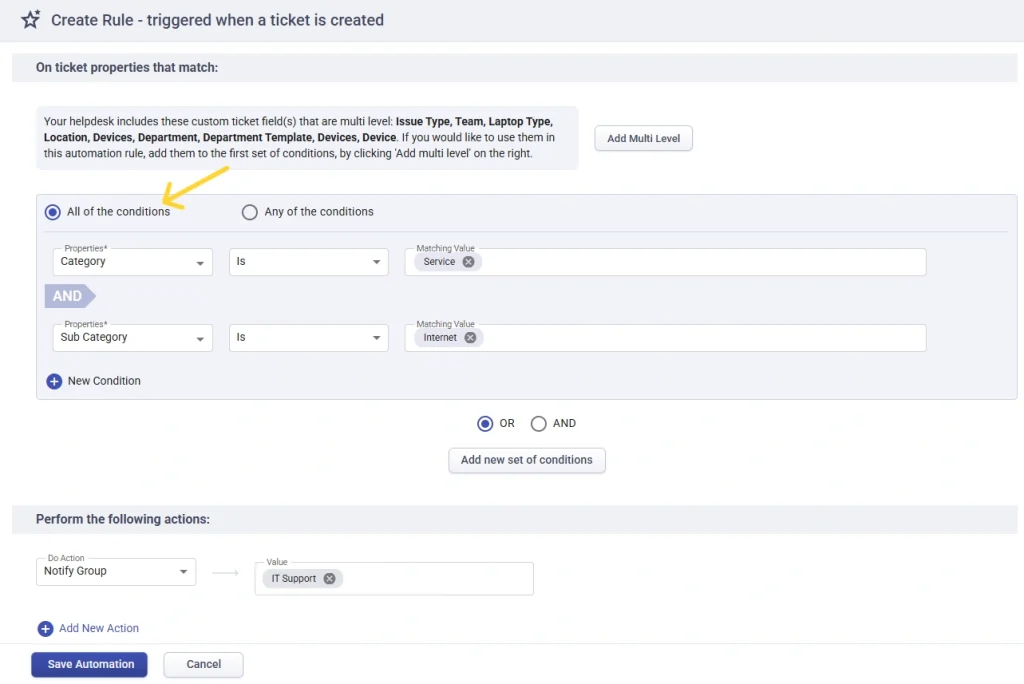
Notifying IT Support team when end-users encounter internet related problems
Imagine a scenario where the end-users in your organization are encountering severe internet problems, and it is crucial to ensure that your IT support team is notified promptly every time it occurs.
The IT Support team requires this in order to troubleshoot the issue and promptly resolve it, which will help minimize any disruptions caused by internet problems for your end-users.
Choose the type of field from the dropdown list that will assist you in configuring this automation.
Select the desired action from the ‘Do Action’ dropdown menu.
After configuring all the conditions and actions, click the Save button to create your automation rule.
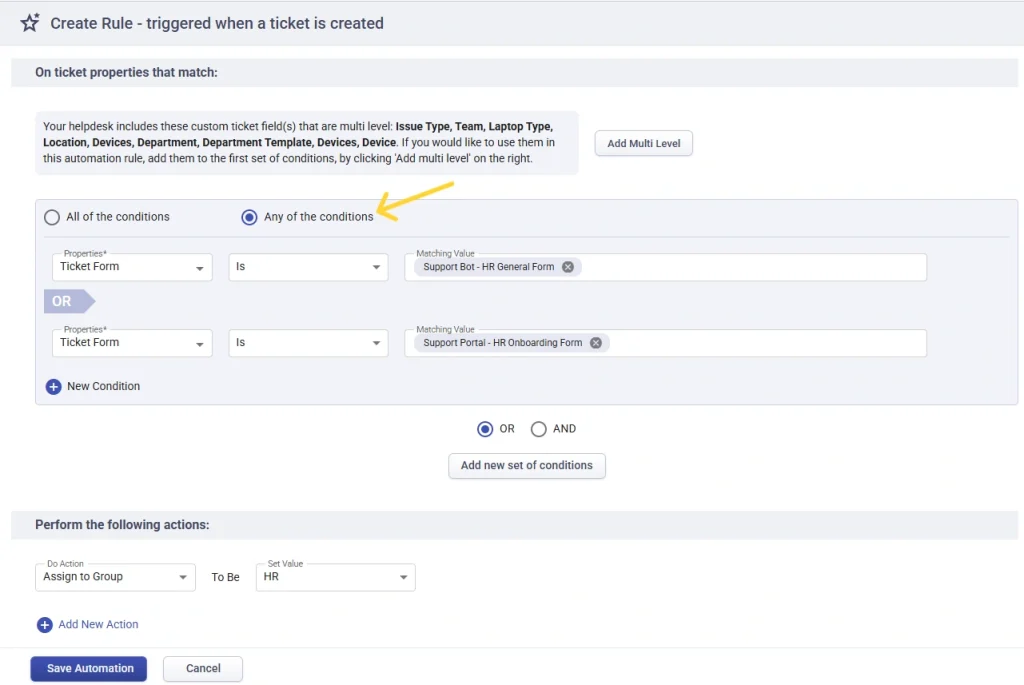
Assigning the tickets to the right group when a ticket is created from ticket forms
Assigning tickets to the correct group based on their origin is an important aspect of optimizing the support process.
By automatically assigning tickets to the appropriate group when they are created from specific ticket forms, such as HR ticket forms or IT ticket forms, the workflow becomes more streamlined, and the resolution time is significantly reduced.
For example, if a ticket is submitted through an HR ticket form, it should be automatically routed to the HR support group.
This ensures that the right team with the relevant expertise is handling the ticket, and there is no delay in resolving the issue. This also avoids the need for manual assignment and reduces the risk of tickets being overlooked or lost in the system.
Setting up automation workflows is another critical help desk best practice that Desk365 enables, allowing you to streamline your ticket management process and enhance overall customer support efficiency.
By using automation rules in Desk365, organizations can improve customer service response times, increase agent productivity and profitability, and provide a better overall customer experience.
Overall, Desk365 has the tools and features to automate almost any task. By automating routine tasks, businesses can free up their staff to focus on more important tasks, increase accuracy and consistency, and ultimately, deliver a better experience for their customers.


