


Time Based Triggers allow you to automate actions based on a specific time frame. By setting up automation rules to run on time based triggers, you can save time and improve efficiency in your helpdesk operations.
For example, you can set up a time based trigger to escalate unresolved tickets to higher-level support after a certain amount of time has elapsed. This helps ensure that critical issues are not left unresolved and that customers receive the support they need in a timely manner.
In this article, we’ll take a closer look at how to set up automation rules to run on time based triggers in Desk365.
Creating automation rules to run on 'Time Based Triggers'
With this feature, you can define specific actions based on time and event-based triggers, seamlessly integrating your workflows into your helpdesk for maximum efficiency.
To set up automation rules to run on time based triggers, these are the steps to follow.
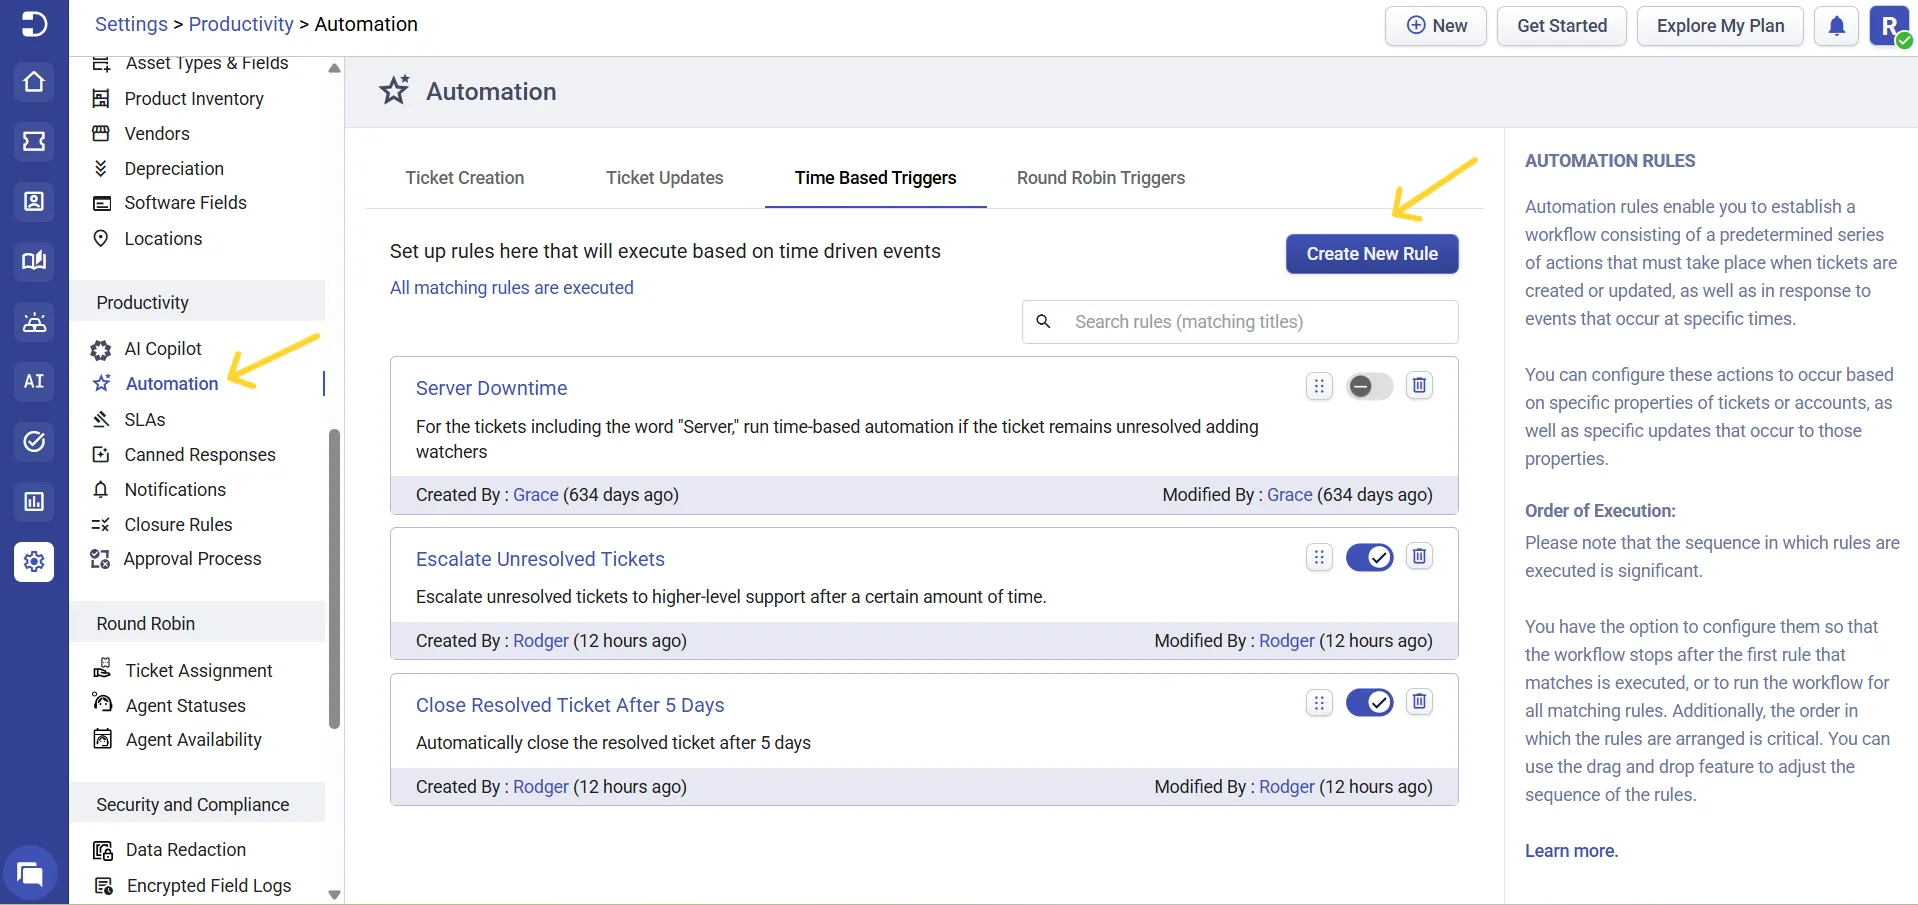
1. To get started, log in to your Desk365 account and navigate to the Settings > Productivity > Automation tab. From there, click on the ‘Create New Rule’ from the ‘Time Based Triggers’ [Beta] tab.
2. Provide a name and enter the description for the rule in the below box.

3. Choose how the elapsed time should be calculated from the hours calculation based on the dropdown.
When creating or editing a Time-Based Trigger rule, you can choose how the elapsed time is calculated before the automation is triggered. This setting determines whether the rule counts every hour continuously or only your configured working hours.
You can choose from the following options:
- All Hours (24 hrs × 7 days) (default) – The elapsed time is calculated continuously, including business and non-business hours.
- Business Hours – The elapsed time is calculated only during your configured business hours. Any time outside those working hours will be excluded from the calculation. This option is useful when you want automation rules to align with your organization’s operating schedule.
When business hours is selected, the calculation is based on the business hours configured for the ticket assigned group. If the ticket is not assigned to a group, the standard helpdesk hours configured for the helpdesk are used instead.
Learn more about how to configure business hours.
4. Set up Conditions which act as a trigger for this specific rule. You have two choices here: ‘All of the conditions’ and ‘Any of the conditions’.
‘All of the conditions’ means that the ticket will only be triggered if all of the conditions are satisfied. If any of the conditions are not met, the ticket will not be triggered.
‘Any of the conditions’ means that the ticket will be triggered when any one of the properties or at least one of the properties matches with the properties of the ticket.
5. Choose the type of field you want from the dropdown list (ticket, custom, accounts, or time based trigger).

Now, let us look into the different time based trigger properties in detail below:
Hours Since Awaiting Customer Response: Time elapsed since the ticket status was updated to “Awaiting Customer Response.”
Hours Since Waiting for Vendor: Time elapsed since the ticket was marked as “Waiting for Vendor” for further action or input.
Hour Since Open: Time elapsed since the ticket was created and opened.
Hours Since Waiting for Approval: Time elapsed since the ticket was updated to “Waiting for Approval” for decision-making or clearance.
Hours Since Approved: Time elapsed since the ticket was marked as “Approved” for execution or resolution.
Hour Since Pending: Time elapsed since the ticket was last marked as pending.
Hour Since Resolved: Time elapsed since the ticket was marked as resolved.
Hour Since Closed: Time elapsed since the ticket was closed.
Hours Since Created: Time elapsed since the ticket was created.
Hours Since Reopened: Time elapsed since the ticket was last reopened.
Hours Since First Assigned: Time elapsed since the ticket was first assigned to an agent.
Hours Since Latest Assigned: Time elapsed since the ticket was last assigned to an agent.
Hours Since Contact Responded: Time elapsed since the contact last responded to the ticket.
Hours Since Agent Responded: Time elapsed since the agent last responded to the ticket.
Now, let’s take a look at some common examples of how these time based trigger properties can be useful.
=> An instance of creating an automation rule is by utilizing the ‘Hours Since Agent Responded’ time based trigger property, which can trigger a reminder email to be sent to a contact in case they haven’t replied to an agent’s message regarding a ticket within a specific timeframe. This can help prevent tickets from falling through the cracks and improve customer satisfaction.
=> Similarly, you can use a ‘Hours Since Contact Responded’ time based trigger property to set up an automation rule that sends a reminder email to an agent in case they haven’t responded to a reply from a customer regarding a ticket within a certain amount of time. This can ensure that agents follow up with customers in a timely manner and provide a better customer experience.
6. Now, configure the actions to be executed on the ticket after the specified rule conditions have been met.
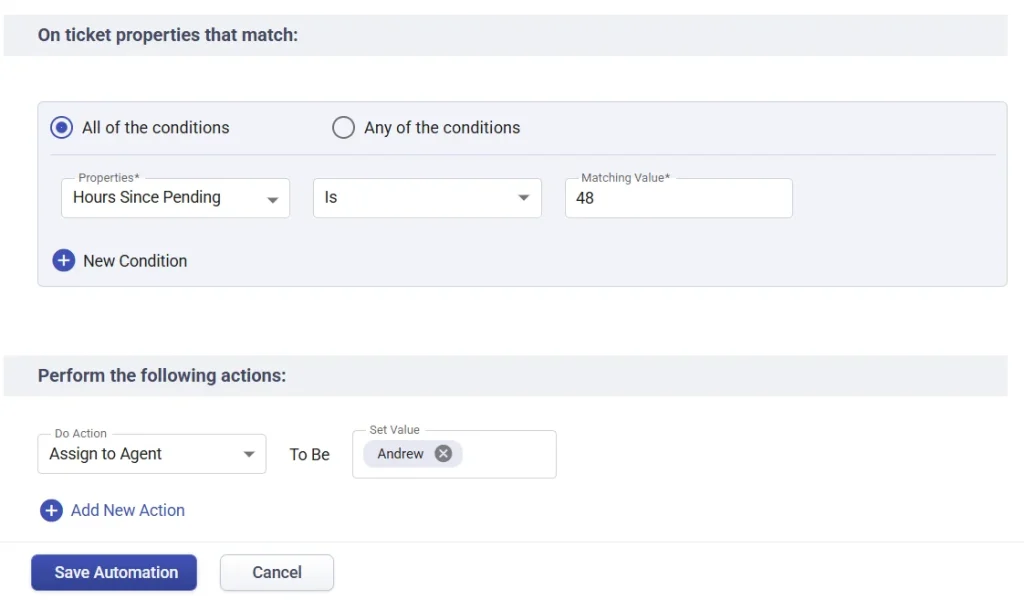
After configuring all the conditions and actions, click the ‘Save Automation’ button to create your automation rule.
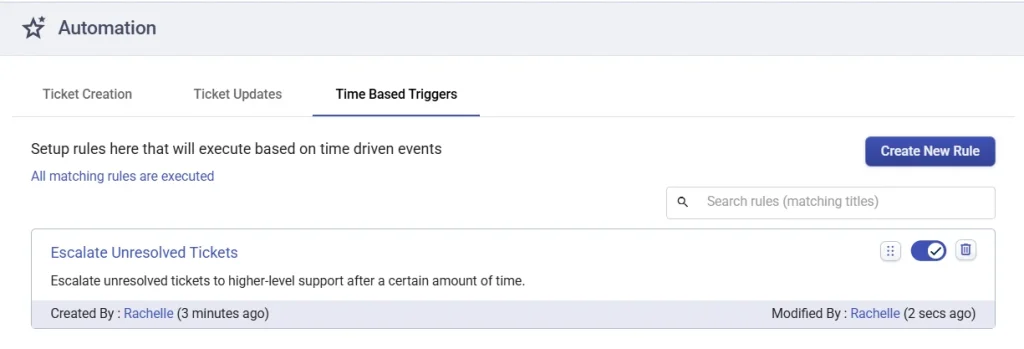
Once the rule is created, you’ll notice it appearing on the ‘Time Based Triggers’ tab in Desk365.
Using time based triggers to run multiple times
Time-based triggers can be configured to run multiple times for a ticket, ensuring automation remains active throughout the ticket’s lifecycle.
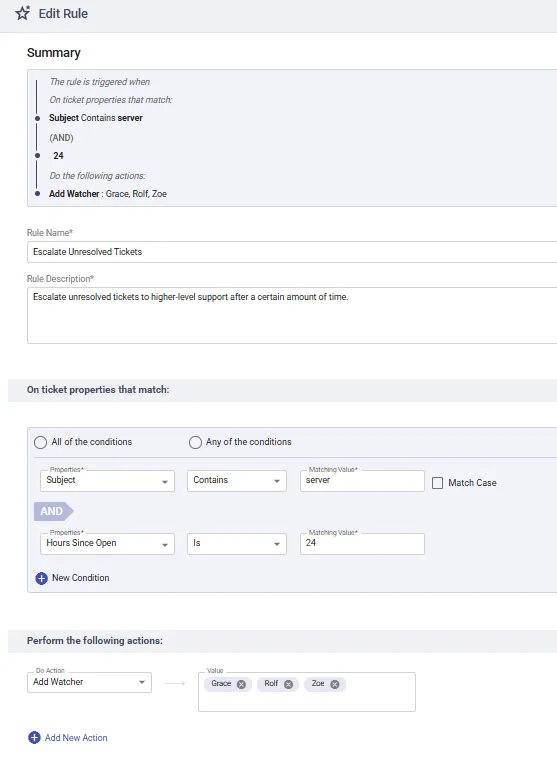
For example, imagine a ticket with the subject line “Server not responding.” If the ticket remains open for more than 24 hours, the rule triggers and adds additional watchers to ensure the issue gets attention. If the ticket is later closed but then reopened because the problem occurs again, the rule will run once again.
This way, critical issues continue to get visibility every time the condition is met.
Time based trigger examples
Here are some common time based triggers that you can use to streamline your helpdesk operations:
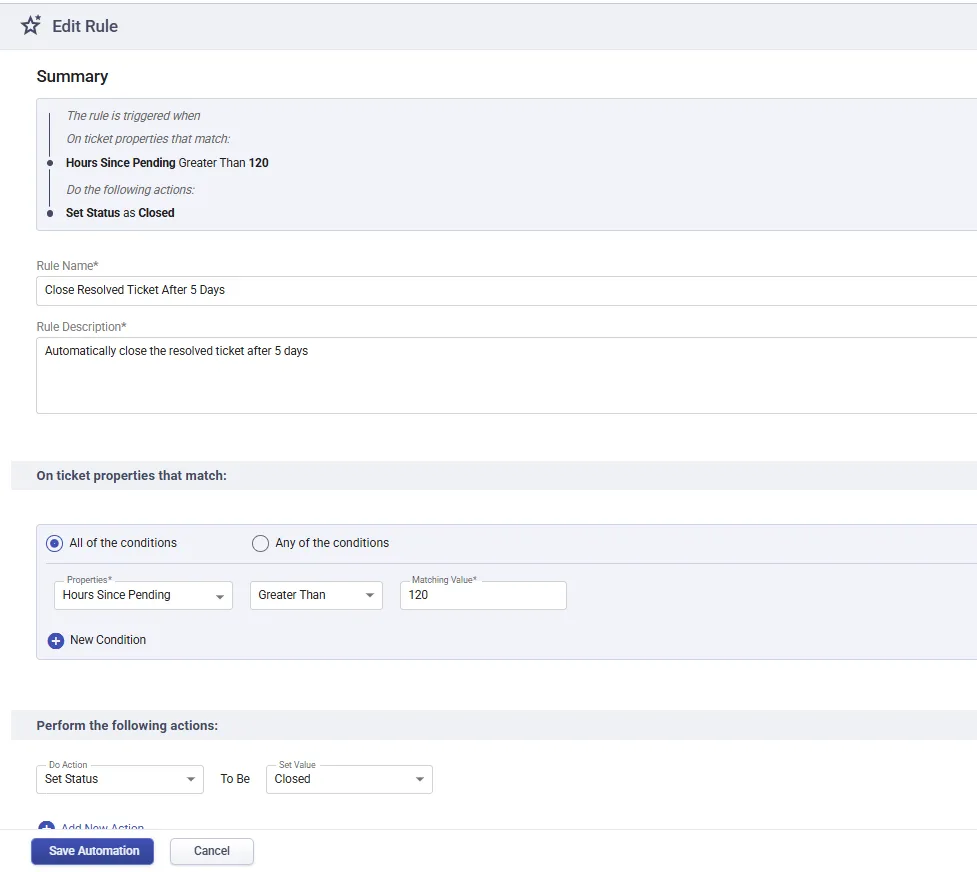
Auto-closing of tickets: Automatically close resolved tickets after 120 hours
Desk365 offers a default automation rule that automatically closes resolved tickets after 120 hours (5 days) if no further activity or response is received from the customer. This feature helps keep your helpdesk organized by preventing resolved tickets from remaining open unnecessarily. The rule is enabled by default but can be easily turned off or customized according to your needs by toggling the settings in the automation menu. This automation saves time by ensuring that your team can focus on active tasks while Desk365 handles the timely closure of resolved tickets.
Reminders for pending tickets
If a ticket has been pending for a certain amount of time, you can set up a rule to send a reminder to the assigned support agent. This ensures that support agents stay on top of pending tickets and can prioritize their workload accordingly.
Additionally, you can use these time based triggers to automate other routine tasks such as updating ticket fields, assigning tickets to agents, and sending notifications to customers and agents.
However, it is important to note that you should use these triggers wisely and only for tasks that require regular and timely action.
Overusing these triggers can lead to unnecessary automation and clutter your helpdesk with irrelevant information.


