


Assigning tickets to the correct groups within your organization is a critical aspect of ensuring timely and accurate resolution.
One of the most useful automation rules is assigning tickets to groups and notifying the assigned groups instantly during ticket creation. This feature allows you to categorize customer requests based on their nature and assign them to the relevant team or department.
In this help center article, we will discuss how to set up automation rules to assign tickets to groups during ticket creation and the benefits of doing so.
What are groups in Desk365?
Groups are a way to organize customer requests into categories or departments. This helps your team manage and respond to requests more easily. For example, if you run an online store, you might have groups for shipping, billing, and returns.
You can create groups in Desk365 based on expertise, product knowledge, language skills, location, and more. By categorizing requests into groups, you can make sure they’re handled by the appropriate team.
Why assign tickets to groups during ticket creation?
Assigning tickets to groups during ticket creation has several benefits. Firstly, it ensures that the ticket is assigned to the right team or department. For example, if a customer has a technical issue, the ticket can be assigned to the technical support team, while a billing issue can be assigned to the finance team.
Secondly, assigning tickets to groups can help streamline your support process. By assigning tickets to groups, you can ensure that the right team or department is working on the ticket, which can help reduce response times and improve customer satisfaction.
Instead of manually assigning tickets to individual agents, helpdesk software like Desk365 allows for the automation of this task. Automation rules enable tickets to be assigned to specific groups based on predefined criteria, such as ticket type, priority, departments, locations, and more.
How to assign tickets to groups using automation in Desk365
To assign tickets to groups during ticket creation, you will need to set up an automation rule in Desk365. Here’s how to do it:
Step 1: Accessing automation rules settings
Log in to your Desk365 account and go to the Settings > Productivity > Automation tab.
Step 2: Creating a new automation rule
Click on the ‘Create New Rule’ from the Ticket Creation tab. Enter a name and description for the rule which you’re going to create.
Step 3: Setting conditions for ticket assignment
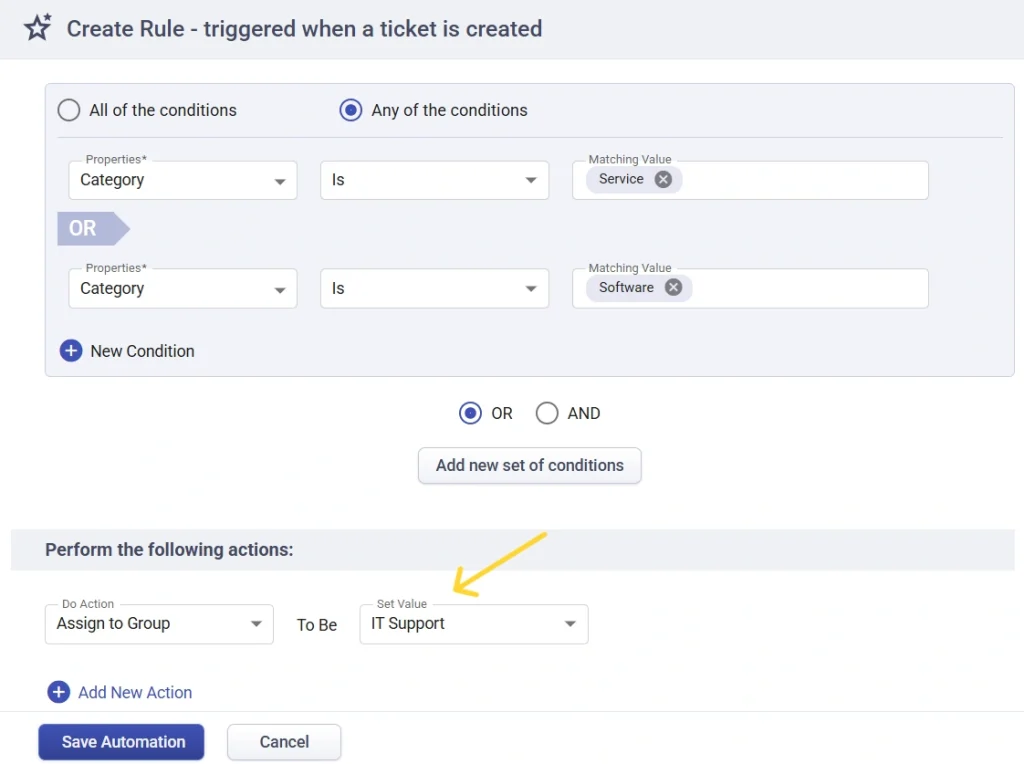
Select the condition that will trigger the automation rule. For example, suppose you intend to establish a rule where tickets categorized as either ‘Service’ or ‘Software’ should be routed to the IT department.
Step 4: Assigning tickets to specific groups
Select the action that will be performed when the condition is met. In this case, you will select “assign the ticket to the ‘IT Support’ group.
Step 5: Save the automation rule.
Once you have saved the automation rule, any new tickets that meet the condition you set will be automatically assigned to the designated group.
Assigning tickets to a group using automation is a powerful feature that can help streamline your customer service operations and improve customer satisfaction. As your business grows, automation can help you scale your customer service operations and ensure that you provide excellent service to your customers.
How to notify the assigned group automatically
In addition to assigning tickets to groups, Desk365 also allows you to automatically notify the assigned group through automation rules.
The ‘Ticket assigned group’ do action is available under the Notify Group action in automation. With this option, whenever a ticket is created or updated and assigned to a group, all agents in that group are instantly notified.
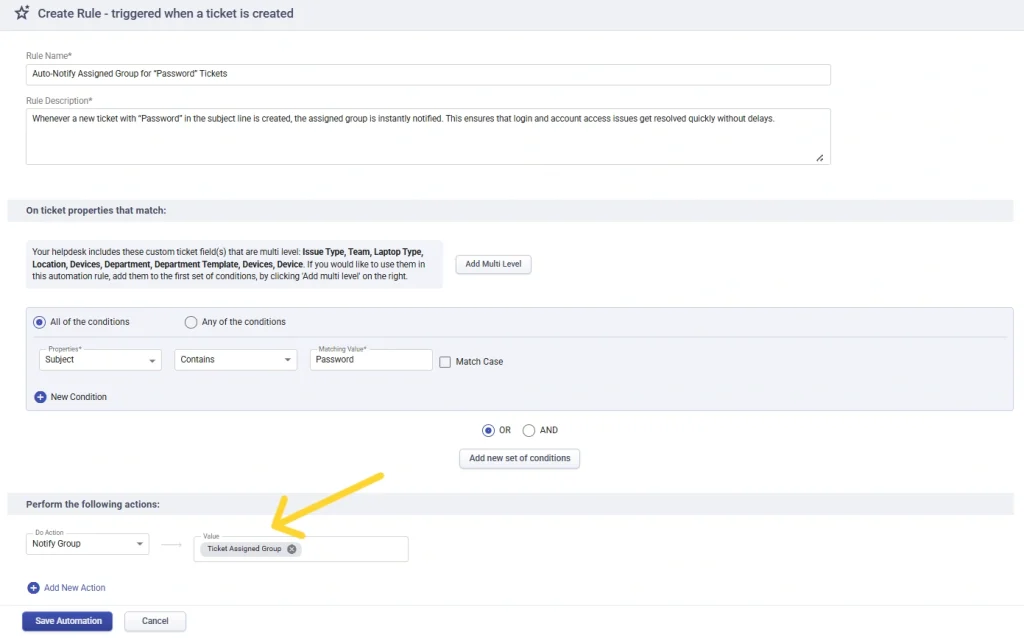
This ensures, the right people are alerted immediately, no tickets slip through the cracks, and you don’t need to manually configure separate notifications for each group.


