One valuable feature in Desk365 that can enhance the effectiveness of automation rules is the utilization of custom ticket fields.
You can create custom fields that will be available in your automation rules. This means that you can set up rules to trigger actions based on these custom fields, allowing you to automate your workflow even further.
By incorporating custom ticket fields into these rules, you can add an extra layer of personalization and precision to your automated processes.
In this help center article, we’ll delve into the details of using custom ticket fields in automation rules to provide seamless and personalized support experiences.
Using custom ticket fields in automation rules
Custom ticket fields are specialized data fields that can be added to your support tickets, allowing you to collect specific information from your end-users. These fields can range from dropdown menus for issue categories to text fields for additional details.
By incorporating automation rules into the mix, you can create predefined conditions based on the values entered in the custom fields and also set predefined values to these custom fields on conditions that you define. This dynamic approach not only saves time but also ensures consistency and accuracy.
Create custom fields
To get started, let’s create the custom fields before we apply them in automation rules. Simply navigate to Settings > Admin > Ticket Fields tab in your helpdesk. From there, you can select the field type you wish to create — such as a text field, dropdown menu, checkbox, or others — and then proceed to create a new custom field.
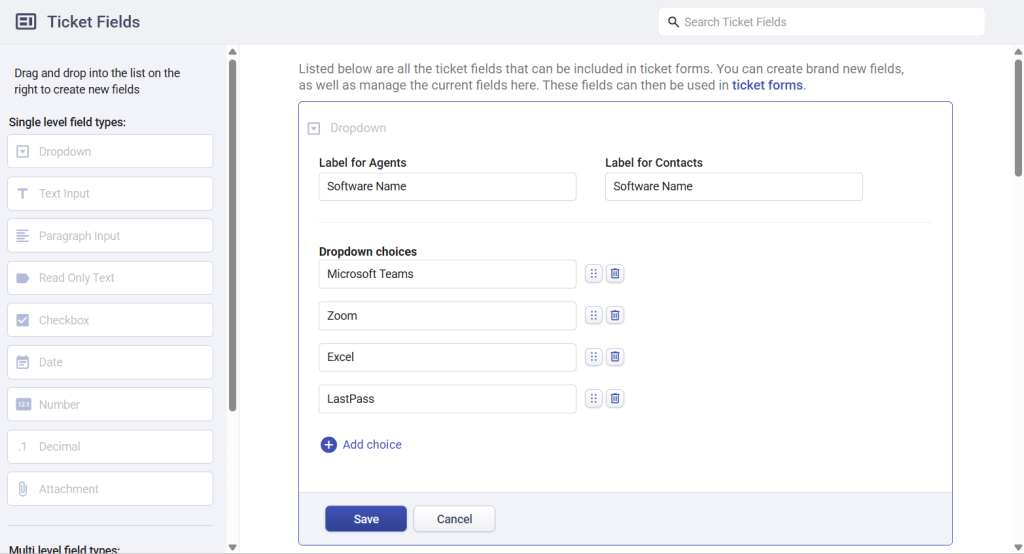
For example, let’s create a custom dropdown field named Software Name. Within the Software Name dropdown, include options such as Microsoft Teams, Zoom, Excel, and LastPass.
We will be using this field in the condition section of automation at the later section of this article.
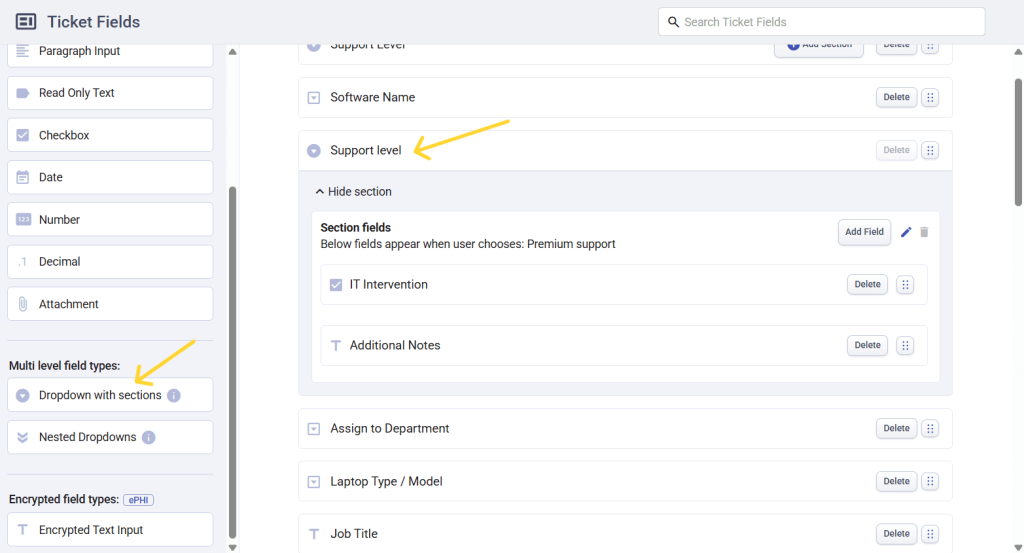
Let’s create a dropdown with sections fields called Support Level and include the section – Premium Support. Under this section let’s create the fields – IT Intervention and Additional Notes.
For more details on creating dropdowns with sections, you can refer to the Desk365 documentation.
Use custom fields in conditions and actions
Once you have created your custom field, you can then use it in your automation rules.
For example, whenever a ticket is created with the field Software Name as Microsoft Teams, you want to set other custom fields so that appropriate agents can handle this ticket more efficiently.
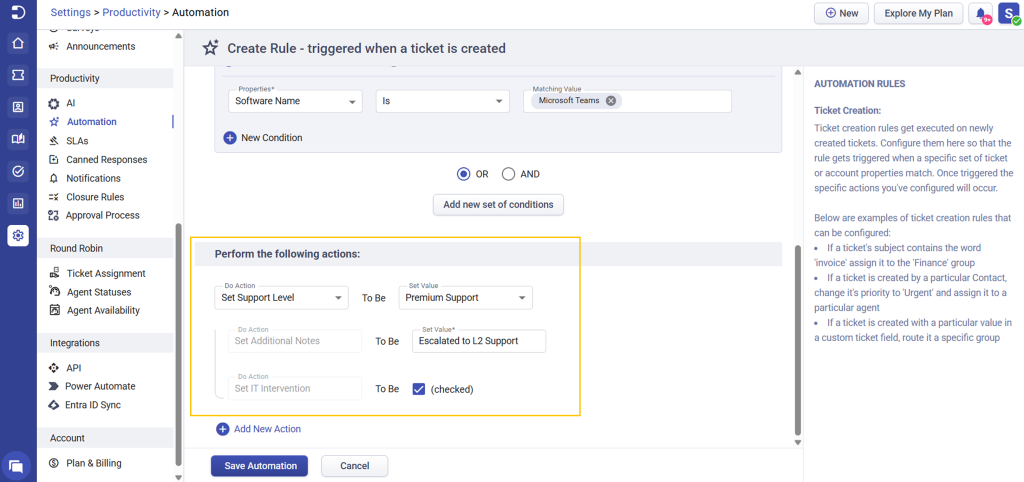
Go to Settings -> Automation -> Ticket creation -> Create new rule. Under ‘On ticket properties that match’, set the condition – Software name → Microsoft Teams. Under ‘Perform the following actions’, set the relevant custom fields as shown below:
- Set Support Level → Premium Support
- Set Additional Notes → Escalated to L2 Support
- Set IT Intervention → Checked
Likewise you can do similar customization in the automation ticket update rule as well as automation time triggers.
This gives you even more control over your helpdesk workflow and allows you to tailor your automation rules to your specific needs.
Whether you need to assign tickets based on location, ticket form, product type, or any other custom field, this feature makes it easy to set up the rules you need.
Incorporating custom ticket fields into your automation rules can revolutionize your customer support efficiency. Tailoring your processes to individual needs while streamlining repetitive tasks leads to happier customers and a more productive support team.