


In the fast-paced world of customer service, delivering relevant and personalized information is crucial to meet the diverse needs of users. This is where dynamic content and placeholders come into play.
Placeholders are a useful feature that allows you to customize your responses and save even more time. Understanding placeholders empowers support agents to deliver tailored responses, ensuring customers feel heard and valued.
In this help center article, we’ll delve into the process of creating and implementing placeholders in Desk365.
What are placeholders?
Placeholders, also known as variables or dynamic fields, are snippets of text that can be customized to display specific information when used in communication templates. They allow support agents to personalize responses, making them more relevant and empathetic.
When you use a placeholder, Desk365 will automatically replace it with the corresponding value when you send the response.
For example, you can use the placeholder {{customer_name}} to insert the customer’s name into your response. You can even use multiple placeholders in a single response.
How placeholders work?
Imagine an agent who has just received a support ticket. By using placeholders, you can smoothly incorporate context-specific information like the customer’s name, the agent’s name, ticket URLs, and additional details into your notification and response templates.
As the ticket undergoes processing, these placeholders get dynamically substituted with real data, resulting in responses that are not only efficient but also highly relevant.
Custom fields in placeholders: An added advantage
With Desk365, adding placeholders to your canned responses and notifications are even more flexible. You now have the ability to incorporate your preferred custom ticket fields as placeholders within the canned response or notification intended for your end users as well as the agents.
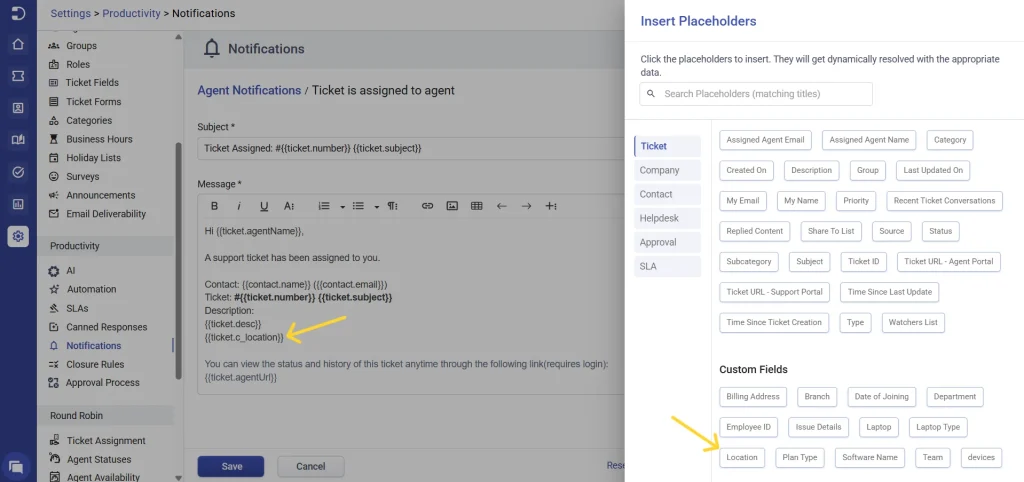
For instance, let’s say you’ve included a ‘location’ ticket field and wish to present the end user’s location to your agent in the notification they receive.
In this scenario, you can effortlessly insert the ‘location’ placeholder into your Agent Notifications template. This placeholder dynamically populates with the relevant information from the ticket.
Full JSON for nested dropdown fields
JSON support for placeholders, enable you to insert structured data from nested dropdowns into agent and contact notifications, and automations.
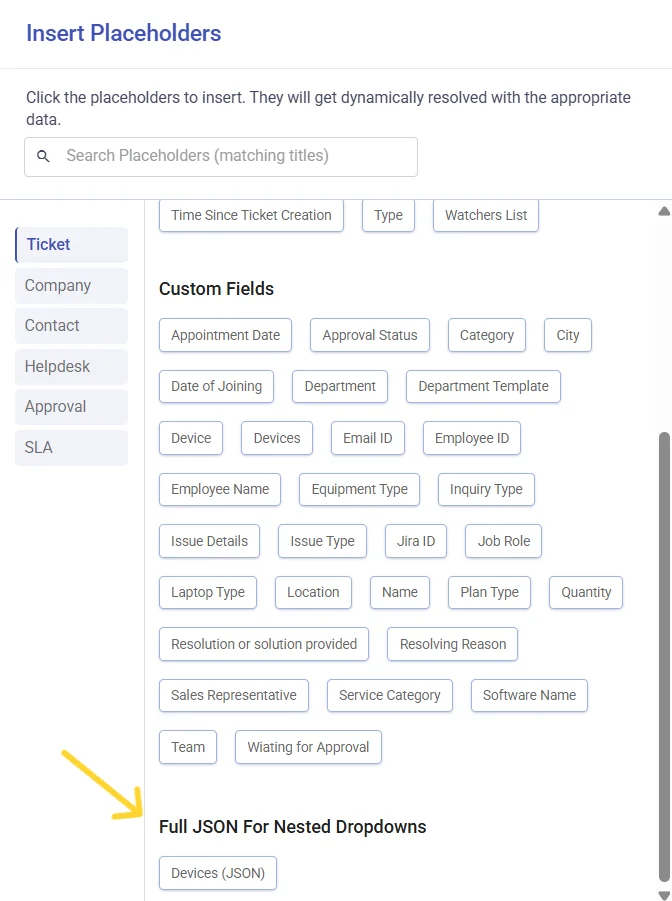
Unlike regular placeholders that only display the final selected value, JSON placeholders return the entire hierarchy. For example, an IT team can include full device details in an approval email, so managers see the category → brand → model before approving a request. Instead of just showing “Latitude 5520”, JSON will return Laptop → Dell → Latitude 5520.
This provides:
- Full context in communications (agents and managers see the entire selection path).
- Smarter workflows, since automations can act on the complete structured data.
A complete list of placeholders in Desk365
Here is the complete list of placeholders available in Desk365. Now, let us look into the different placeholders and what they represent in detail below.
Ticket Placeholders:
Placeholders
Functions
{{ticket.agentEmail}}
{{ticket.agentName}}
{{ticket.category}}
{{ticket.createdOn}}
{{ticket.desc}}
{{ticket.group}}
{{ticket.lastUpdatedOn}}
{{ticket.myEmail}}
{{ticket.myName}}
{{ticket.priority}}
{{ticket.recentConversations}}
{{ticket.repliedContent}}
{{ticket.shareToList}}
{{ticket.source}}
{{ticket.status}}
{{ticket.subcategory}}
{{ticket.subject}}
{{ticket.number}}
{{ticket.agentUrl}}
{{ticket.supportUrl}}
{{ticket.timeSinceLastUpdate}}
{{ticket.timeSinceCreation}}
{{ticket.type}}
{{ticket.watchersList}}
{{ticket.c_custom_field}}
{{ticket.c_custom_field_json}}
Email address of the assigned agent
Name of the assigned agent
Category of the ticket
Date and time when the ticket was created
Description of the ticket
Group which the tickets belong to
Date and time when the ticket was last updated
Logged in Agent’s email address
Logged in Agent’s name
Priority of the ticket
Recent conversations related to the ticket
Replied content of the ticket
List of contacts or end-users the ticket is shared with
Displays the source of the ticket (Microsoft Teams, Email, Support Portal, Web Form etc.)
Status of the ticket
Subcategory of the ticket
Subject of the ticket
The unique ticket number generated for each ticket
URL of the ticket for agents in the Agent Portal
URL of the ticket for end-users in the Support Portal
Time since the ticket was last updated
Time since the ticket was created
Type of the ticket (Question/Issue/Incidence/Request)
List of all agents added as Watchers to the ticket
Custom Ticket Fields
Full JSON hierarchy for multi-level (nested dropdown) fields
Company Placeholders:
Placeholders
Functions
{{company.domains}}
{{company.name}}
Domains associated with the ticket requester’s company
The company to which the contacts belong
Contact Placeholders:
Placeholders
Functions
{{contact.email}}
{{contact.name}}
Email address of the contact
Name of the contact
Helpdesk Placeholders:
Placeholders
Functions
{{helpdesk.name}}
{{helpdesk.supportUrl}}
Name of the helpdesk
URL of the support portal
Additional Placeholders:
Contact Notifications:
Placeholders
Location
Functions
{{ticket.repliedContent}}
{{note_content}}
{{password_reset_link}}
{{activation_url}}
Agent replies to ticket
Agent adds public note to ticket
Contact requests password reset
Contact signs up for Support Portal account
Reply content of the agent
Public Note content of the agent
URL for password reset
URL for account activation
Agent Notifications:
Placeholders
Location
Functions
{{ticket.repliedContent}}
{{note_content}}
Contact Replied To Ticket
Note Added To Ticket
Reply content of the contact
Public/Private Note content of the agent
SLA Notifications:
Placeholders
Functions
{{ticket.timeSinceCreation}}
{{ticket.timeUntilResponseDue}}
{{ticket.timeUntilResolveDue}}
{{ticket.resolutionDueTime}}
{{ticket.responseDueTime}}
Time since the ticket is created
Time left for the agent to respond back to the contact
Time left for the agent to resolve the ticket
Time left for the agent to resolve the ticket
Time left for the agent to respond to the contact
Approval Notifications:
Placeholders
Functions
{{approval.actionPerformedByEmail}}
{{approval.actionPerformedByName}}
{{approval.description}}
{{approval.status}}
{{approval.subject}}
{{approval.type}}
{{approver.note}}
{{requestor.email}}
{{requestor.name}}
Email of the user who performed the approval action
Name of the user who performed the approval action
Description of the approval process
Status of the approval (e.g., approved, rejected)
Subject related to the approval process
Type of approval action
Notes added by the approver
Email address of the person who requested the approval
Name of the person who requested the approval
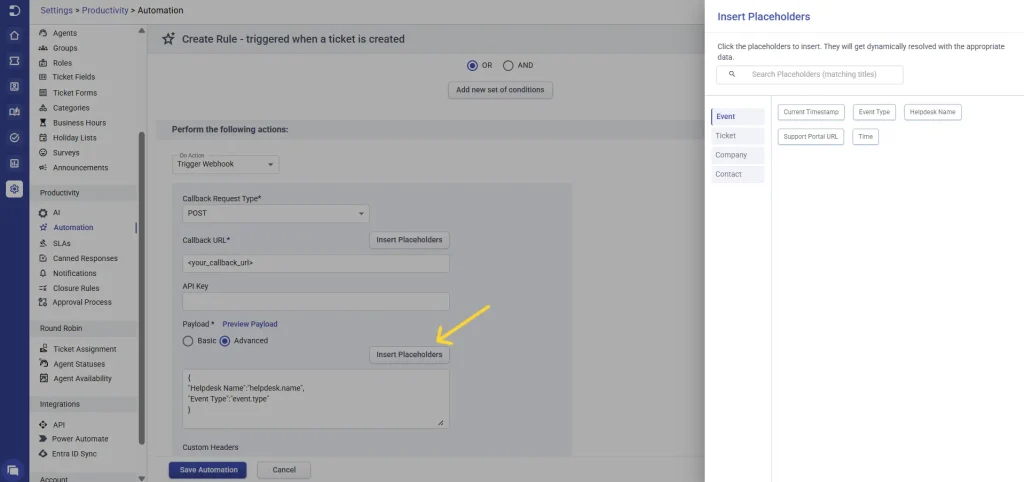
Automation:
Create new rule > Do action > Trigger Webhooks
Placeholders
Functions
{{event.type}}
{{event.time}}
Type of the event (Ticket create / Ticket Update)
Current time of the event
Where and how to use placeholders in Desk365?
You can utilize placeholders in Desk365 at multiple places. Let’s take a look at them in detail below:
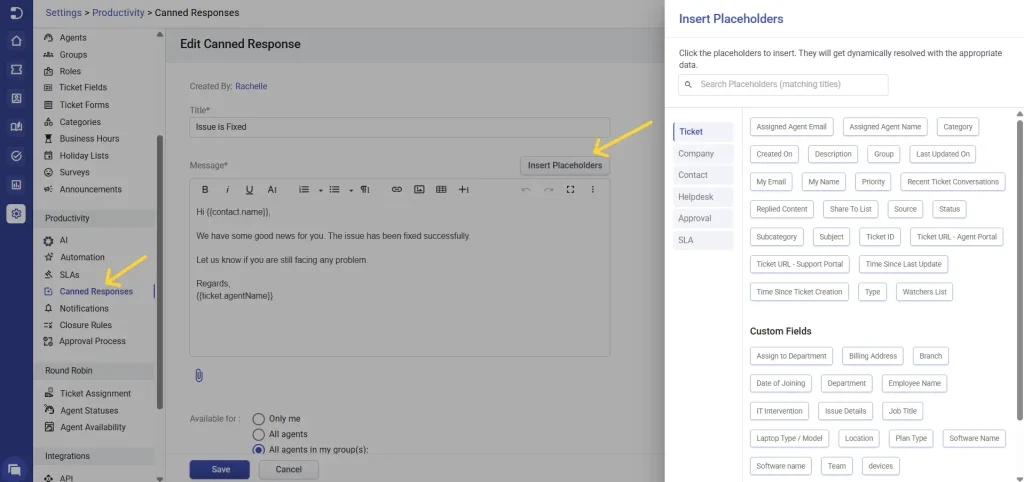
Canned Responses:
Go to Settings > Productivity > Canned Responses.
Select any canned response that you’ve created already.
Click on the ‘Insert Placeholders’ button.
This will open a list of Placeholders in Desk365 that are available to be use with Canned Responses which can be manually inserted into ticket replies.
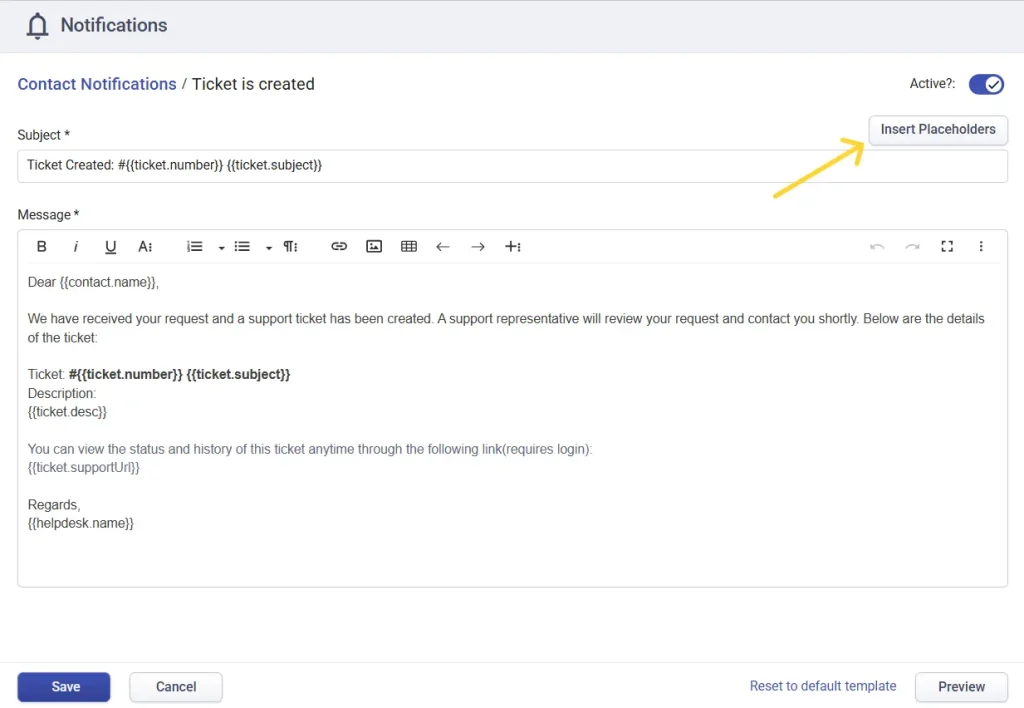
Notifications:
In the Agent Portal, Go to Settings > Productivity > Notifications.
Choose any of the notifications under Contact Notifications or Agent Notifications.
Click on ‘Insert Placeholders’ button.
This will open a list of Placeholders in Desk365 that are available to be use with Notifications.
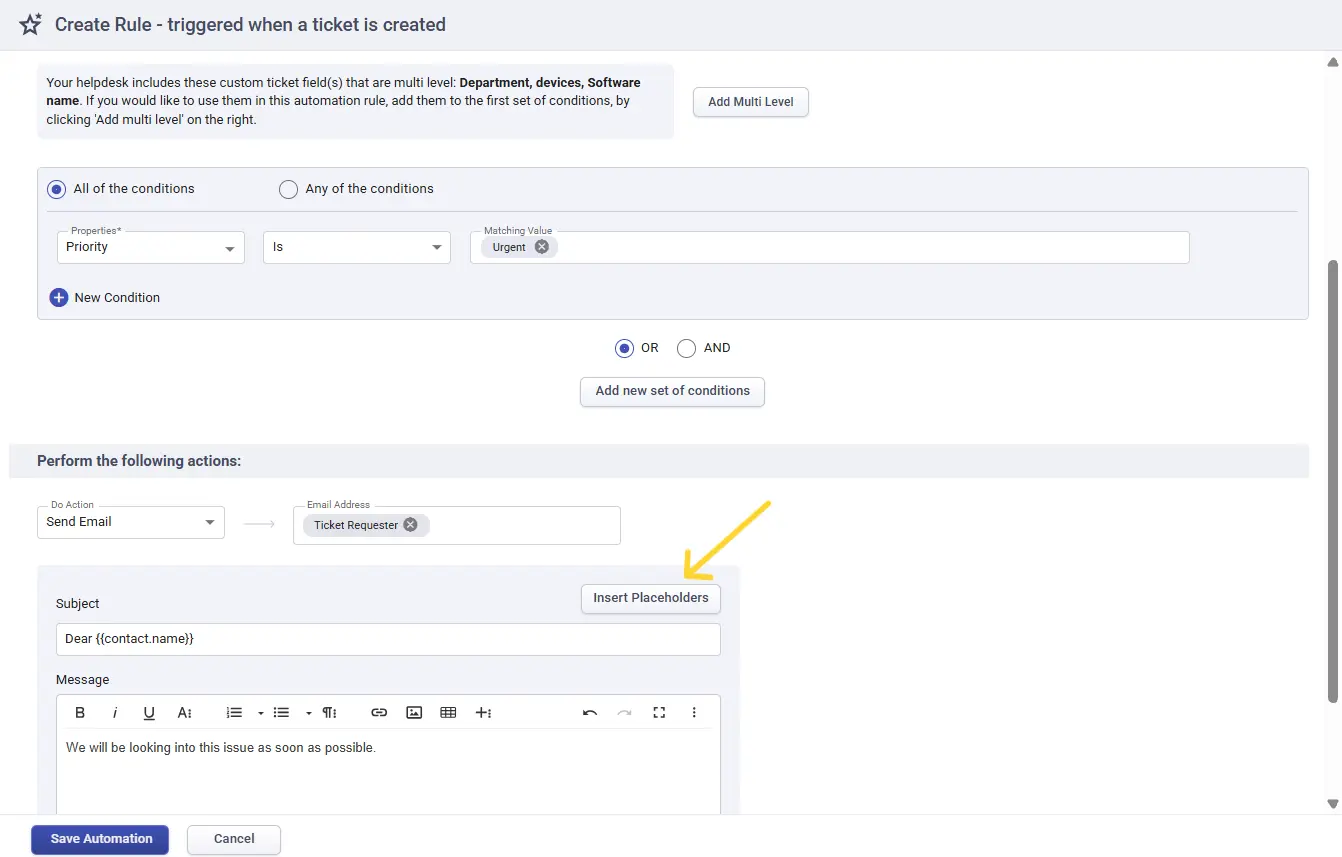
Automation:
1. Navigate to Settings > Productivity > Automation.
2. Click to create a new rule for Ticket Creation, Ticket Updates, or Time Based Triggers.
3. Enter the rule name, provide a description of the rule, and outline the condition. Proceed to the ‘Do Action’ section, and within that, select the option for sending an email.
4. Choose the email address and, as you compose the email, click the ‘Insert Placeholders’ button to include placeholders in your email.
Likewise, you can employ placeholders when utilizing the ‘trigger webhook’ choice within automation rules.
In the dynamic landscape of customer support, placeholders in Desk365 stand as a powerful tool to streamline interactions, personalize responses, and ensure consistent communication. Balancing automation with a human touch is the key to leveraging placeholders effectively, ultimately fostering stronger customer relationships and driving business success.


