In Desk365, you can create and use multiple custom ticket forms according to your own needs.
A ticket form is a set of predefined ticket fields for a specific service request. For example, you might need to collect different information for different workflows and having the same form for different functions might not be useful.
This is where Custom Forms come in handy for your organization.
Let’s discuss in detail how you can create Custom Forms in Desk365 with the help of this article.
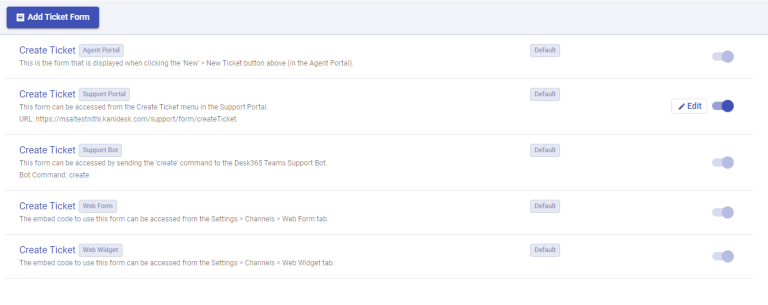
Default ticket forms
Default ticket forms are provided when you first create your Desk365 account. You will notice five default forms that are available for five different channels – Agent Portal, Support Portal, Web Forms, Teams Support Bot, and Web Widgets.
You can modify them by adding or removing any ticket field that suits your need. If you would like to create new fields, you can do that by going to the Ticket Fields tab.
Modifying default ticket forms
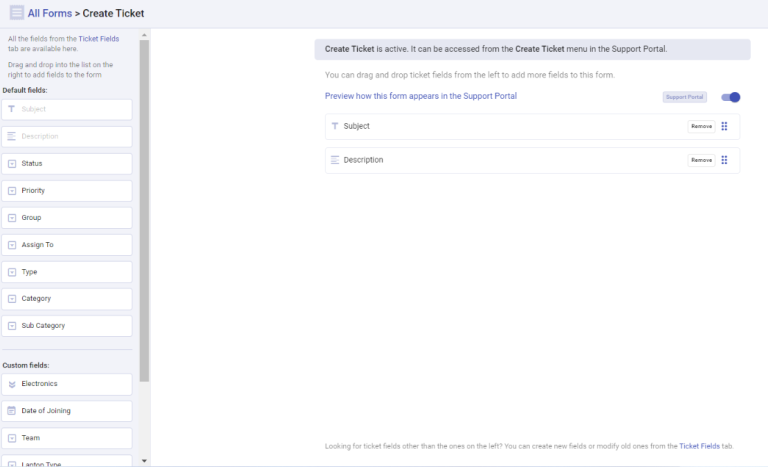
Let’s say you want to modify an existing default ticket form. For this example, let’s take the ‘Create Ticket’ form for the Support Portal.
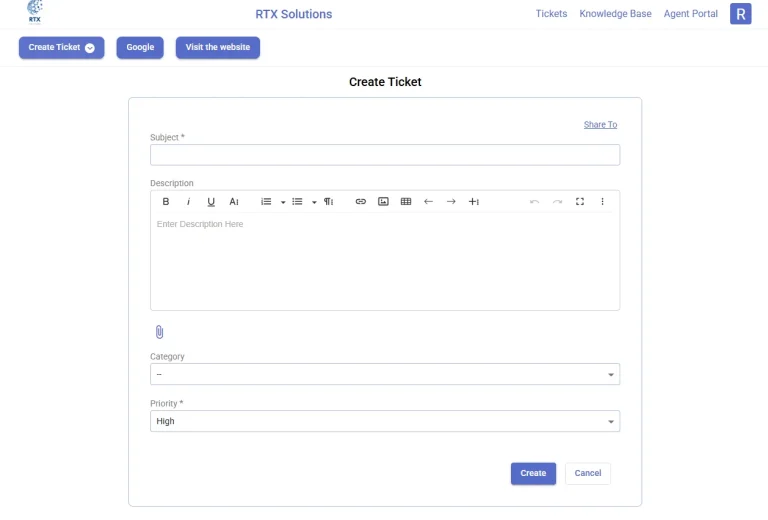
The Create Ticket form is active. You’ll find it in the Ticket Forms tab. You’ll notice that it contains only two fields, Subject and Description.
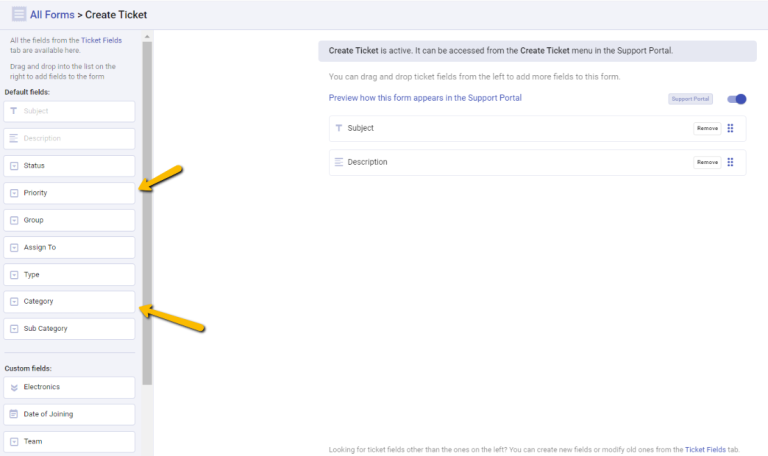
Now, let’s say, you want to add two more fields to the ticket form – ‘Priority’ and ‘Category’.
You will notice that ‘Priority’ and ‘Category’ are already available as default ticket fields.
You can easily add them to the form right away by dragging these fields from the left and dropping them into the list on the right. This immediately adds them to the form.
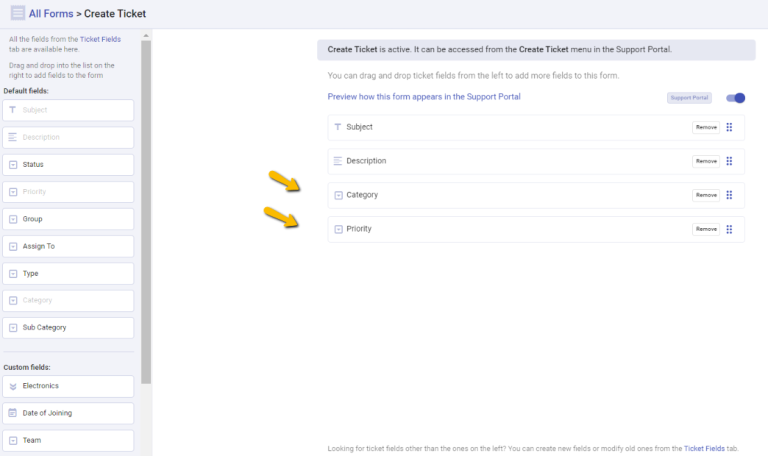
That’s it. Now, you can see all the four fields appear in the form. You can drag and drop to change ticket fields order if needed.
This form can be accessed from the Create Ticket menu in the Support Portal.
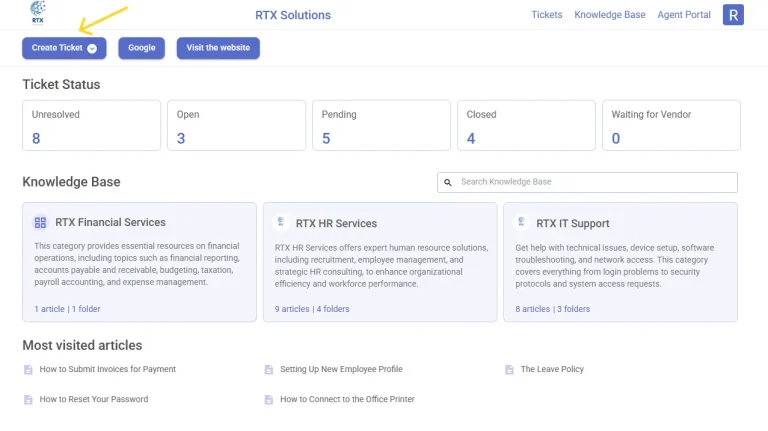
Let’s create a ticket by going to the Support Portal. Click on the ‘Create Ticket’ button at the top in the Support Portal.
You will notice all the four fields appear here in the Support Portal Ticket Form.
Custom ticket forms
Other than the already provided default ticket forms, you can create brand new ticket forms.
Before you start creating a Custom Form, we recommend you set up all the necessary ticket fields that you would be needing in a Custom Form that you want to create.
You can also add fields during any point of time after the form creation.
The ticket form helps you gather all the required information that you would like to collect at the very first step, so that you don’t have to ask your customers again and again for more data.
How to create a custom ticket form in Desk365
Creating a Custom Form in Desk365 is very simple.
For example, let’s say you want to create two different forms with different fields. They are ‘New Employee Form’, and ‘Software Issue Form’.
Let’s take a look at how you can create these forms in Desk365.
New employee form
Let’s create a custom form called ‘New Employee Form’ through which you want to collect the details of the employee who has just joined your company.
Before you start creating the custom form, we recommend you set up all the necessary ticket fields that you would be needing in this custom form.
These are the steps to do so.
1. Let’s say, you want to collect information like ‘Employee ID’, ‘Team’, ‘Laptop Type’ etc.
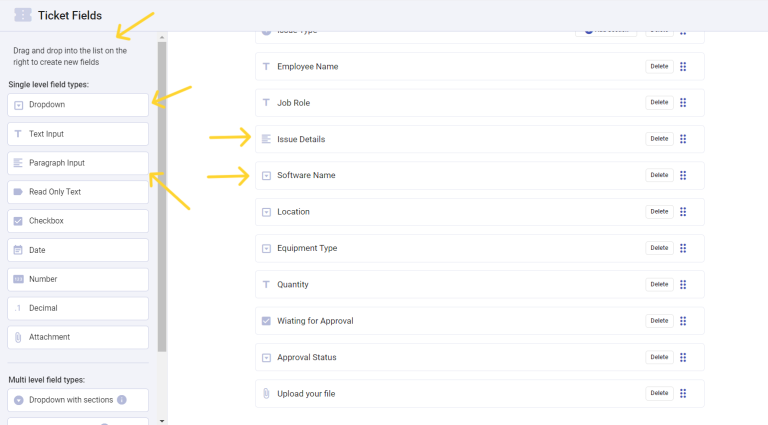
To do this, first you have to create these fields in the Ticket Fields Tab. You can drag and drop any field type to create a new field. For example, to collect the ‘Employee ID’ information, you could use a Text Input field. Drag and drop it to the right and you can give it a name like ‘Employee ID’.
Similarly, to collect the other information like ‘Team’ and ‘Laptop Type’, you could use a Dropdown field where you can have many choices. Drag and drop these fields to the right and you can give it a name like ‘Team’ and ‘Laptop Type’.
2. After creating the necessary ticket fields, we can now create the Ticket Form by clicking on the ‘Add Ticket Form’ button in the Ticket Forms tab.
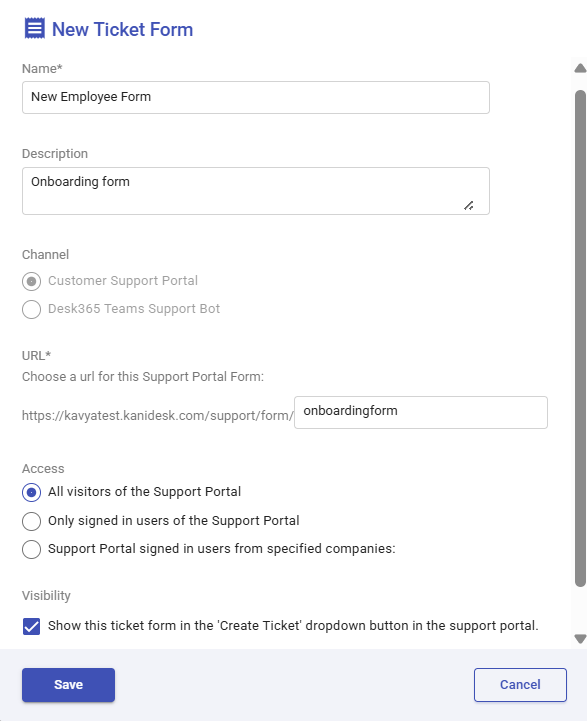
3. Give a name, description, and choose the channel where you want this custom form to appear.
Let’s say you want to create this ticket form to appear in the Support Portal. Then choose ‘Customer Support Portal’ as the Channel.
Provide a URL for the custom form. Just below that, you’ll see an option that helps you control how the form is accessed and displayed.
You can decide who should be able to access this form in the Support Portal. Choose from options like allowing all visitors (including those who aren’t signed in), only signed-in users, or even restricting it further to signed-in users from specific companies. This helps in ensuring the form is visible only to the right group of users, depending on the nature of the request.
You can also control whether the form appears in the ‘Create Ticket’ dropdown button in the Support Portal. If you check this option, the form will be listed alongside other ticket forms in the dropdown. If you leave it unchecked, the form won’t show up in the dropdown menu but will still be available via a direct URL link.
Note: The visibility setting is available only for forms created for the Support Portal and does not apply to forms created for other channels.
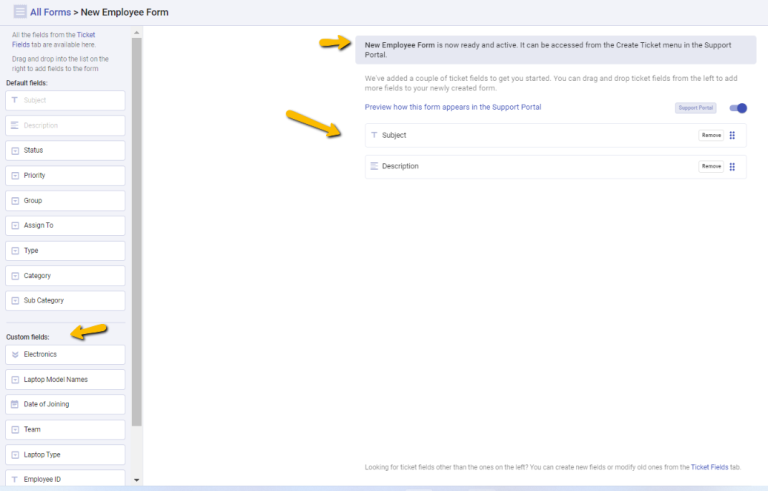
4. ‘New Employee Form’ is now successfully created and is active. You’ll notice that there are only two fields that appear (Subject and Description) which are added by default. You can remove them if they’re not needed for your form.
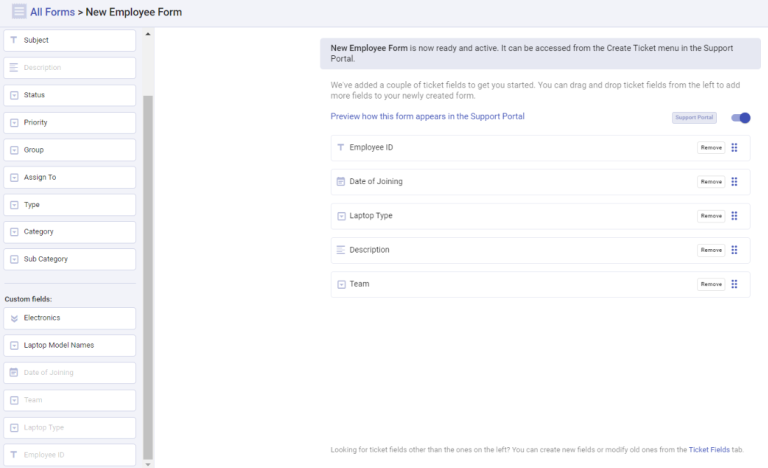
5. Now, you can drag and drop add all the required custom fields that you created previously from left to right to make them appear in the form.
You can drag and drop to change ticket fields order if needed.
6. This form can now be accessed from the Create Ticket menu in the Support Portal. You can also directly share the URL of the form with your users who submit service requests.
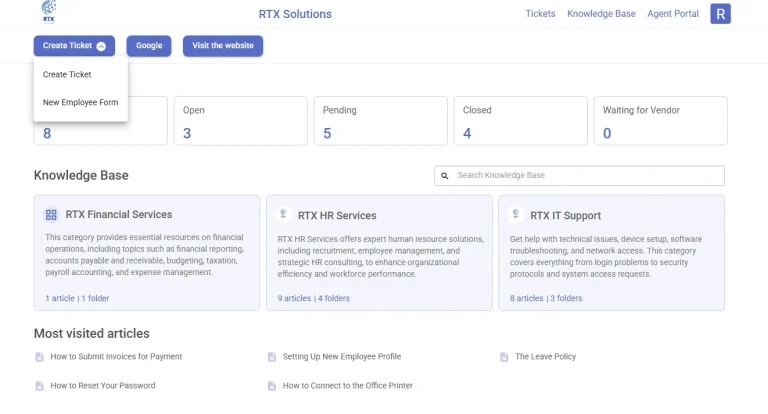
Let’s see the form in action by going to the Support Portal.
Click on the ‘Create Ticket’ button at the top in the Support Portal.
7. Now you’ll notice two options that appear in the Support Portal.
‘Create Ticket’ which is the default form in the Support Portal and ‘New Employee Form’ which is the custom form that we created now.
Click on the ‘New Employee Form’ option. The custom form appears now.
That’s it, you can now collect all the required information from your newly joined employees using this ticket form and provide them a fantastic on-boarding experience.
Software issue form
Let’s create one more custom form called ‘Software Issue Form’. This time let’s create it such that it can be used from the Desk365 Support Bot.
These are the steps to do so.
1. Let’s say, you want to collect information like ‘Software Name’, ‘Issue Details’ etc.
To do this, first you have to create these fields in the Ticket Fields Tab. You can drag and drop any field type to create a new field. For example, to collect the ‘Issue Details’ information, you could use a Paragraph Input field. Drag and drop it to the right and you can give it a name like ‘Issue Details’.
Similarly, to collect the other information like ‘Software Name’, you could use a Dropdown field where you can have and display many choices. Drag and drop the fields to the right and you can give it a name like ‘Software Name’.
2. After creating the necessary ticket fields, we can now create the Ticket form by going to the Ticket Forms Tab.
Click on the ‘Add Ticket Form’ button which is situated at the top.
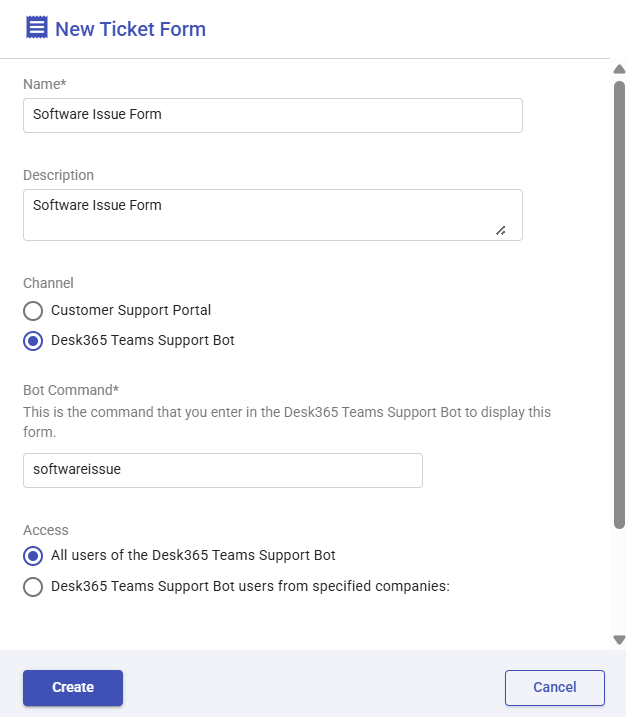
3. Provide a name, description, and choose the channel where you want this custom form to appear.
Since you want this form to be available in the Teams Support Bot choose ‘Desk365 Teams Support Bot’ as the Channel.
Provide a ‘Bot Command’ for the custom form and click on the ‘Create’ button. The ‘Bot Command’ is the keyword that is used in the Teams Support Bot to trigger the form.
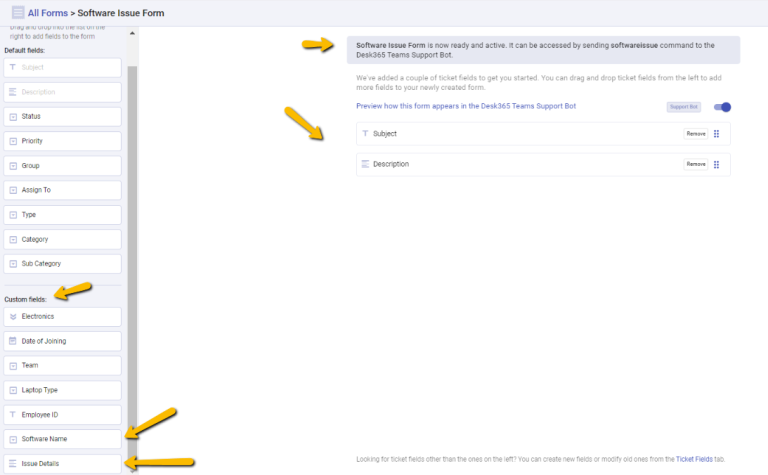
‘Software Issue Form’ is now successfully created and is active. You’ll notice that there are only two fields that appear (Subject and Description) which are default fields by nature.
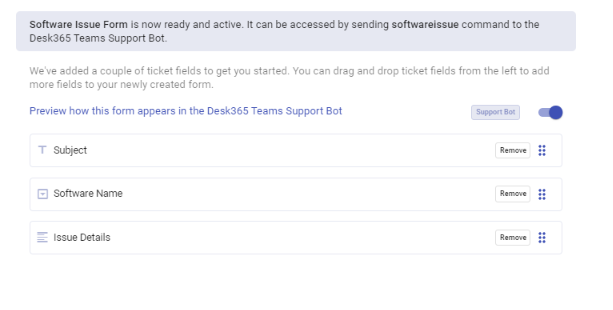
4. Now, you can drag and drop add all the required custom fields from left to right to make them appear in the custom form. Also, you can remove fields like Subject and Description if you wish to do so.
Now, the custom form appears with all the required ticket fields that you wanted to have in the form.
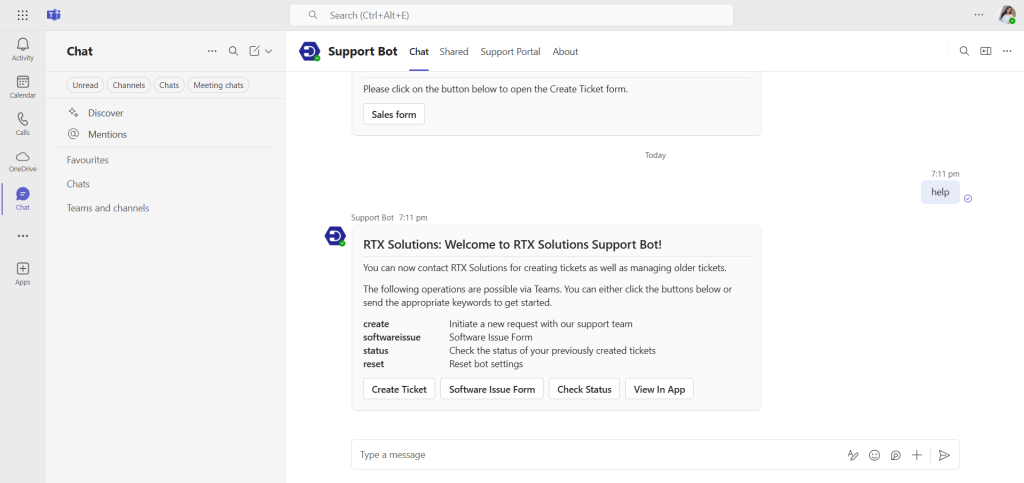
5. As the custom form is created with all the required ticket fields, let’s create a ticket by going to the Desk365 Teams Support Bot. Let’s get started by typing ‘help’ in your Desk365 Teams Support Bot.
Now, you see a ‘Welcome message’ with your help desk name reflected in the support bot. You’ll also notice commands like ‘create’, ‘status’, ‘reset’, and also the custom form names that you have created appears as a command on the Support Bot.
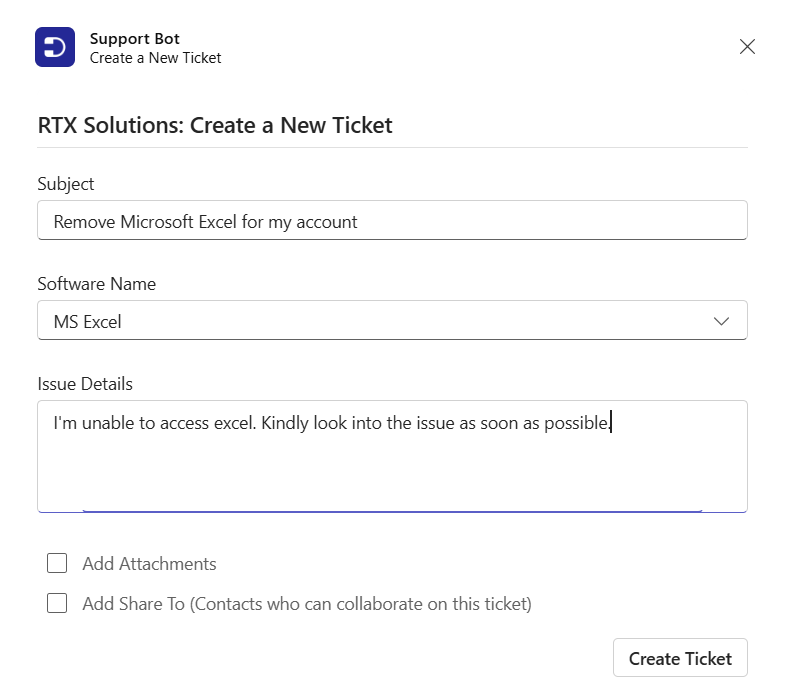
6. Type the Bot Command ‘softwareissue’ in the Desk365 Teams Support Bot to get the ‘Software Issue Custom Form’ that you created appear in the bot.
That’s it, you can now collect all the required information from your employees using this ticket form.
Enter all the required data and click on ‘Create Ticket’ button to create a ticket in Desk365.