


Importing tickets into your helpdesk can be a daunting task. It can be time-consuming and prone to errors if not done correctly. However, with Desk365, importing tickets has never been easier.
In this help center article, we will guide you through the process of importing tickets into your helpdesk.
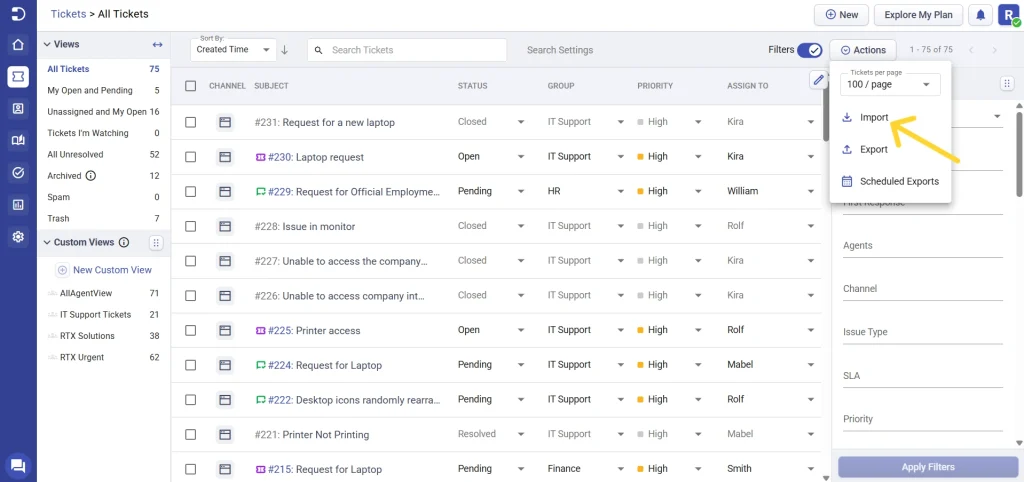
Finding import tickets option in Desk365 Agent Portal
To import the tickets in Desk365, go to the ‘Actions’ menu in the Tickets tab in Agent Portal, and select the ‘Import’ option.
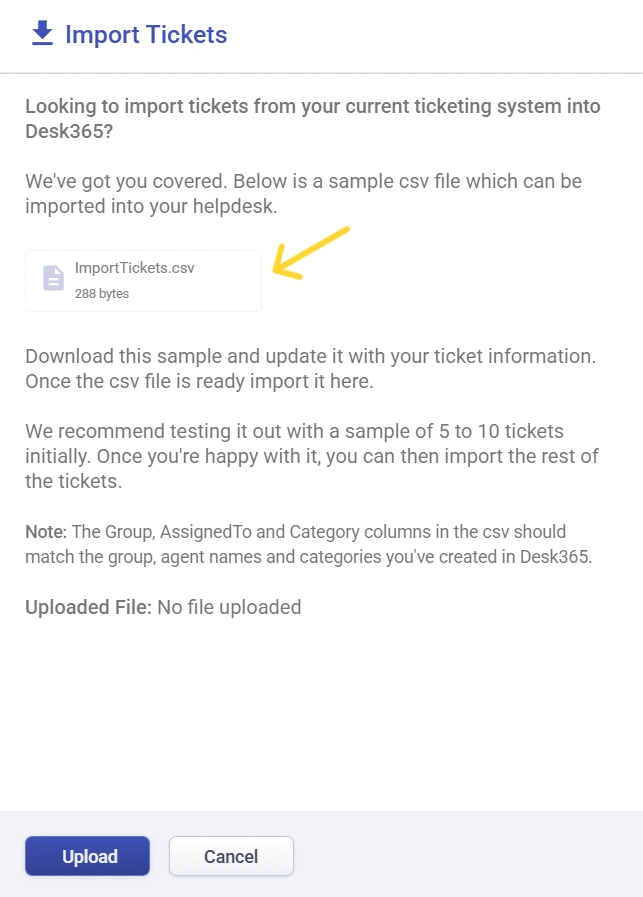
Firstly, we recommend downloading the sample csv file provided by Desk365. This file serves as a template for you to update with your ticket information. You can download the sample csv file and start updating it with your ticket data.
To help you correctly populate the CSV file, refer to the field requirements below. Fields marked with * are mandatory and cannot be left empty.
| Field Name | Description |
|---|---|
| Subject | A short summary of the ticket. Must not exceed 120 characters. |
| Description | Detailed information about the issue. Can be provided in plain text or HTML format. |
| CreatedBy | Name of the contact raising the ticket. Used to create a new contact if the email does not already exist in the system. |
| ContactEmail* | A valid email address of the contact. If the email already exists, the ticket will be linked to that contact; otherwise, a new contact will be created using this email and the CreatedBy name. |
| Group | The support group responsible for the ticket. The specified group must already exist in the helpdesk. |
| AssignedTo | The agent assigned to the ticket. The agent must be active and already exist in the helpdesk. If a Group is specified, the agent should belong to that group. |
| CategoryName | The category under which the ticket is classified. The specified category must already exist in the helpdesk. |
| Priority* | The priority level of the ticket. Must be one of the default values: Low, Medium, High, or Urgent. |
| Status* | The current status of the ticket. Must be a valid, active, default or custom status configured in the helpdesk |
| createdOn* | The date and time when the ticket was created. Must follow the date and time format configured in helpdesk settings. |
| closedOn | The date and time when the ticket was closed. Required if the status is “Resolved” or “Closed.” Must follow the helpdesk date and time format. |
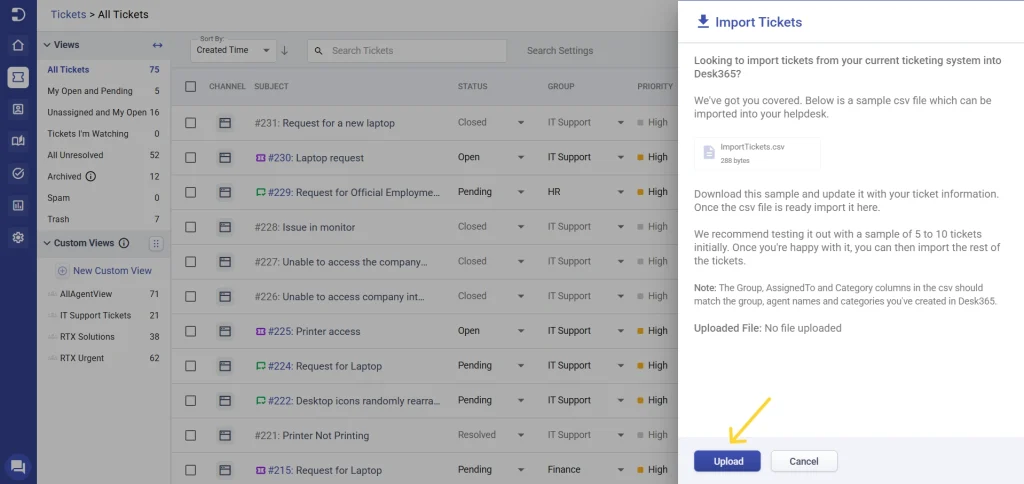
It is important to note that we recommend testing the import process with a sample of 5 to 10 tickets initially. This will help you identify any errors in the csv file before importing all of your tickets. Once you are satisfied with the import process, you can import them into your helpdesk by clicking on the upload option.
To ensure the import process runs smoothly, it is crucial that the Group, AssignedTo, and Category columns in the csv file match the group, agent names, and categories you have created in Desk365. This will ensure that the tickets are assigned to the correct group and agent, and are categorized correctly.
Import tickets and conversations via API
In addition to importing tickets using CSV files, Desk365 also provides API endpoints for migrating tickets and their conversation history.

Import tickets with conversations
Use the ‘Import Tickets with Conversations’ API endpoint to create new tickets along with their associated conversation history in a single request. This is useful when migrating tickets from another helpdesk and preserving the complete communication history of each ticket.
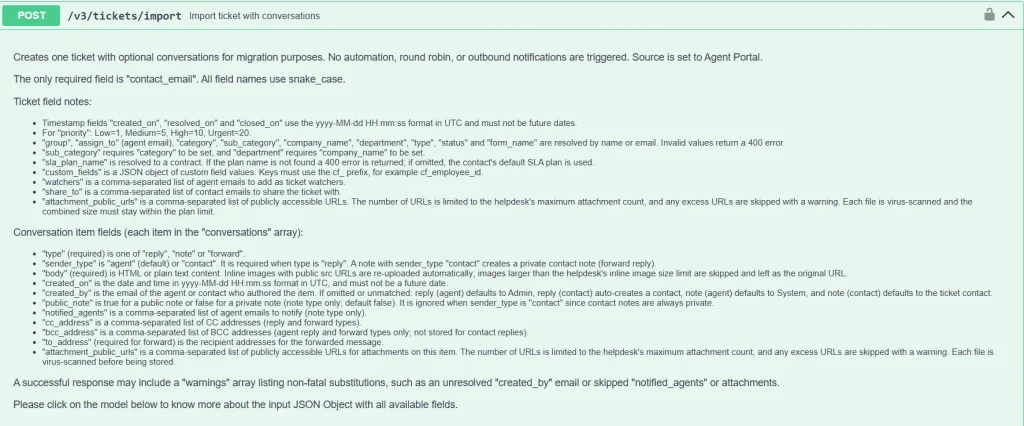
Import conversations for existing tickets
Use the ‘Import Conversations for Existing Tickets’ API endpoint to import historical conversations and associate them with tickets that already exist in your helpdesk. This allows you to enrich existing ticket records with previous interactions without creating duplicate tickets.
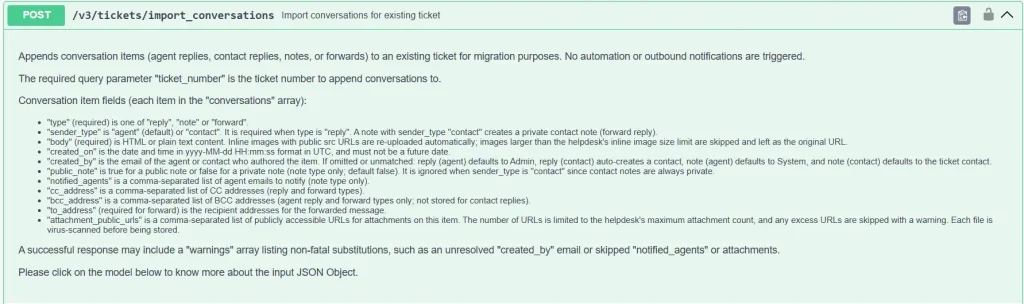
These endpoints help maintain complete ticket history, customer interactions, and conversation context during migration. A maximum of 30 conversations can be imported per API call, whether importing new tickets or adding conversations to existing tickets.
To know more about accessing Desk365 API, refer to the following article: https://help.desk365.io/en/articles/desk365-api/
Importing tickets into your helpdesk can be a breeze with Desk365. By following the steps outlined in this article, you can easily import your tickets into Desk365 and start managing them efficiently.
If you have any questions or need further assistance, please do not hesitate to contact us. We are always here to help!


