


DKIM (DomainKeys Identified Mail) is a vital component of email security, ensuring that the sender’s identity is authenticated. However, there are instances where the DKIM configuration status reflects as unverified.
This DKIM unverified status raises concerns among email senders. Understanding the reasons behind this status is crucial for maintaining a secure and reliable email communication system.
In this article, we will delve into the intricacies of DKIM unverified status, exploring common reasons, troubleshooting steps, and best practices for prevention.
One of the primary reasons for DKIM unverified status is incorrect DKIM records. Small mistakes in the configuration can lead to the failure of authentication.
Issues with the Domain Name System (DNS) configuration can also contribute to the DKIM unverified status. It’s essential to ensure that your DNS records align with your DKIM configuration.
Common issues with verifying domains
When attempting to verify a domain with your DNS provider, you may encounter various challenges. Let’s explore some common problems and their solutions:
1. Verifying a non-owned domain:
- You’re trying to verify a domain that you don’t own.
- It’s essential to verify specific email addresses rather than entire domains. For instance, if you wish to send emails via Desk365 using an address from the your_subdomain.com domain, verify that particular email address.
2. Verifying private domains:
- Unable to verify a domain with DNS records that cannot be resolved over public DNS.
- Ensure that your domain’s DNS records can be resolved publicly for successful verification.
3. Underscores in DNS record names
- Sometimes, your DNS provider doesn’t allow underscores in record names, a requirement for DKIM.
- If your provider restricts underscores, contact their support for assistance, or consider switching to a provider that supports this requirement.
4. Appended domain names in DNS records:
- Some providers automatically append the domain name to DNS records, causing duplication.
- Add a period at the end of the domain name when entering DNS records to signal your provider to avoid appending the domain name.
5. Modified DNS record values:
- Providers may automatically change DNS record values to lowercase.
- Contact your DNS provider for assistance, ensuring that the attribute value exactly matches the one provided by Amazon SES during the verification process.
6. Multiple verifications for the same domain:
- Attempting to verify the same domain multiple times.
- If your DNS provider allows it, assign multiple attribute values to the same DNS record. Alternatively, verify the domain once with “_domainkey” in the attribute name and another time with “_domainkey” removed.
Note: The latter solution allows for two verifications of the same domain but is limited to only two verifications in total.
DKIM records
Initially, ensure that you include all three DKIM records requiring updates with your DNS provider as CNAME records.
Please verify the correct format for adding CNAME records with your domain name provider.
For certain providers such as GoDaddy and AWS Route 53, you should enter the CNAME record without your subdomain at the end.
For example, enter the CNAME record as “ozzb2gqo2emq6gptppdrcwgn2se3gakw._domainkey” instead of “ozzb2gqo2emq6gptppdrcwgn2se3gakw._domainkey.your_subdomain.com“.
For other domain providers you need to enter the CNAME record as it is.
Note: It will take up to 72 hours to verify your domain identity.
Still if your DKIM remains unverified, it means that the DKIM records have to be entered in a different way for your domain hosting provider.
To learn more about the correct method of entering records for various common domain name providers, click here.
DNS configuration
Once you’ve initiated the DKIM setup, your CNAME records must be seamlessly integrated into your domain’s DNS records. Ensure they are publicly accessible to validate your domain’s authenticity.
To validate your domain, you need to run a DNS test on all the CNAME records and ensure they are publicly accessible with the exact record value.
For Linux:
Use the ‘dig‘ command as shown below.
dig CNAME +short ozzb2gqo2emq6gptppdrcwgn2se3gakw._domainkey.your_subdomain.com
For Windows:
Use the ‘nslookup‘ command as shown below.
nslookup -q=CNAME ozzb2gqo2emq6gptppdrcwgn2se3gakw._domainkey.your_subdomain.com
If your domain’s DNS records are set up correctly, the command output will display the record value followed by .dkim.amazonses.com as shown below.
ozzb2gqo2emq6gptppdrcwgn2se3gakw.dkim.amazonses.com
If you couldn’t find any output after running your command then make sure you have done the following:
Verify the DNS settings for your domain and ensure that the CNAME record names and values match the DKIM names and values generated by Amazon SES.
Also double-check the accurate entry of all CNAME record names in your domain’s DNS settings.
When reviewing the record names, ensure there is no duplication of the domain as few DNS providers automatically add the domain to the record name.
For instance, entering “ozzb2gqo2emq6gptppdrcwgn2se3gakw._domainkey.your_subdomain.com” might be appended as “ozzb2gqo2emq6gptppdrcwgn2se3gakw._domainkey**.your_subdomain.com.your_subdomain.com**” by certain providers.
This may lead to DKIM unverified status. So make sure to enter the domain name only once.
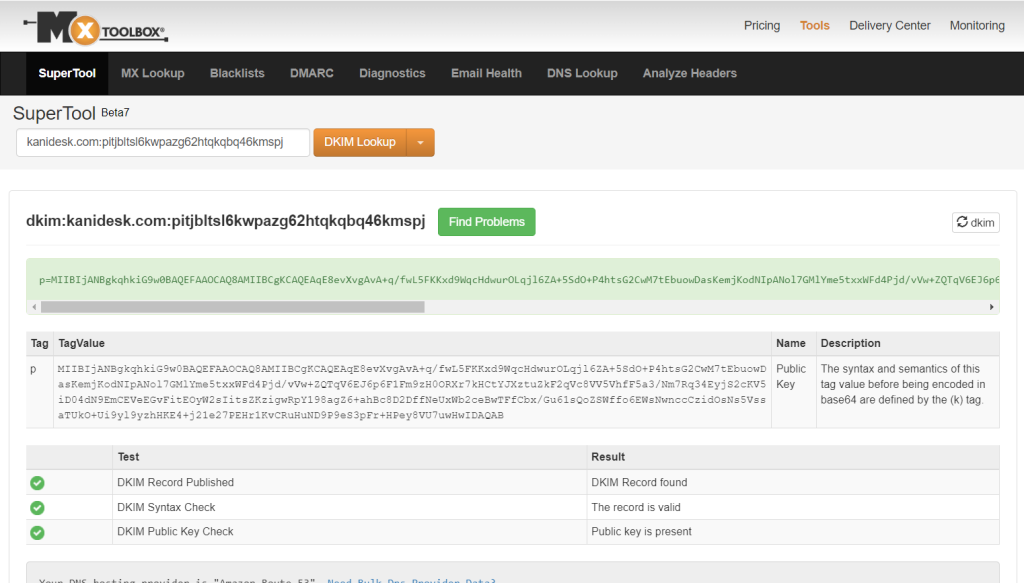
Tool to verify CNAME records:
You can use a tool such as MX toolbox to check whether your entries have been added.
Use the format as shown below:
dkim:your_subdomain.com:ozzb2gqo2emq6gptppdrcwgn2se3gakw
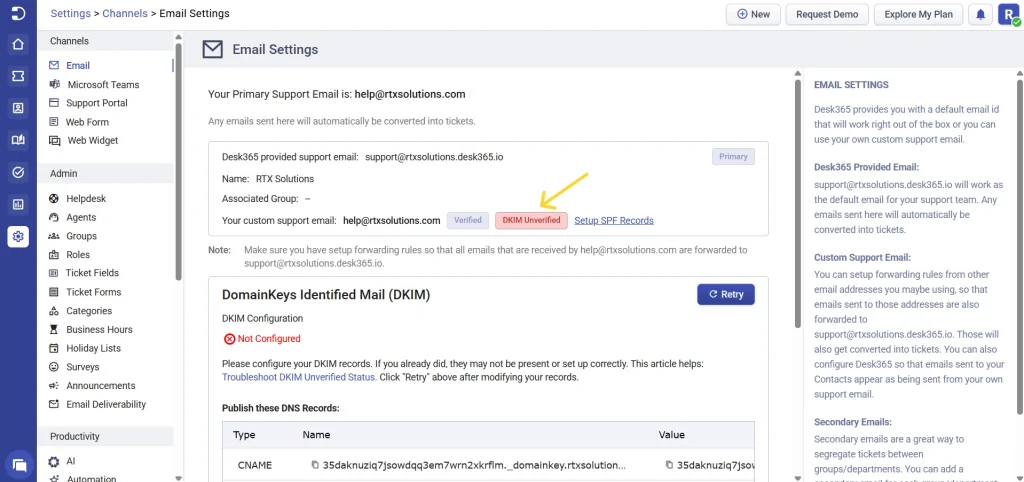
DKIM unverified status in Desk365
To change the DKIM unverified status in Desk365, ensure that you have satisfied all the above mentioned conditions.
Now click on ‘Retry’ as shown below.
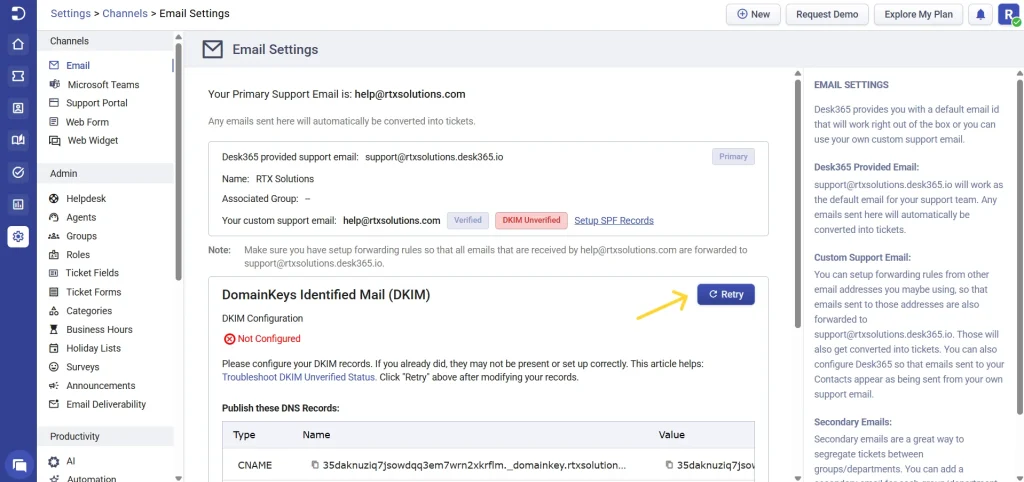
It may take up to 72 hours to validate your DKIM.
If you have any further questions, please contact us at help@desk365.io. Your trust is the driving force behind us.


