


As a business owner or administrator, it’s important to ensure that the emails you send are secure and trusted by your recipients. One way to do this is the process of email domain verification using DKIM.
DomainKeys Identified Mail(DKIM) is a method of verifying the authenticity and integrity of an email by attaching a digital signature to the email’s header.
This way, whenever a message is sent from Desk365 on your behalf, the mail server knows it is sent on your behalf with authorization and is never sent to the junk folder.
We support DKIM (Domain Key Identified Mail) for domain verification, which means we’re compliant with DMARC (Domain-based Message Authentication, Reporting, and Conformance). This process allows you to validate communication between you and your customers.
In this help center article, we will explore the process of email domain verification using DKIM and how it can help protect your emails from being marked as spam or phishing attacks.
What is DKIM?
DKIM (DomainKeys Identified Mail) is an email authentication method that allows email senders to add a digital signature to their messages to verify the authenticity of the message source ensuring that an email message has not been modified in transit.
For each email being sent, the sender’s email server attaches the digital signature to the message, and the recipient’s server can verify the signature by looking up the sender’s public key in the DNS.
This signature is used to verify the authenticity of the sender and helps protect email senders and recipients from spam, spoofing, and other forms of email fraud. By using DKIM, companies are able to thwart spammers and attackers who attempt to send emails impersonating them, while allowing Desk365 to send emails on their behalf without the risk of them being flagged as spam.
The use of DKIM strengthens email security and promotes trust among email recipients, ensuring that legitimate emails reach their intended destinations.
How does DKIM work?
DKIM is an email authentication method that uses public-key cryptography to add a digital signature to an email message, providing a mechanism to verify the integrity and authenticity of the information being transmitted.
When an email is sent, the sender’s mail server generates a DKIM signature by applying a hash function to the email’s header and body.
This signature is then attached to the email as a DKIM-Signature header and is associated with the organization’s registered domain name.
When the recipient’s mail server receives the email, it retrieves the sender’s public DKIM key from the DNS records for the sender’s domain in order to verify the DKIM signature. If the signature is valid, the recipient’s mail server knows that the email is from the domain it claims to be from and has not been altered in transit.
By verifying the domain of the sender, recipients can be sure that the email is not from a fake or spoofed domain. This can help to protect both individuals and organizations from receiving malicious emails.
An added advantage of having DKIM authentication is that it can improve the deliverability of legitimate emails.
When an email is signed with DKIM, it is more likely to be delivered to the recipient’s inbox rather than being flagged as spam. This is because many email providers use DKIM verification as a factor in their spam filters.
How to set up a DKIM record
Setting up DKIM records is an easy and one-time process.
You can find the DKIM records within the Desk365 Agent portal that should be updated with your DNS provider. These should be added as CNAME records.
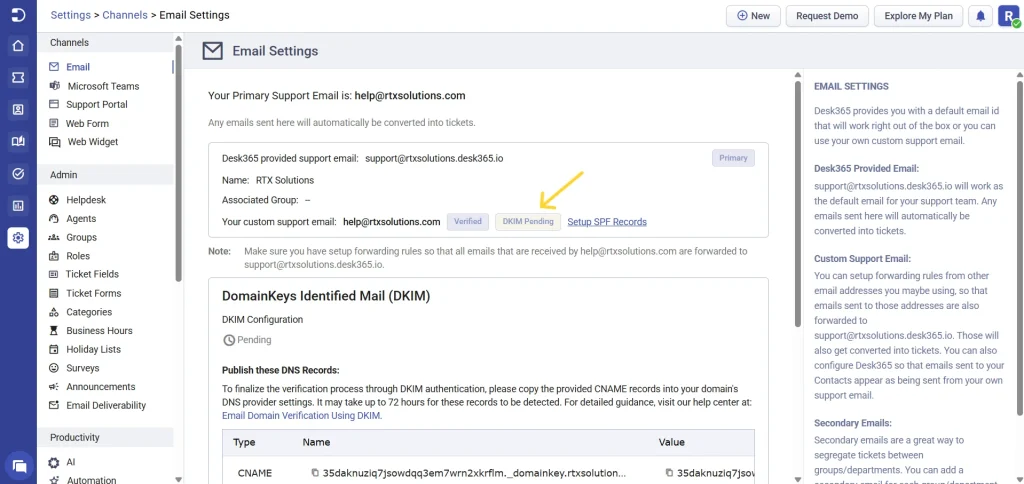
Navigate to the Settings > Email.
Once you have added the custom support email and verified it, you will find the option to set up DKIM records, as shown below.

Click on Setup DKIM records. A table containing your CNAME records populates. You can then click ‘Download records as .csv’ to obtain your DKIM records in CSV format or you can simply copy from the table.
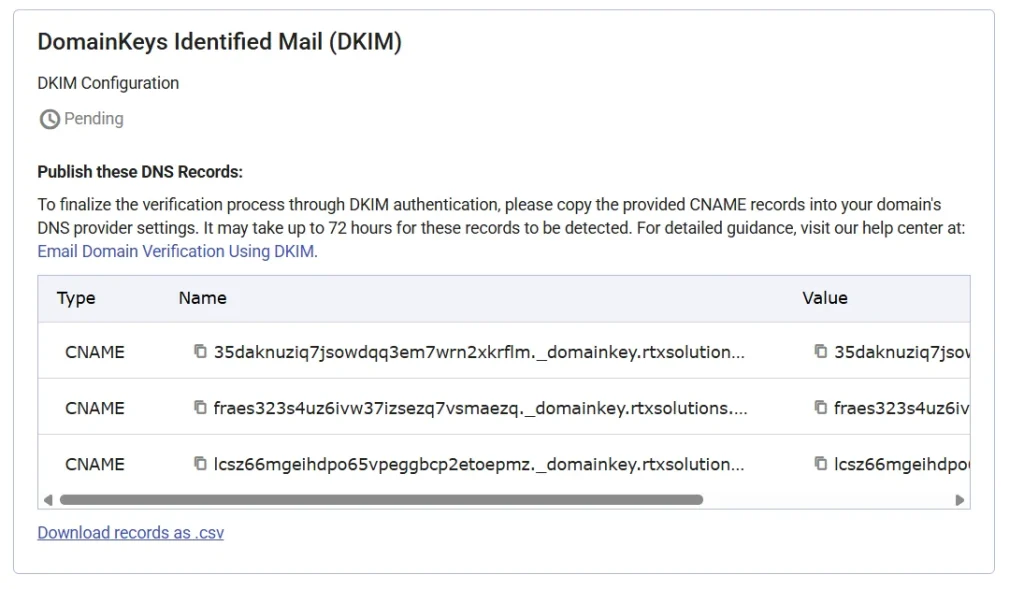
Your status will remain pending until you complete the verification process with DKIM authentication.
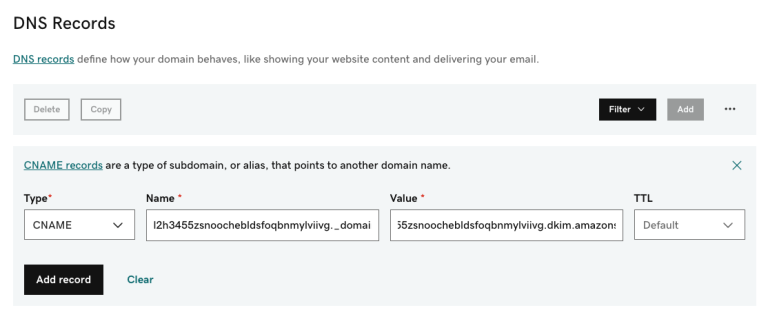
Note: Please check the correct format to use to add CNAME records for your domain name provider. For some providers like GoDaddy, you’ll need to enter the CNAME record without your subdomain at the end.
For example, “l2h3455zsnoochebldsfoqbnmylviivg._domainkey” instead of “l2h3455zsnoochebldsfoqbnmylviivg._domainkey.kanidesk.com” while for other domain providers you’ll need to enter as it is.
Your domain name provider will have more information on the correct format to use.

How to update your DNS records with the Desk365 domain key (in your domain registrar):
1. Login to your domain registrar’s control panel with the correct credentials used to register your domain name.
2. To change the DNS records, locate and find the option called Manage DNS, Name Server Management, DNS Management, or Advanced Settings.
3. Search for an option to create a CNAME record.
4. Copy the CNAME records that we provided you and publish it in your DNS server/domain provider’s account.
This is just a one-time configuration step you need to set up per domain name.
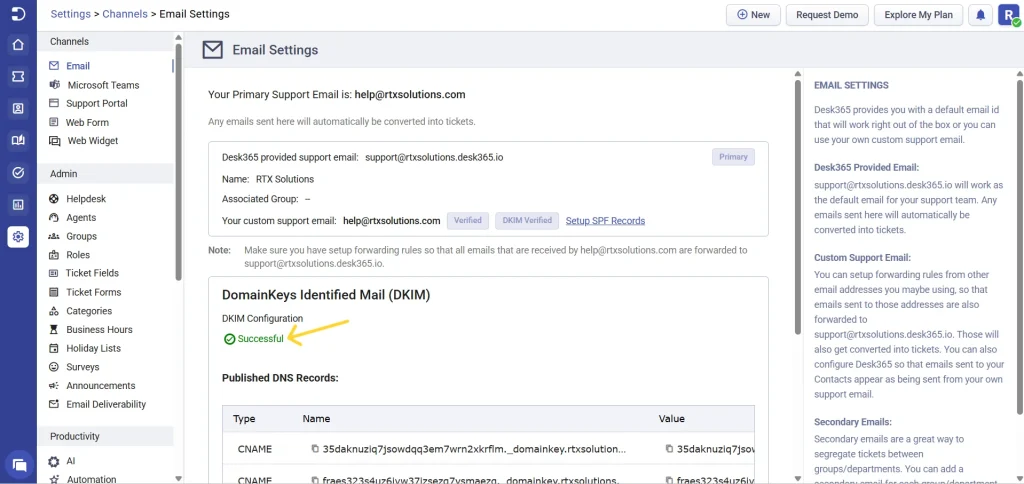
5. Once you’ve entered them, you can check in your Agent Portal and confirm if everything is good to go.
Note: It may take around 24-48 hours for your DNS changes to propagate to all servers.
As email remains a vital form of communication in personal and professional settings, it is crucial to take measures to secure it.
Email domain verification is an essential aspect of email authentication, and DKIM is a valuable tool for achieving this goal.
By implementing DKIM, you can enhance the security and credibility of your sending emails, ensuring that they reach the intended recipients and are not mistakenly marked as spam or phishing attempts.


