


It’s important to have a good understanding of the basic helpdesk settings that you need to configure in order to provide effective customer support.
In this help center article, we’ll take a look at the key settings that you need to configure in order to set up your helpdesk and start providing top-notch customer service.
What's covered?
- Setting up your helpdesk name
- Setting up your next ticket number
- Setting your date format
- Choosing buttons for your header
- Setting your helpdesk access
- Configuring Support Bot allowed domains
- Removing reCAPTCHA
- Setting the original sender as contact
- Allowing contacts to close tickets
- Reopening closed tickets
- Configuring archiving tickets
- Default response preference
- Signatures
- Currency
Setting up basic helpdesk settings
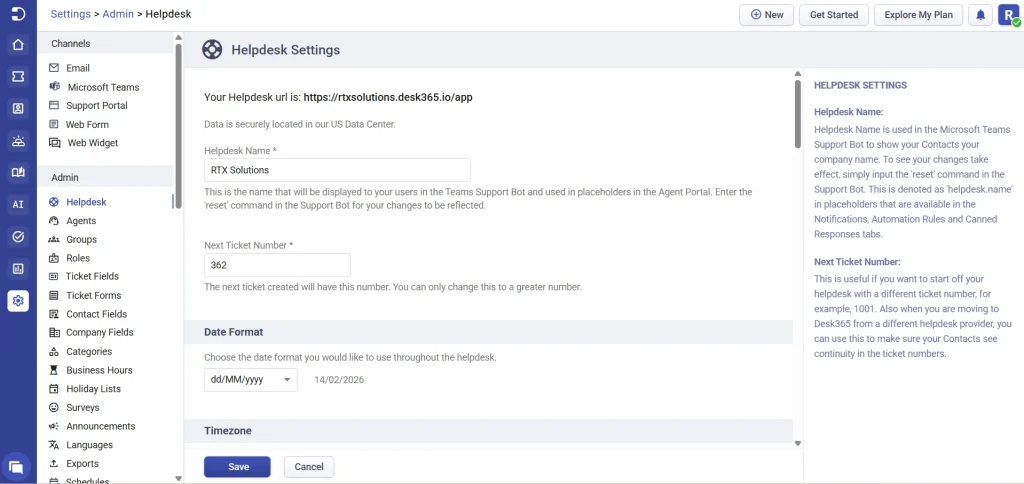
To configure basic properties of your helpdesk, head to Settings > Admin > Helpdesk Settings. Here, you can customize settings such as your Helpdesk Name, Date Format, Header Buttons, Reopening closed tickets, and more.
Let’s take a look at them in detail below.
Helpdesk name
The first step in configuring your helpdesk is to set up the name that will be displayed to your customers. This should be a name that is easy to remember and that accurately reflects the nature of your business.
This is the name that will be shown to your users in the Support Portal and the Teams Support Bot.

Next ticket number
Another important setting that you need to configure is your next ticket number. This is the number that will be assigned to the next customer support ticket that you receive.
Also when you are moving to Desk365 from a different helpdesk provider, you can use this to make sure your contacts see continuity in the ticket numbers.

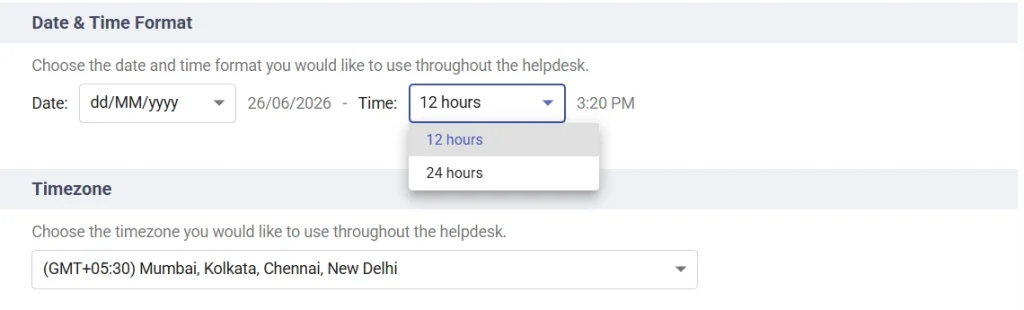
Date and time format
You have the option to select your preferred date and time format for use throughout the helpdesk from this setting.
In addition to choosing your preferred date format, you can select either the 12-hour or 24-hour time format. Once saved, the selected format is applied consistently across the Agent Portal, the Support Portal, and email notifications, ensuring a uniform time display throughout your helpdesk.
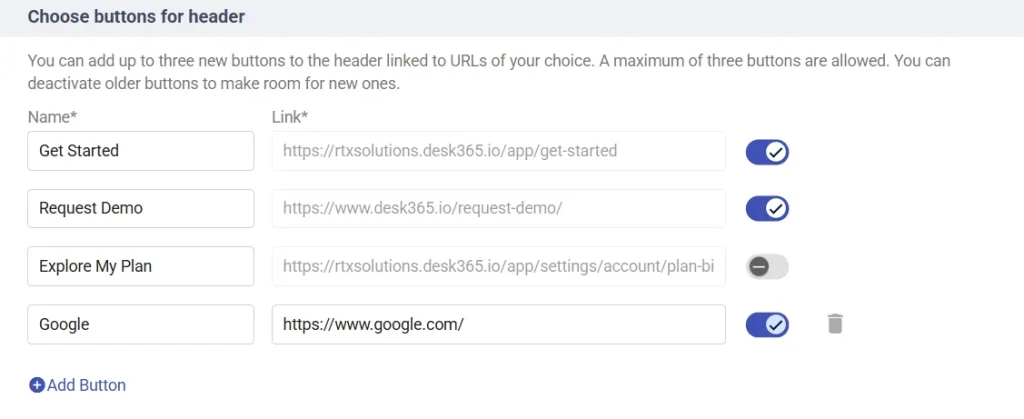
Choose buttons for header
You have the option to include a maximum of three new buttons in the header, each linked to a URL of your choice. If you wish to add new buttons beyond this limit, you will need to deactivate existing buttons to create space for the new ones.
This is useful when you want to link to content that is outside of Desk365, like taking your customers to google, your website or anywhere else as per your wish.
Helpdesk access
You have the ability to determine the level of access you wish to grant for your help desk. You have two options to choose from:
Users from any domain: All users will be able to access your help desk with no restrictions on who can create tickets, use the Support Bot, or sign up for an account in the Support Portal.
Users from Allowed Domains only: Only users from Allowed Domains can access your help desk. This means that emails sent from other domains will be rejected and a notification will be sent to those users.
You can also notify the senders when emails from non allowed domains are rejected.
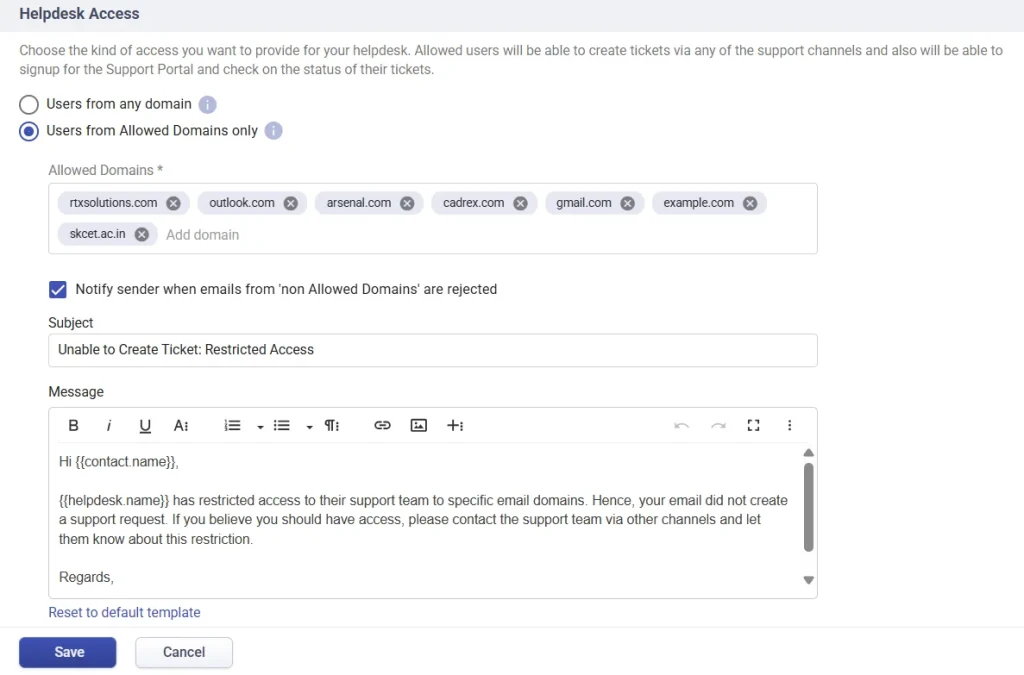
Additionally, Teams Support Bot and the Support Portal can only be accessed by users from Allowed Domains. This option is particularly useful if you want to block certain domains, such as your own backup services or other companies that you do not want to create tickets.
Support Bot allowed domains
The Support Bot Allowed Domains option lets administrators control who can access the support bot by specifying trusted email domains. This setting offers more flexibility, allowing admins to manage user access to the support bot. For a step-by-step guide on setting this up, refer to our Support Bot Allowed Domains article.

Remove reCAPTCHA
reCAPTCHA is employed to verify that actual users, rather than automated bots, are attempting to access your Agent Portal. If you wish to eliminate it from your Sign In page, you can achieve this by selecting the corresponding checkbox.

Original sender as contact
When an agent sends an email from their mailbox to the helpdesk by forwarding it, a ticket will be created with the original sender as the contact. Please be aware that this functionality is applicable exclusively to emails forwarded as .eml attachments. If this option is left unchecked, the ticket will be created with the agent as the contact.
Learn more in detail about this feature with the help of this help center article.

Allow contacts to close tickets
When checked, contacts will be able to close tickets from the Support Portal or the Desk365 Teams Support Bot. This option provides flexibility for customers who wish to mark their issues as resolved without requiring agent intervention.

Reopening closed tickets
You have the option to determine what should occur when a contact responds to a ticket that is in the ‘Closed’ status using this setting.

Archiving tickets
Ticket archiving allows you to clean up your helpdesk by removing old, inactive tickets from the active queue without permanently deleting them. Tickets that have been closed and inactive for more than 120 days will automatically move to the Archived View. You can configure the archiving period to be anywhere between 15 and 120 days. Opting for a shorter archive period can help improve loading times for your Ticket List View.

For more details, refer to the help center article on ticket archiving.
Default response preference
The default response preference feature allows you to set how the editor behaves when agents respond to tickets in Desk365. In simpler terms, it lets you choose the default type of editor for agents when they respond to a ticket, but they can still change it to any action they prefer. The available options are:
- Reply: The agent’s response will be sent directly to the customer.
- Forward: The ticket will be forwarded to another person or department.
- Private note: The agent can leave an internal note, which is visible only to the support team, not the customer.
- Public note: The agent can add a note that is visible to both the customer and the team.

When you set a default, it means the system will automatically choose that option unless the agent decides to change it manually.
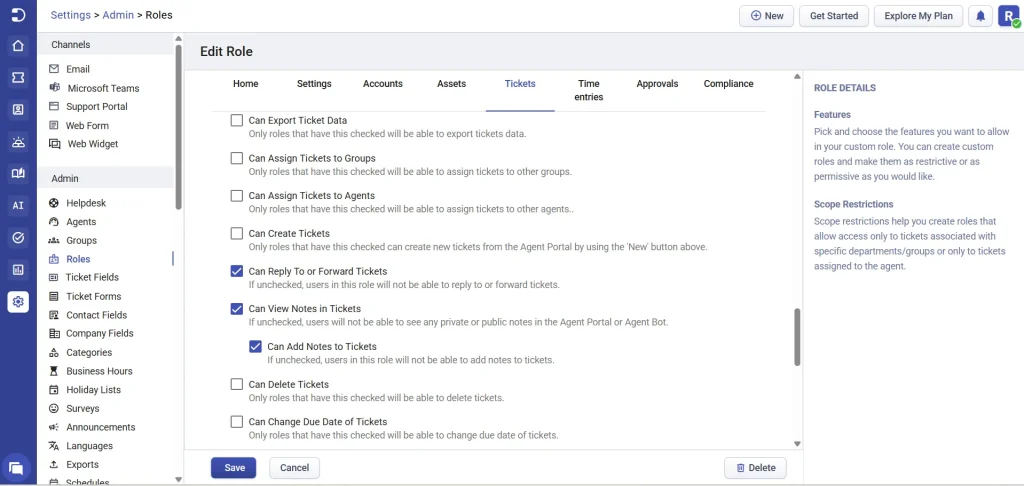
While setting the default response preference, it’s also important to check the agent’s role permissions. Here’s why:
- Can reply to or forward tickets: If this is unchecked, agents in that role won’t be able to reply to or forward tickets at all. Even if you’ve set the default to Reply, the system will automatically change it to Private Note if the agent doesn’t have permission to reply.
- Can view notes in tickets: If unchecked, agents won’t be able to see any notes, whether they are private or public. This means they won’t have access to important internal discussions or customer-visible notes.
- Can add notes to tickets: If unchecked, agents won’t be able to add any type of note to the ticket.
For example, let’s say you set the default to Reply, but the agent in question doesn’t have permission to reply or forward tickets. In that case, even though the system tries to reply, it will automatically save the agent’s response as a Private Note instead of sending it to the customer.
This feature helps you control how agents interact with tickets based on their role permissions, ensuring that everything works smoothly according to your setup.
Signatures
Desk365 allows you to configure Brand, Group, and Personal Signatures to ensure consistent and professional communication across your helpdesk. These signatures can be automatically applied to outgoing ticket replies, forwards, and notes based on your signature configuration.
The Brand Signature serves as the default signature for your helpdesk. You can also create Group Signatures for specific support groups, which replace the Brand Signature for tickets assigned to those groups.
Additionally, agents can create their own Personal Signatures from their profile settings. When enabled, a Personal Signature takes precedence over both the Group Signature and the Brand Signature, allowing agents to personalise their responses while maintaining your organisation’s signature hierarchy.

Learn more about how to configure and use brand and agent signatures.
Currency
Choose the currency for your helpdesk from the dropdown list. The selected currency will be used across the asset management module, ensuring that asset values, depreciation, and related financial information are displayed consistently in the chosen currency.

Finally, click on ‘Save’ to save all your changes.
Configuring your helpdesk settings with these options is an important part of providing effective customer support. By following the above, you can ensure that your helpdesk is set up to provide high-quality support to your customers.
Check out our other help center articles on related topics, such as adding new support agents in Desk365 and setting up custom roles.


