


Scheduled ticket creation allows you to automatically generate tickets in Desk365 at predefined times or intervals. This is useful for recurring operational tasks such as IT maintenance, asset health checks, compliance reviews, monthly audits, and more.
Desk365 will automatically create tickets based on the schedule configuration you define, without any manual intervention.
Note: All schedules follow the Helpdesk time zone set under Settings > Admin> Helpdesk >.
How it works
Desk365 supports different types of scheduled ticket occurrences:
- Create Once – Ticket created once, at a specific future date/time
- Repeat – Ticket created on a recurring schedule (Daily, Weekly, Monthly, or Yearly)
Below are examples of how each schedule type works.
How to create a scheduled ticket
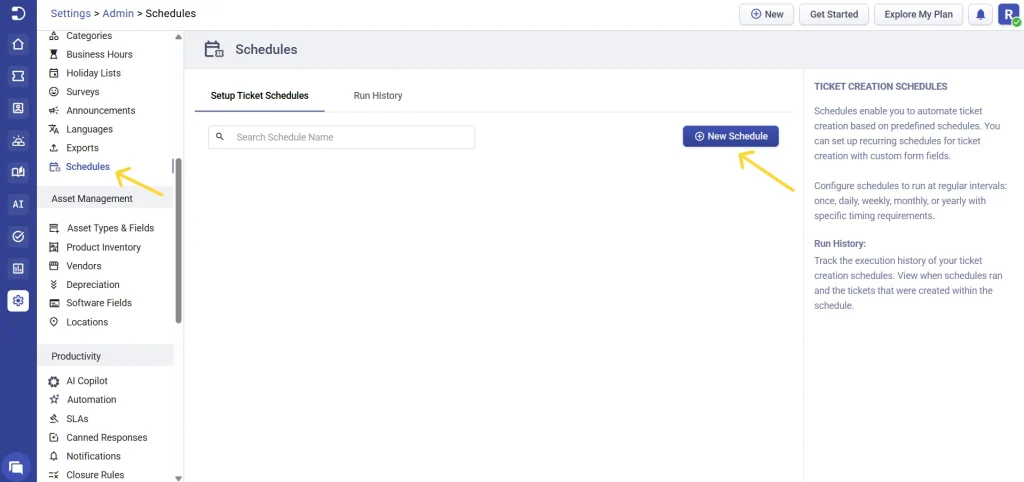
- Go to Settings > Admin > Schedules
- Below the setup ticket schedules tab, click the new schedule button
You will see the ‘Setup Ticket Creation Schedule’ screen where you can configure the following:
- Schedule name: Provide a clear and descriptive name.
- Choose occurrence type: Desk365 allows you to create:
– Create once (one-time ticket)
– Repeat (recurring ticket)
Let’s explore each option.
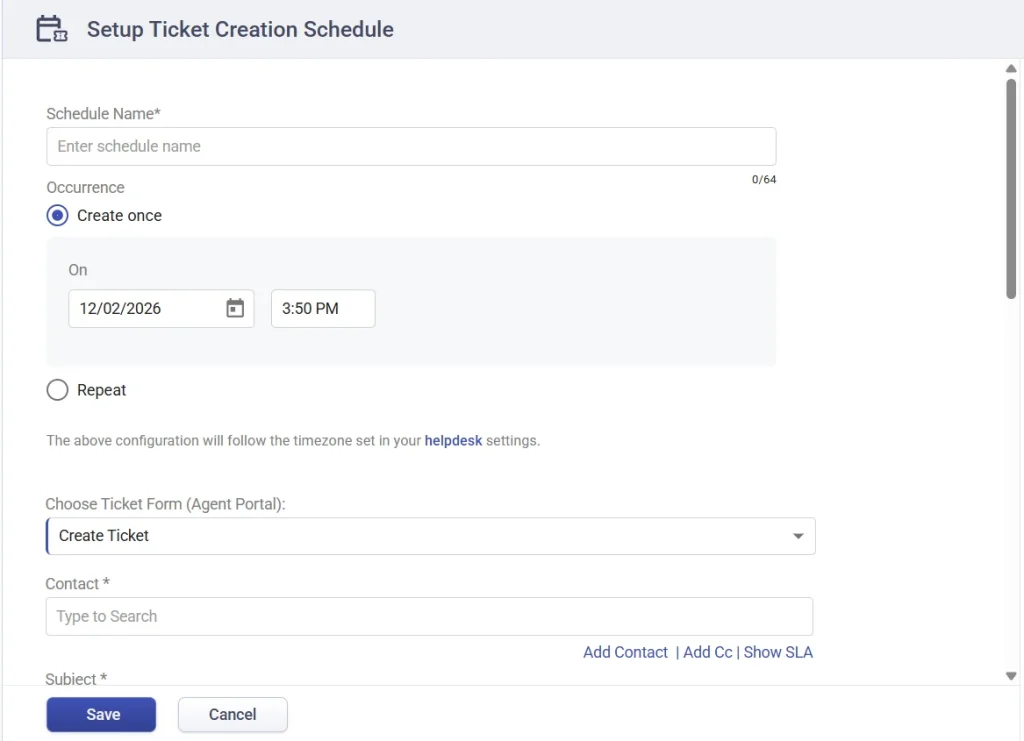
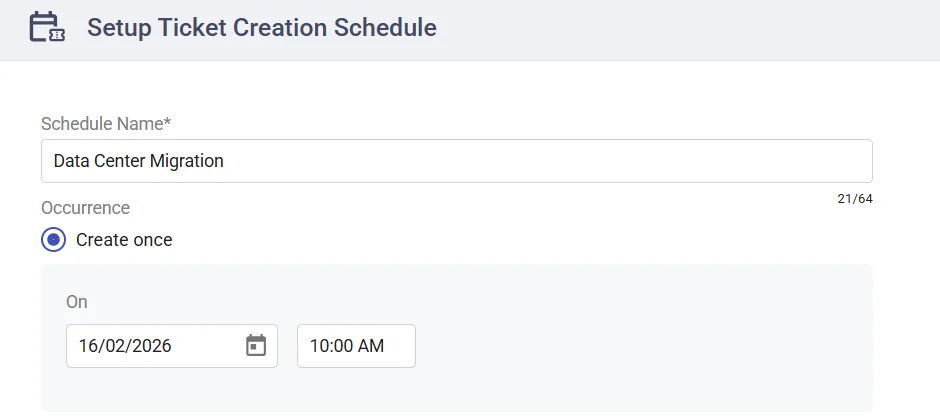
Create once
Use this option when the ticket needs to be created only once in the future. At the specified date and time, Desk365 will automatically create the ticket.
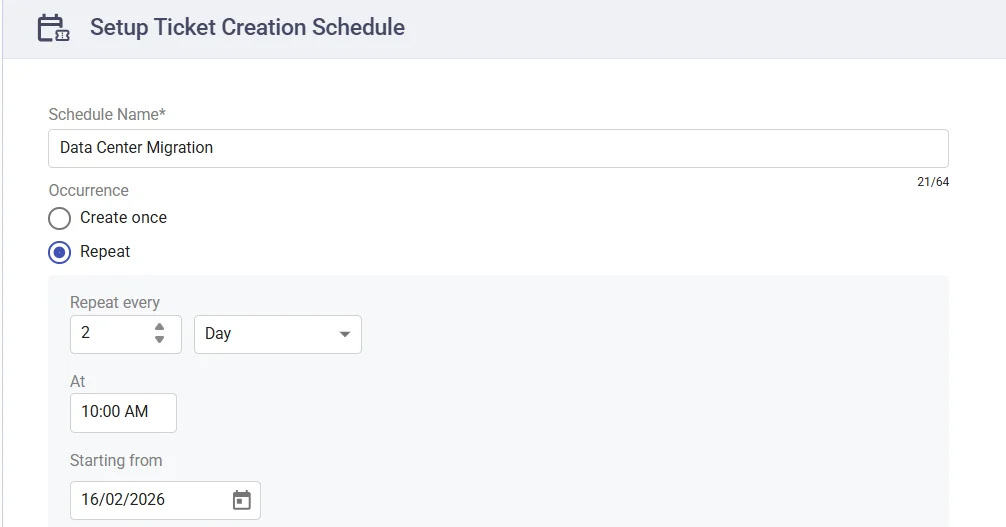
Repeat
Choose repeat to create tickets at regular intervals. You can repeat:
1. Daily
Use this when a ticket must be created every few days.
2. Weekly
Use this option when you need tickets to be created on specific days of the week at regular weekly intervals.
You can choose a weekday and time. The schedule runs based on the selected interval, for example, every 3 weeks on a Friday at 10:00am.
The recurrence cycle is calculated from the ‘Starting From’ date.

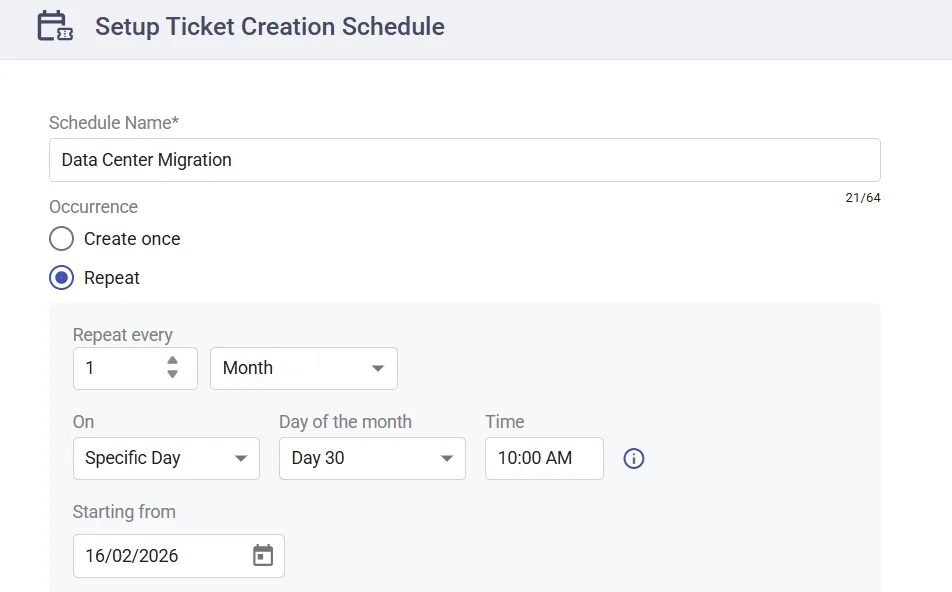
3. Monthly
Use this when tickets need to be created on a specific day and time each month, or on a specific week of the month at a defined time. This is useful for recurring activities such as monthly audits, compliance checks, or scheduled maintenance tasks.
The schedule runs based on the selected interval, for example, every 1 month on Day 30 at 10:00 AM.
If the configured day does not exist in a particular month (for example, February 30), the ticket will not be created that month.
The schedule will trigger the next time the configured date becomes valid (for example, March 30).
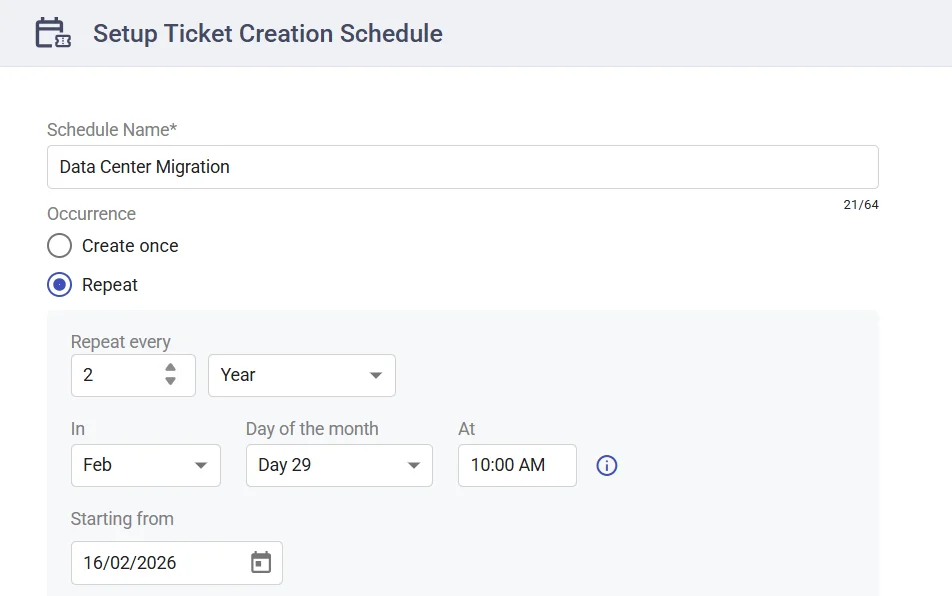
4. Yearly
Use this when tickets need to be created once every year or once every two years on a specific month, date, and time.
The recurrence is calculated from the Starting From date.
If the configured date does not exist in a given year (for example, February 29 in a non-leap year), the ticket will not be created that year.
The schedule will resume automatically the next year when the date becomes valid.
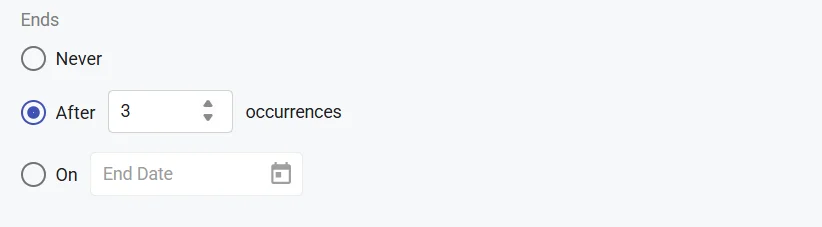
Set ends behavior
After configuring the recurrence, define when the schedule should stop. You can choose:
- Never, if the ticket should continue to be created indefinitely.
- Select After # occurrences if the schedule should stop after a specific number of tickets have been generated.
- Alternatively, choose On End Date to stop the schedule automatically on a particular date.
Ticket form, fields, contact and assets
Next, select the ticket form to be used when the scheduled ticket is created. The dropdown will display only the ticket forms configured for the agent portal. The selected form determines the field layout, mandatory fields, and overall structure of the ticket.
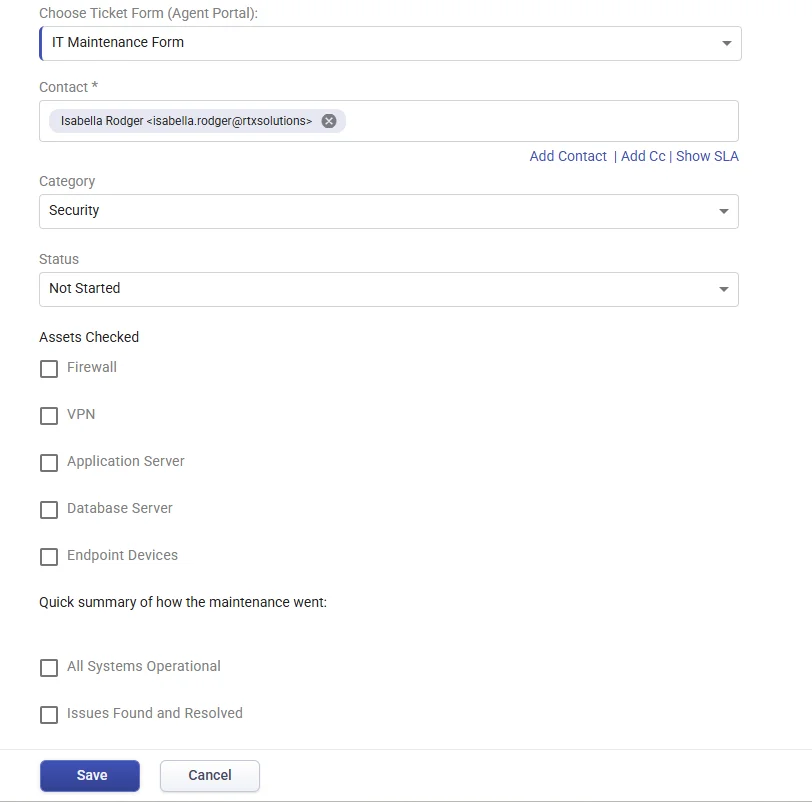
Under Contact, select who the ticket should be raised for. You can choose an existing contact or add a new contact directly from this screen. You may also optionally associate an SLA Policy to ensure the ticket follows predefined response and resolution timelines. This field is mandatory.
Ticket Fields & Assets, the available ticket fields are automatically populated based on the Agent Portal ticket form selected. Any fields configured within that form; including properties such as Category, Priority, Group, Status, and Assigned Agent will be available for you to define as part of the schedule.
If the selected form includes asset fields, you can also associate relevant assets (such as Firewall, VPN, Servers, or Endpoint Devices). These assets will automatically be linked to the ticket when it is generated.
Once all configurations are complete, click save. The schedule becomes active immediately, and Desk365 will automatically generate tickets based on the defined recurrence and settings.
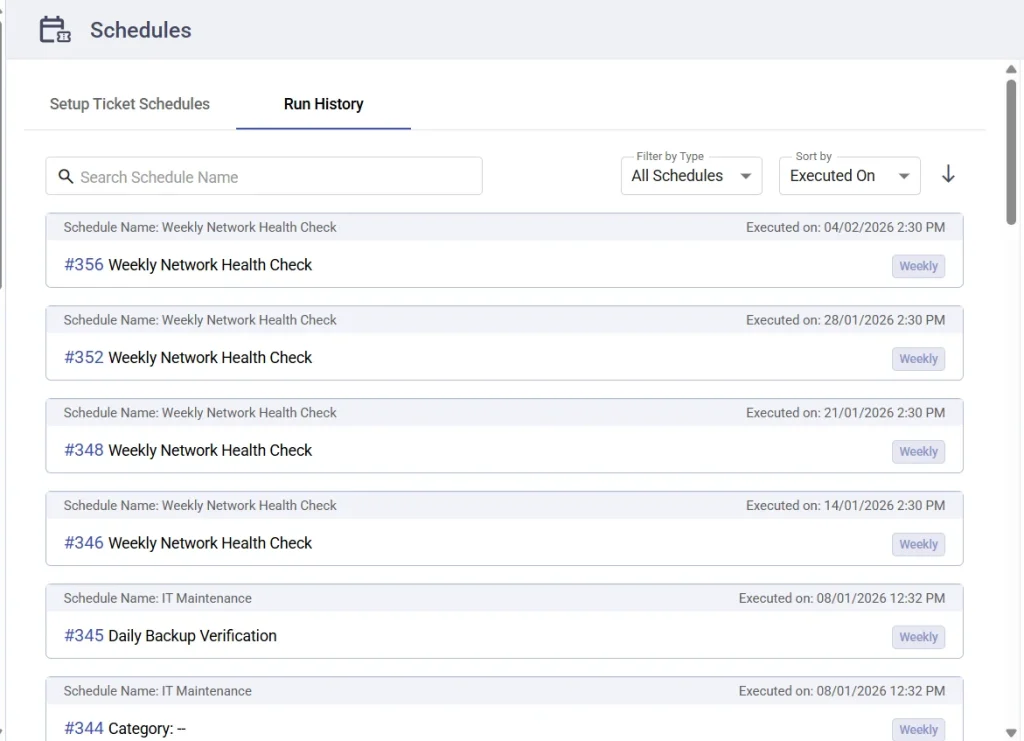
View schedule history
To monitor schedule activity, navigate to the Run History tab next to Setup Ticket Schedules.
The Run History page displays a list of all executed schedules, including:
- Schedule name
- Ticket ID generated
- Executed on date and time
- Schedule type (e.g., Weekly, monthly, etc.)
You can use the Search bar to find a specific schedule, apply filters using Filter by Type, and sort results by Executed On, Schedule Type, or Schedule Name.
Clicking on the Ticket ID will take you directly to the associated ticket for further review.
Permissions
Administrators can control access to Scheduled Ticket Creation through role settings. Permissions can be configured to allow users to create, edit, or delete schedules. To manage these permissions, go to Settings > Admin > Roles > Settings and Reports and update the appropriate role settings.
Note: Scheduled Ticket Creation is available only on the Premium Plan.

Best practices
- Use clear and descriptive schedule names to easily identify recurring tasks.
- Always confirm the helpdesk time zone before saving a schedule.
- Preselect ticket properties to avoid manual edits after creation, and associate assets only when relevant to the recurring task.
- Regularly reviewing the Run History ensures that scheduled automation continues to function as expected.


