Web forms and widgets are a convenient way for customers to submit tickets without needing to navigate through multiple pages or menus.
By embedding a web form or web widget on your website, customers can easily submit a ticket by filling out a simple form or clicking a button.
But why is this important? For starters, it improves the customer experience by making it easy for customers to get in touch with your support team. With a web form or widget, customers can submit a ticket from anywhere on your website, without needing to navigate to a specific support page or contact form.
So how do you set up a web form or web widget for customer ticket submissions? It’s actually quite simple. Desk365 offers the ability to create custom forms or widgets that can be embedded on your website.
Creating and customizing web forms
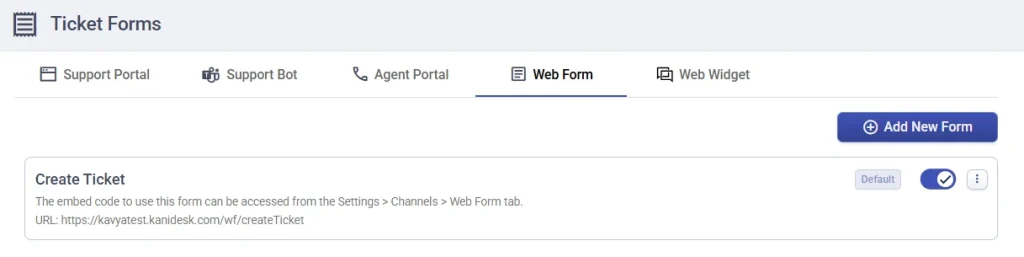
You can create multiple web forms in Desk365 for different purposes — for example, a Support Request Form, Sales Inquiry Form, or IT Help Form — depending on your organization’s needs.
To create one:
- Navigate to Settings > Admin > Ticket Forms.
- Click Add New Form to create a web form.
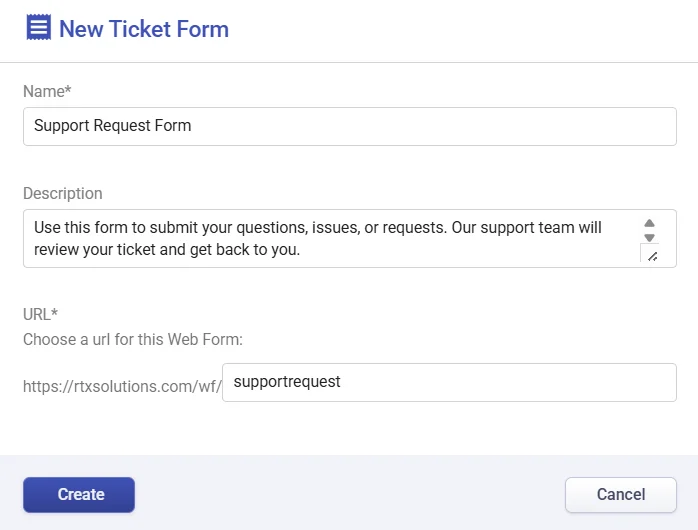
- Give the form a name and description.
- Configure the URL for the web form and click create.
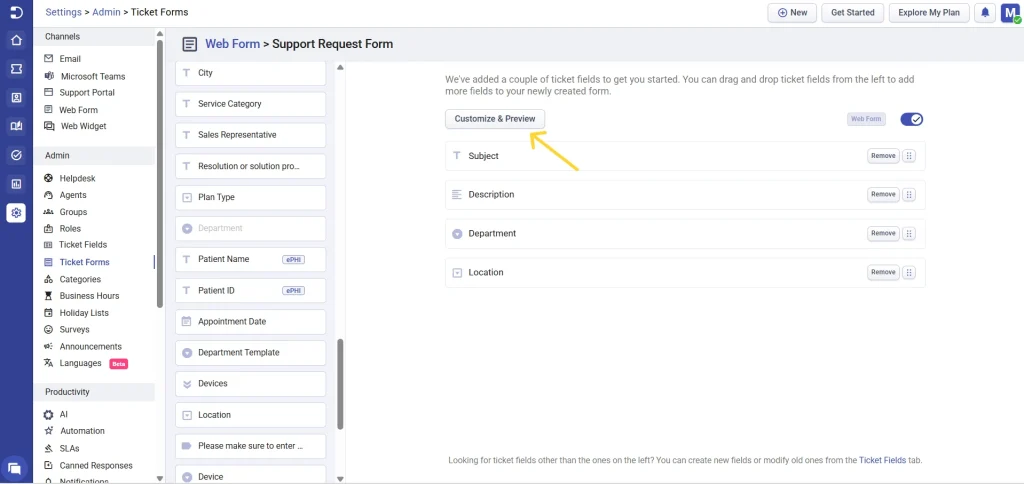
- Drag and drop the required ticket fields both default or custom fields you’ve created
- Once the form structure is ready, click Customize and Preview.
Customizing the web form
The Customization and Preview dashboard allows you to:
- Edit the title and button text.
- Choose a theme color.
- Add a confirmation message.
- Enable the Allow Attachments option (if you want customers to upload screenshots or documents).
- When you’re done, click Save.

Once saved, go to the Embed Code tab (located next to the Customization tab) to get the HTML iframe code for embedding your form on your website.
Embedding the web form
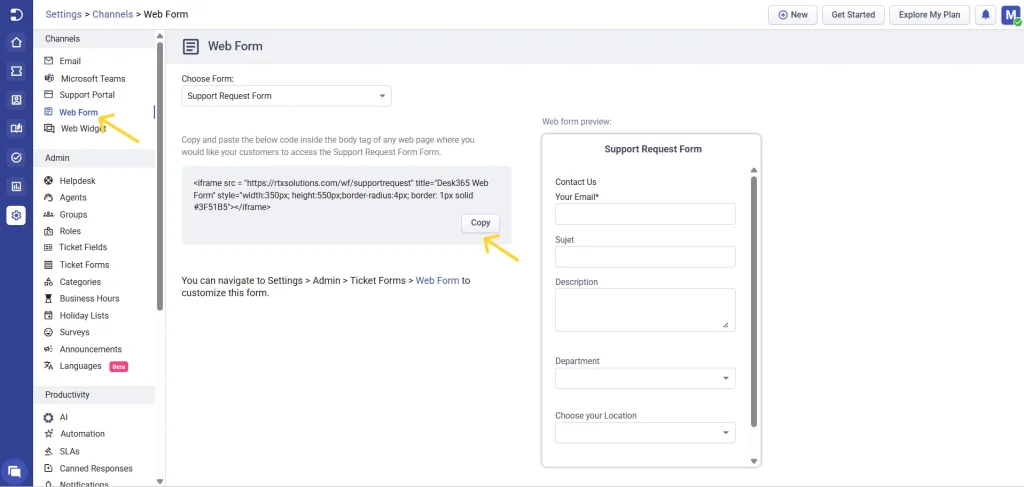
- After creating your form, navigate to Settings > Channels > Web Form.
- From the Choose Form dropdown, select the form you created under Ticket Forms.
- Copy the HTML code snippet (iframe) provided.
- Paste this snippet into the body of any webpage where you want customers to access the form.
You can also access the form directly at any time by going to Settings > Admin > Ticket Forms > Web Form to make further customizations.
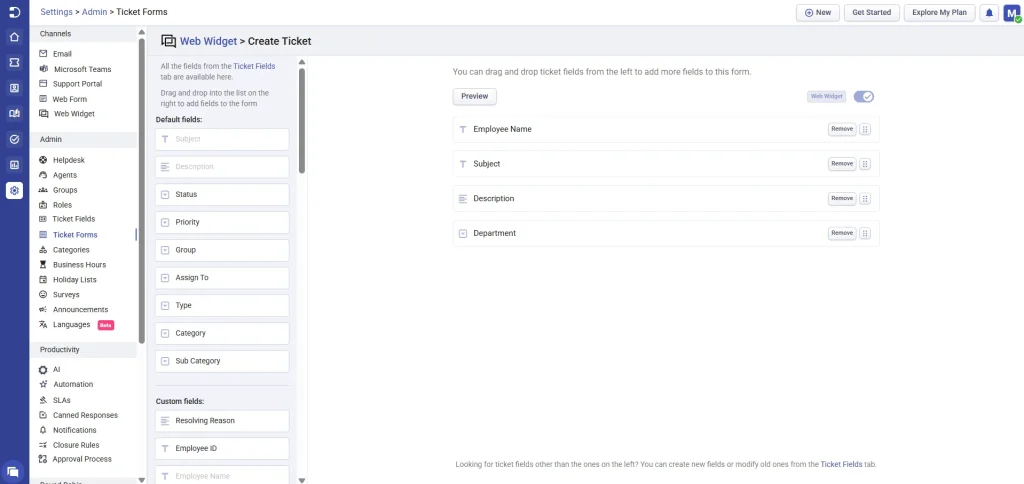
Creating and customizing web widgets
The web widget in Desk365 is a default widget that lets customers easily raise tickets without leaving the page they’re on. It appears as a small, interactive pop-up or button on your website, making it quick and convenient for users to reach your support team.
You can customize the widget to match your website’s style and choose which ticket form and fields to display.
To access it, go to Settings > Admin > Ticket Forms > Web Widget.

Here, you can:
- Select the default web widget.
- Add or modify custom ticket fields that you want displayed in the widget’s form.
- Click preview, which will take you to Settings > Channels > Web Widget, where you can configure the widget’s appearance.
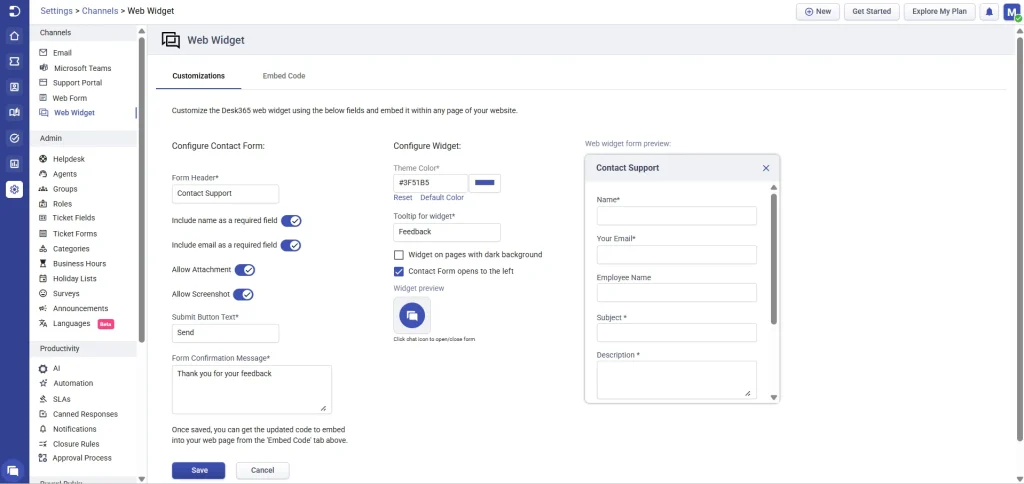
Here, you’ll find two main configuration sections — Contact Form and Widget — which you can adjust to match your website’s look and feel.
In the Contact Form section, you can edit the form header, choose which fields to include (like name and email), allow attachments or screenshots, and customize the button text and confirmation message.
Under the Widget section, you can change the theme color, tooltip text, and choose where the widget appears on your page.
After making your changes, save the configuration and copy the embed code provided under the Embed Code tab. Add it to any webpage or intranet site where you want customers to access the widget.
Any updates you make to the linked ticket form will automatically reflect in the widget as well.
After integrating Desk365’s web forms or widgets on your website’s product or intranet pages, your support team will start receiving tickets from customers or end-users through these channels.
Best practices
When creating forms, keep them simple and user-friendly. Only include fields that are essential to understanding and resolving the customer’s issue.
Avoid adding too many required fields, as long forms can discourage users from submitting tickets. If needed, you can also enable file attachments so customers can upload screenshots or documents to support their request.
Overall, using a web form or web widget for customer ticket submissions is a simple and effective way to improve the customer experience and streamline your support process. By collecting all necessary information upfront, you can reduce the time it takes to resolve a ticket and provide faster and more efficient support to your customers.