In the dynamic world of customer support, effective communication and teamwork are crucial. Desk365’s “Share To” feature is designed to enhance collaboration within your team by allowing specific tickets to be shared with selected contacts. This feature enables your team to work together seamlessly on complex issues, ensuring faster resolution times and higher customer satisfaction. By incorporating the “Share To” feature into your workflow, you can improve transparency, facilitate better information sharing, and ultimately deliver superior service to your customers.
Getting started with ticket sharing
Support tickets can be shared with contacts from Desk365’s agent portal, support portal, and from the Microsoft Teams support bot. Let’s walk through the step-by-step process for each platform using a practical example.
Imagine a situation where a customer, submits a support ticket regarding an issue with accessing the intranet. This ticket needs to be reviewed by multiple specialists to ensure a comprehensive solution. You can use the “Share To” feature to share this ticket with relevant contacts quickly.
Share tickets from the agent portal
- Open the desired ticket in the agent portal
- Click on the “Share To” button, which will open a dialog box.
- Use the search bar to find and select the contacts you want to share the ticket with.
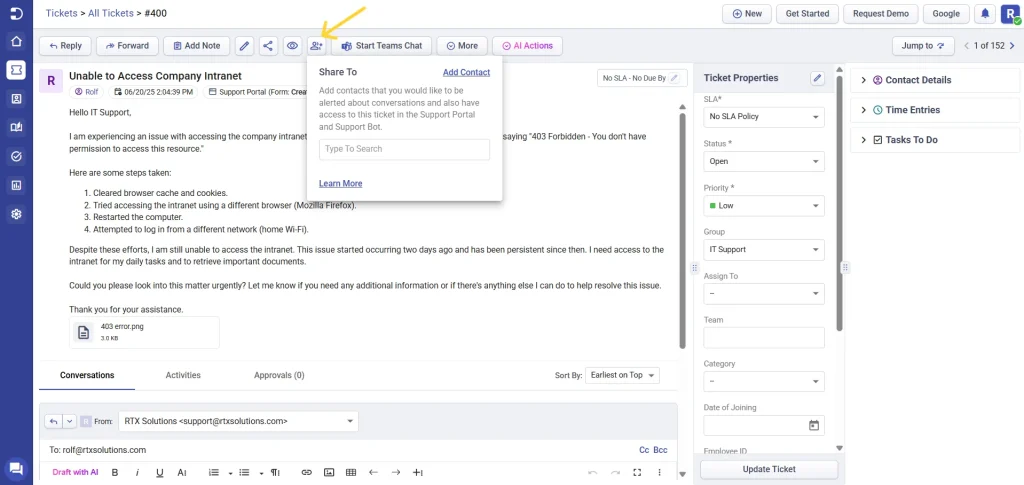
- If needed, add a new contact by clicking on the “Add Contact” option.
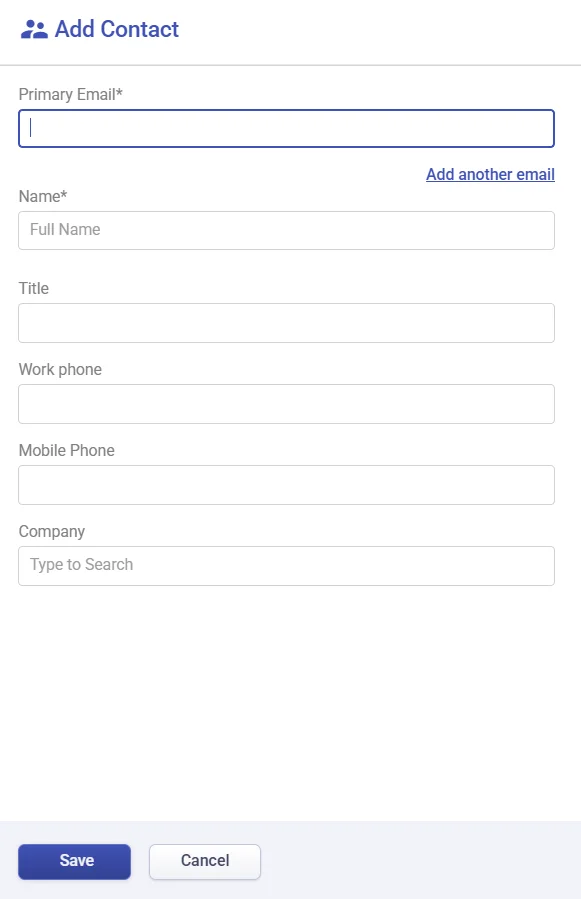
- Once all desired contacts are selected, confirm the sharing. The ticket is now shared with the selected contacts.
Share tickets from the support portal
- Sharing a ticket when signed in
- Open the ticket in the support portal.
- Use the “Share To” option to add contacts.
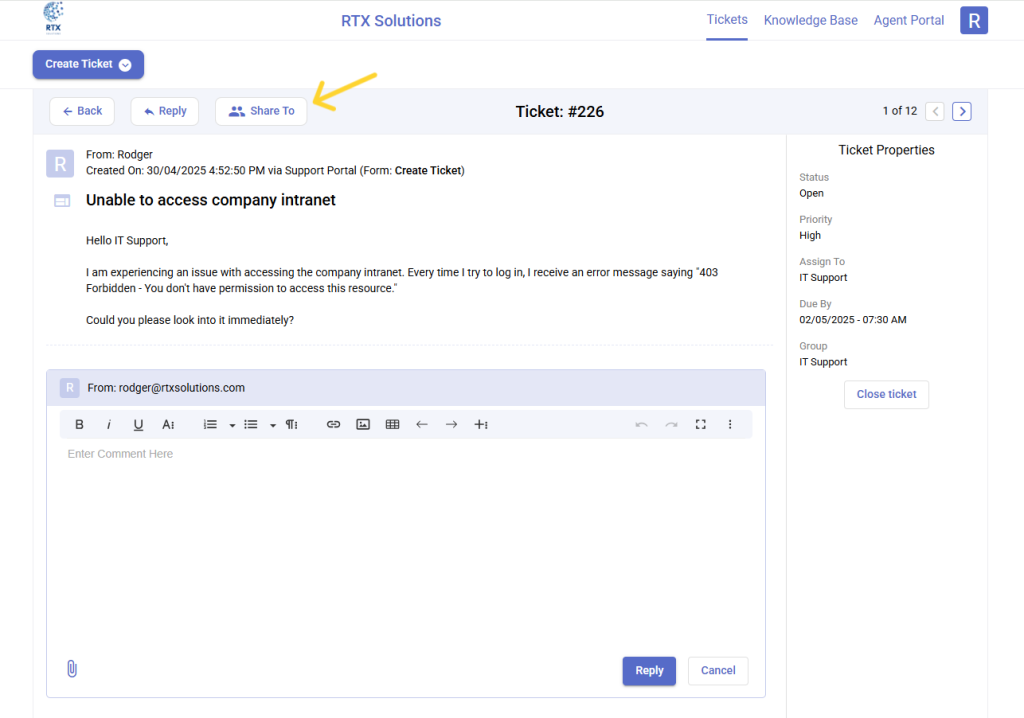
3. Add the contacts to the list to share the ticket.
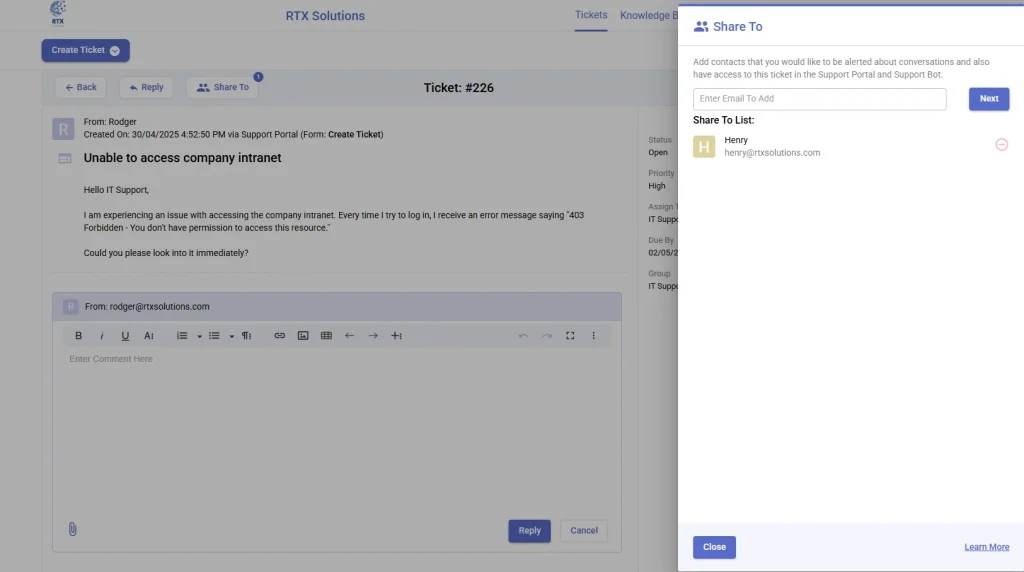
- Sharing a ticket when signed out
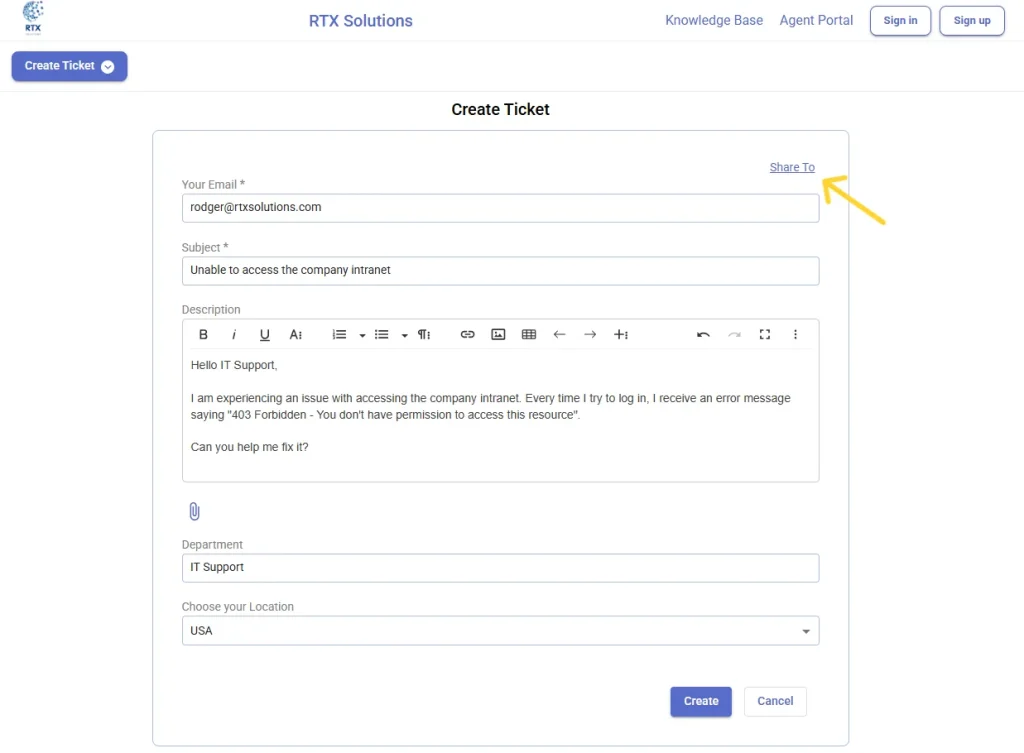
- Click on the “Create Ticket” form.
- Fill in the ticket details.
- Click on the “Share To” option to add contacts.
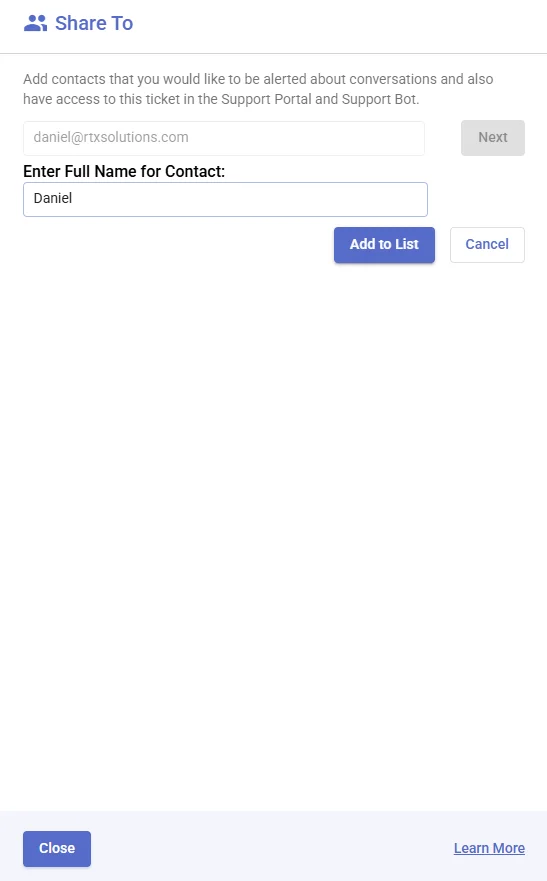
Note: New contacts can be easily added from the support portal. Just enter their email address, type the contact’s full name in the dialog box, and click “Add to List.” Contacts added this way are automatically linked to the company associated with their email domain.
Sharing tickets from the support bot
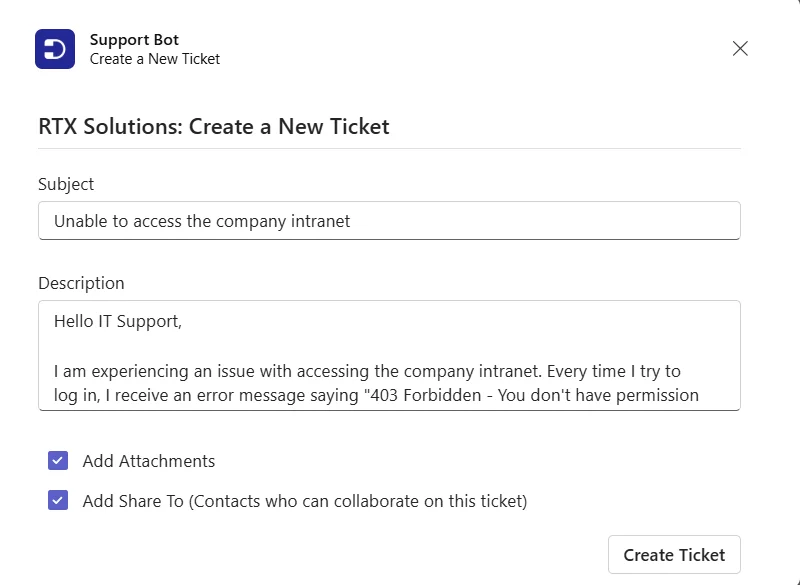
- Fill in the support ticket form in the support bot with the issue details.
- Check the “Add Share To“ option check box to inform contacts about the ticket’s activities.
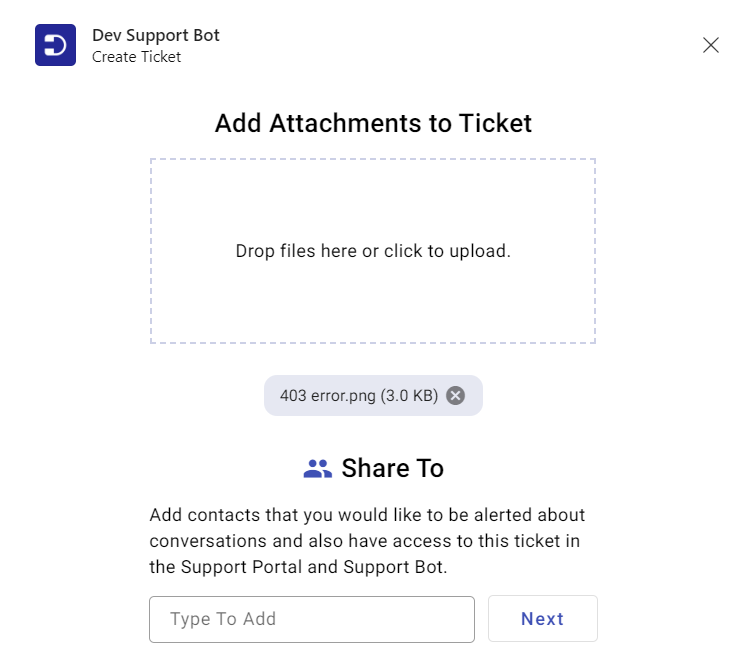
- Confirm to share the ticket. Contacts added through the support bot can access the ticket from both the support portal and the support bot.
Managing shared tickets
1. Viewing shared tickets
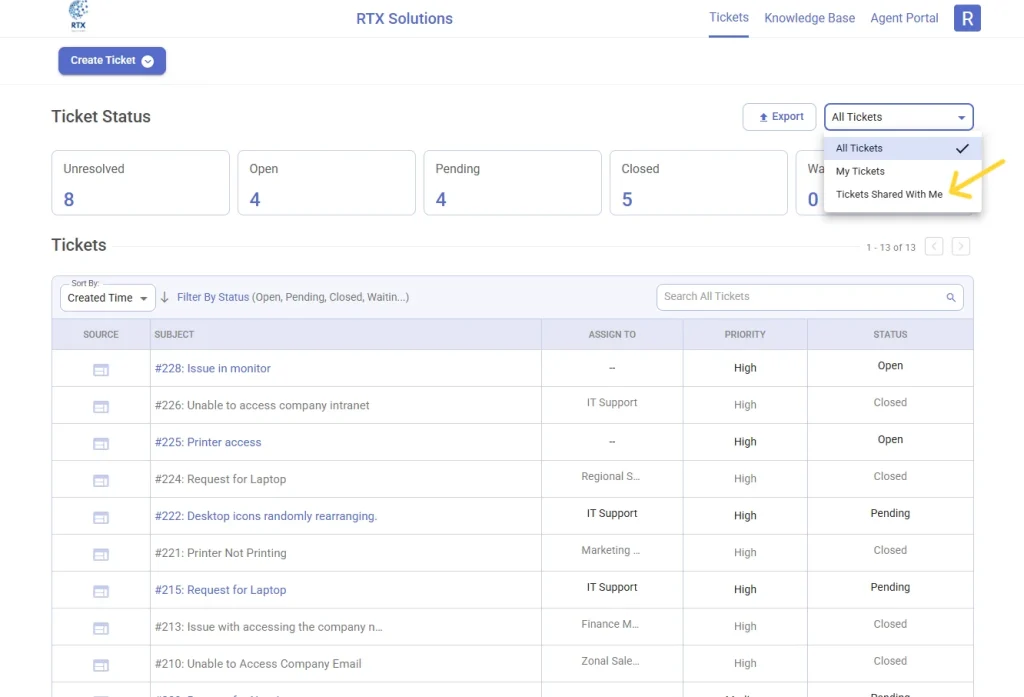
Shared tickets can be easily viewed in the support portal by contacts by clicking on the “Tickets Shared With Me” option.
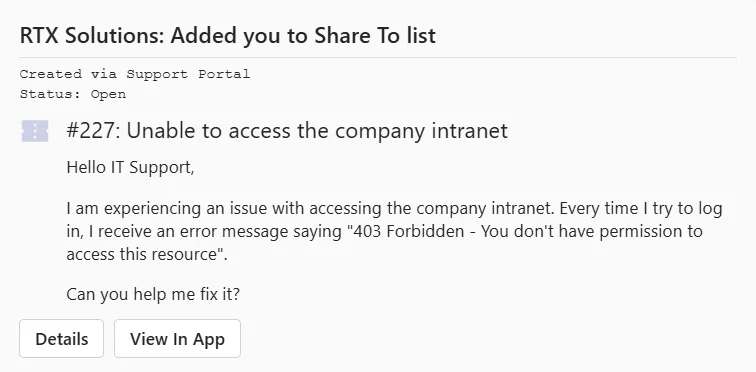
Contacts can also view shared tickets in their support bot. They can interact with the ticket card they receive as a notification. However, to view the list of shared tickets, they must click on the support portal tab in the support bot.
2. Receiving notifications
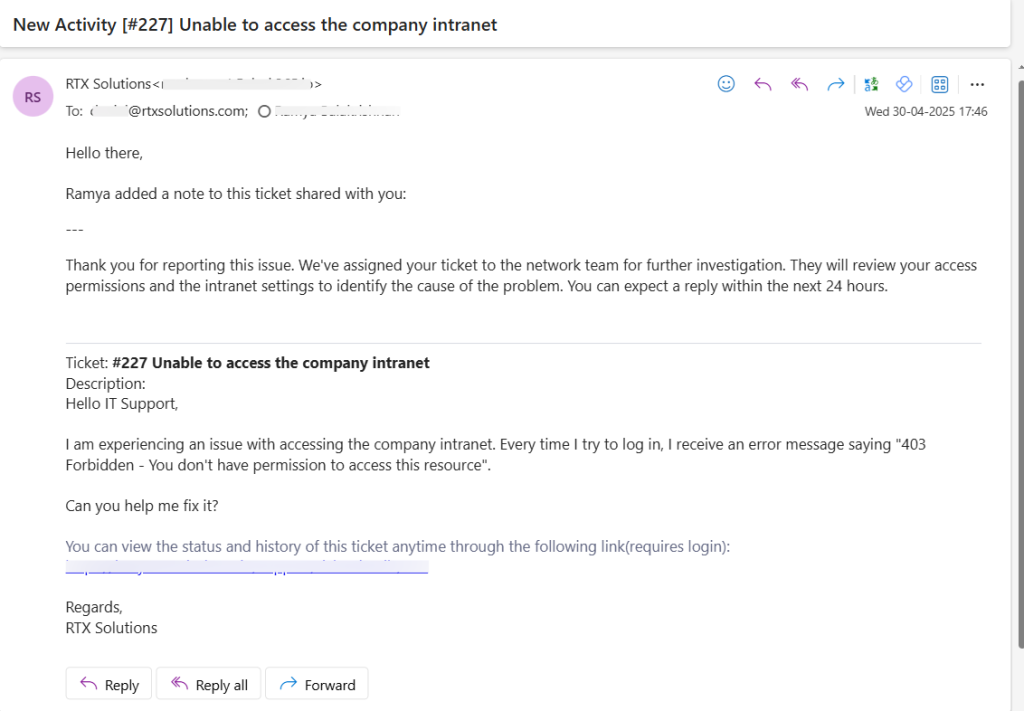
Contacts will receive notifications via email and the support bot for various actions depending on their notification setting:
- Agent replies: Notifications are received whenever a support agent replies to the ticket.
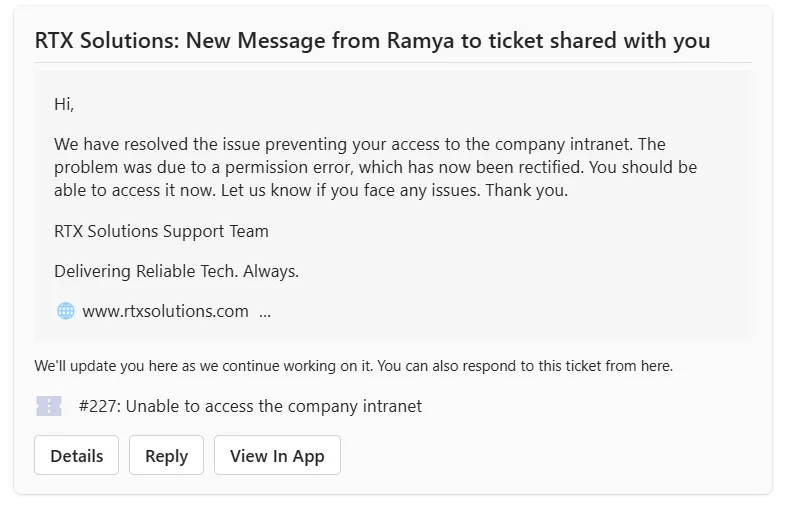
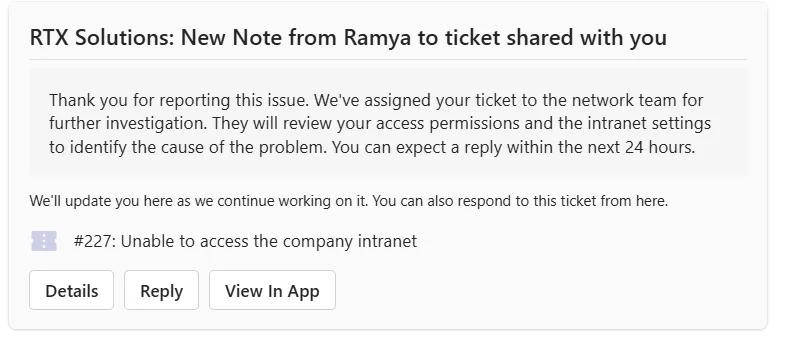
- Public note additions: Receive notifications when a support agent adds a public note to the ticket.
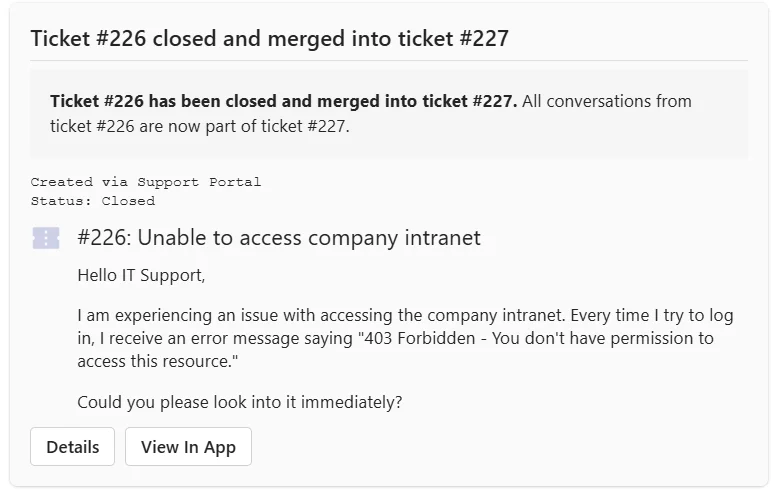
- Ticket mergers: Notifications are sent when tickets are merged, including the addition of contacts to the “Share To” list.
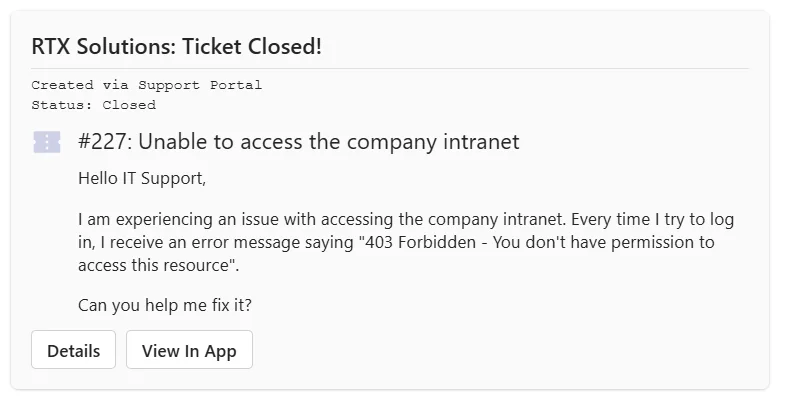
- Ticket closure or resolution: Contacts receive notifications when the ticket is closed or resolved. However, only the contact who created the ticket can close it.
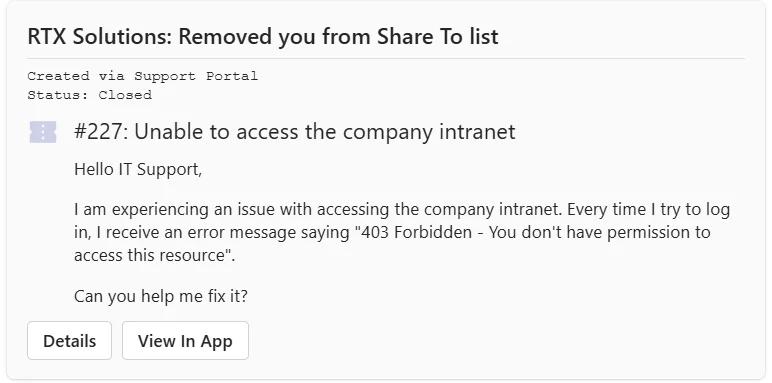
- Removing shared access: Contacts receive notifications when they are removed from the “Share To” list.
- Spam and restricted notifications: Contacts added to the spam list or restricted notifications section will not receive any notifications. Contact your administrator to remove any email from the spam list.
Customizing Share To notifications
You have the option to customize the email templates for each “Share To” notification to better suit your communication style or business requirements. This enables you to personalize the notifications that are sent when a ticket is shared with external contacts.
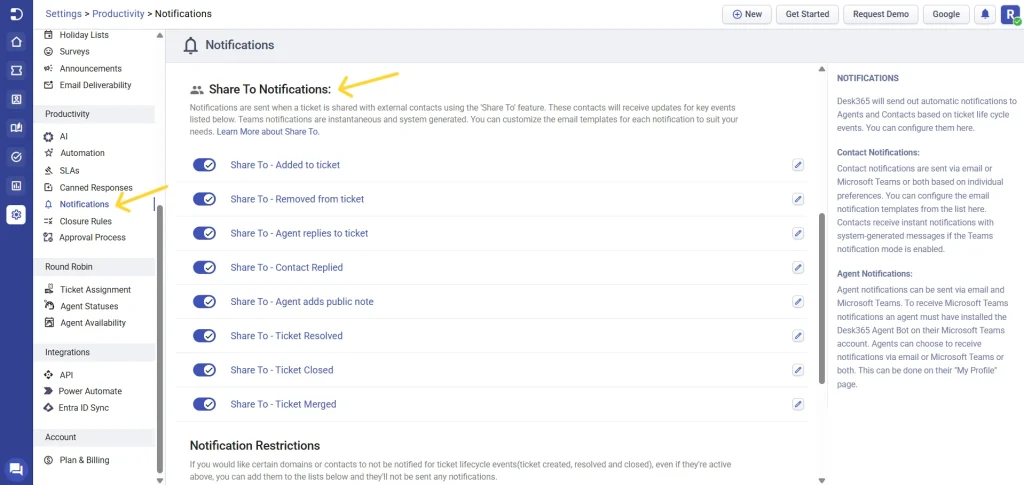
The key events for which notifications are sent when a ticket is shared using the ‘Share To’ feature include:
- Share To – Added to ticket: Sent when a contact is added to the ticket’s “Share To” list.
- Share To – Removed from ticket: Sent when a contact is removed from the “Share To” list.
- Share To – Agent replies to ticket: Sent when a support agent replies to the ticket.
- Share To – Contact Replied: Sent when a contact replies to the ticket.
- Share To – Agent adds public note: Sent when a public note is added by the support agent.
- Share To – Ticket Resolved: Sent when the ticket is resolved.
- Share To – Ticket Closed: Sent when the ticket is closed.
- Share To – Ticket Merged: Sent when tickets are merged, including when contacts are added to the “Share To” list.
Customizing these templates allows you to ensure the information provided aligns with your internal communication or brand voice.
When customizing your notification email templates, you can also use the placeholder {{ticket.shareToList}} to dynamically display the list of all contacts the ticket has been shared with. This is especially helpful in providing full visibility to all recipients of the notification.
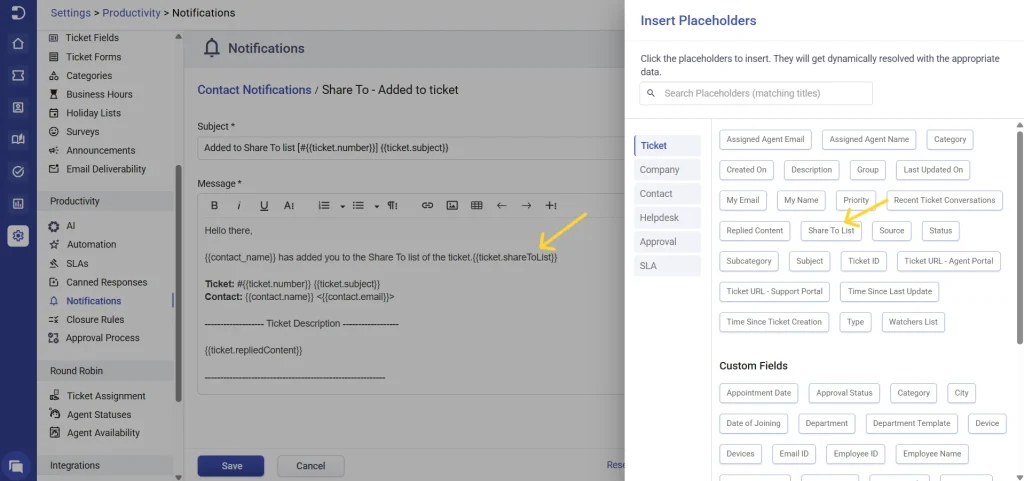
This placeholder helps keep all relevant stakeholders informed and ensures clarity in communication about who else is involved in resolving the ticket.
To learn more about customizing your email templates for Share To notifications, check out the detailed article about configuring contact notifications.
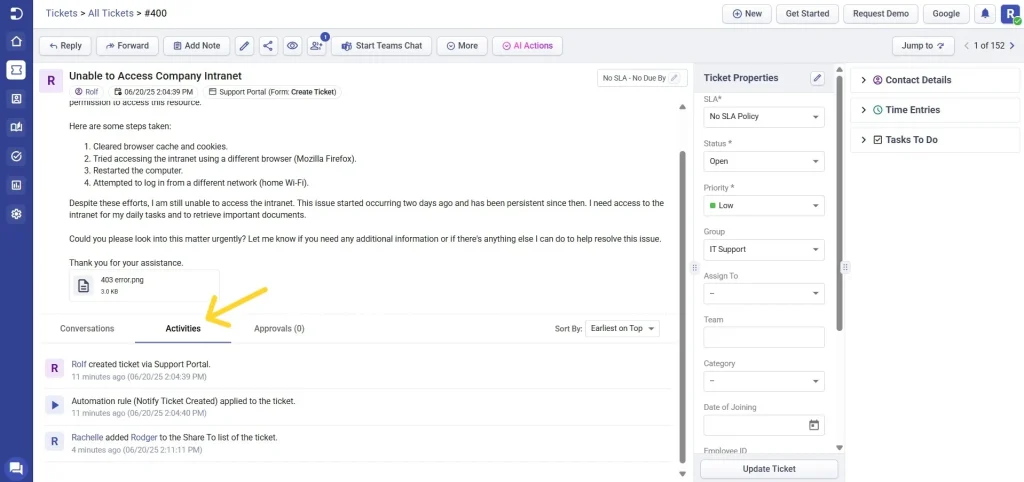
Note: All activities related to the “Share To” feature can be viewed by the agent in the agent portal under the Ticket Activities section.
Advanced sharing options
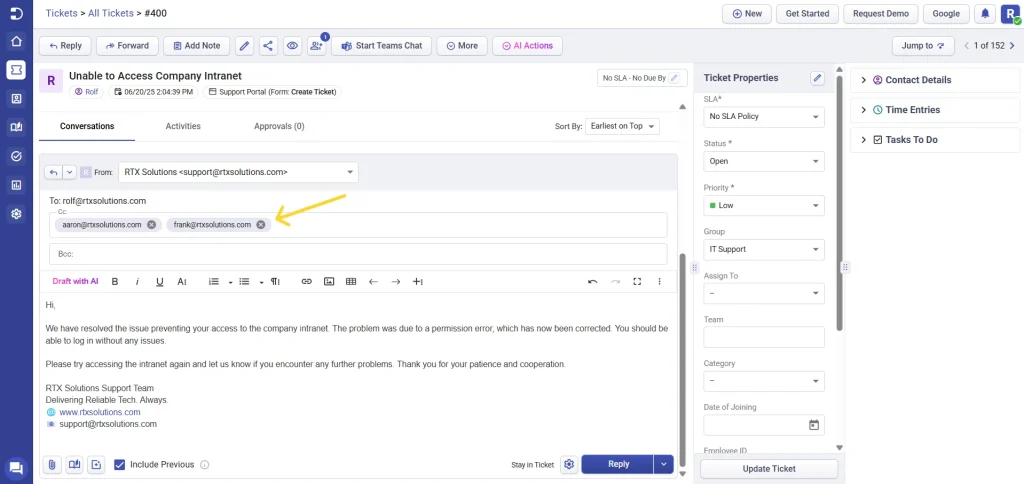
Adding CC recipients
In addition to sharing tickets directly, you can CC other team members to keep multiple stakeholders informed about the ticket’s progress. Simply enter the email addresses of the recipients in the ticket details.
Difference between CC and "Share To"
While both CC and “Share To” options allow you to involve additional contacts in a ticket, they serve different purposes and have distinct functionalities:
CC: Adding a CC is mainly useful for email communication. When you CC someone on a ticket, they receive email notifications about updates and responses. However, they do not have direct access to view the ticket in their support portal. This means they can stay informed via email but cannot interact with or track the ticket within the Desk365 system.
“Share To”: Adding someone to the “Share To” list provides them with full access to the ticket in their support portal. This option allows them to view all ticket details, add notes, and participate in resolving the issue directly within the Desk365 platform. It’s ideal for team members who need to be actively involved in the ticket’s progress and resolution
By understanding these differences, you can choose the appropriate method to ensure that the right people are informed and have the necessary access to collaborate effectively on support tickets.
Removing shared access
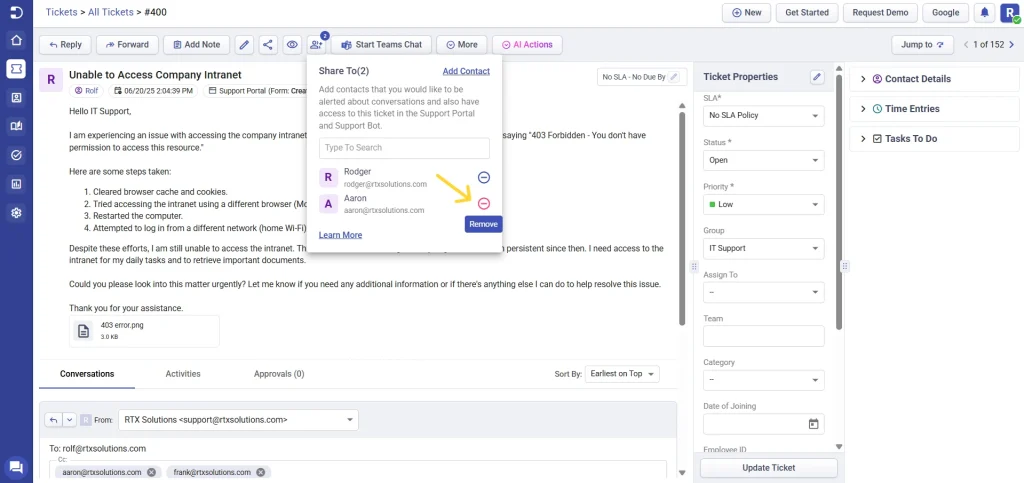
- Agent portal
- Open the shared ticket in the agent portal.
- Go to the ticket details.
- Click the “Share To” option and click “Remove” next to the contact to revoke their access.
- Support portal
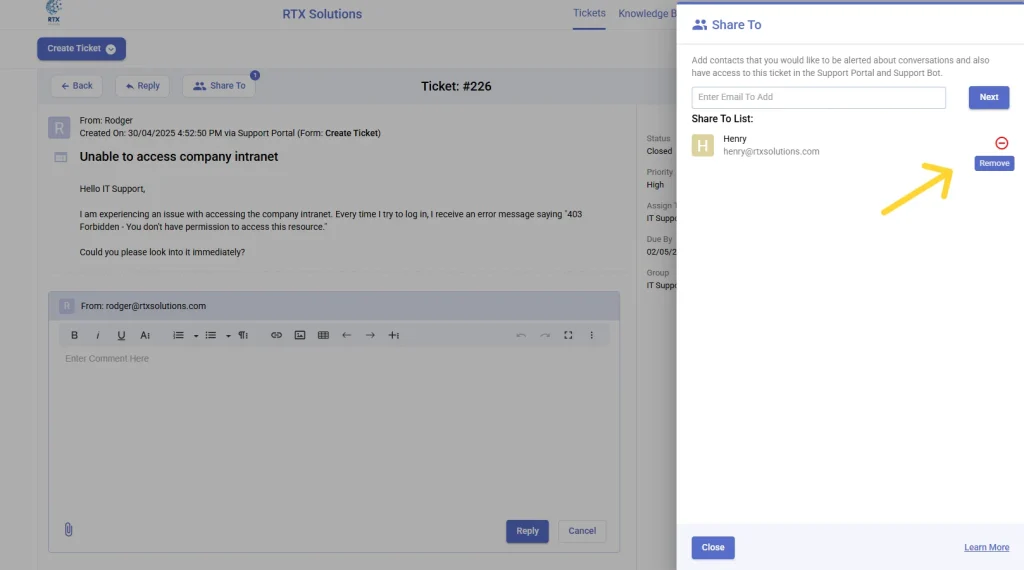
- Open the shared ticket.
- Click on the “Share To” button.
- In the dialog box, select the “Remove” option next to the contact you wish to revoke access from.
- Support bot
Tickets shared from the support bot cannot have their access removed from the support bot itself. Access can be removed from the agent portal or the support portal.
Uniform and updated "Share To" list across platforms
A ticket with the “Share To” feature will maintain a uniform and updated list of shared contacts across all platforms, including the support portal and agent portal. This means that any changes to the shared contacts will be reflected consistently in all places where the ticket is accessed. Additionally, the “Share To” feature allows a maximum of 20 contacts to be added to a single ticket (this limit does not apply to merged tickets).
The “Share To” feature by Desk365 is a powerful tool for enhancing teamwork and efficiency in customer support. By enabling easy sharing and collaboration on tickets, your team can resolve issues faster and provide better service. With the ability to share tickets, Desk365 ensures that your contacts and team remains informed and connected, leading to higher customer satisfaction and streamlined support operations.


